Last Saturday I found myself in a kitchen crisis that would make any home cook cringe: the deep fryer was dead, the oven was on the fritz, and my roommate had just announced a spontaneous craving for something crunchy, salty, and unmistakably Filipino. I stared at a half‑cooked batch of chicken that smelled like a bland grocery store version of fried chicken and thought, “This is it, I’m never going to satisfy that craving again.” Then I remembered an old family secret—a simple marination trick and a secret coating that turns ordinary chicken into a golden, crackling masterpiece that practically sings with flavor. I dove in, and what came out of the pan was nothing short of a revelation. The first bite was a crunchy, juicy explosion that made my taste buds do a happy dance, and I swear the whole apartment inhaled the aroma like a collective sigh of relief.
Picture this: the sizzling sound of oil bubbling like a hot spring, the faint hiss as the chicken pieces hit the surface, and that intoxicating scent of garlic and soy mingling with a faint hint of citrus. The skin turns a deep amber, the coating shatters with a satisfying crack that reminds you of thin ice underfoot, and the meat inside stays succulent, practically melting in your mouth. You can hear the faint pop of batter lifting away from the pan, feel the heat radiating from the skillet, and see the glossy sheen of the finished pieces glistening like tiny suns. It’s a full‑on sensory overload that makes you want to shout, “I dare you to taste this and not go back for seconds!”
Most recipes for Filipino fried chicken get the flavor profile wrong, either drowning the chicken in soy sauce or leaving it too plain. This version, however, balances the salty‑sweet umami of soy with a bright citrus kick, a whisper of garlic, and a secret spice blend that adds depth without overpowering. The coating is a hybrid of flour and cornstarch, giving it that feather‑light crunch that most deep‑fried dishes lack. And the best part? It’s unbelievably simple—no fancy equipment, no obscure ingredients, just a handful of pantry staples and a few minutes of your time. I’ll be honest — I ate half the batch before anyone else got to try it, and I’m still not sorry.
There’s a little twist in this recipe that most home cooks overlook: a splash of buttermilk (or a quick milk‑and‑lemon substitute) in the marination step. This not only tenderizes the meat but also creates a subtle tang that cuts through the richness of the fried coating, keeping each bite from feeling heavy. And for those who love a pop of color, a pinch of annatto powder gives the crust a beautiful golden hue that looks as good as it tastes. Let me walk you through every single step — by the end, you’ll wonder how you ever made it any other way.
What Makes This Version Stand Out
- Flavor Fusion: The marriage of soy sauce, garlic, and a dash of citrus creates a layered taste that’s both familiar and exciting, making each bite a mini adventure.
- Texture Triumph: The flour‑cornstarch blend yields a crust that’s crisp on the outside, airy on the inside, and shatters like thin ice when you bite into it.
- Simplicity: No need for a deep fryer or exotic spices; everything you need lives in a typical pantry, keeping the process breezy.
- Unique Twist: The buttermilk marination adds a tangy tenderness that most recipes skip, preventing the chicken from becoming dry.
- Crowd Magnet: Serve it at a family gathering and watch the plates empty faster than you can say “extra sauce, please.”
- Ingredient Quality: Using fresh garlic and real annatto powder elevates the dish from ordinary to unforgettable.
- Cooking Method: Shallow frying in a heavy skillet gives you control over the crust’s color and crunch without the mess of a full‑deep fryer.
- Make‑Ahead Potential: The chicken can be marinated overnight, and the coated pieces freeze beautifully for a quick future feast.
Alright, let's break down exactly what goes into this masterpiece...
Inside the Ingredient List
The Flavor Base
The cornerstone of any great Filipino fried chicken is its marination. Soy sauce provides a deep umami backbone, while minced garlic adds aromatic depth that awakens the palate. A splash of calamansi or lemon juice introduces a bright acidity that balances the salty notes and keeps the meat tender. If you skip the citrus, the chicken can taste flat; if you skip the soy, it loses that signature savory punch. For a healthier twist, swap regular soy sauce for low‑sodium, but keep the flavor intensity by adding a pinch of mushroom powder.
The Texture Crew
The coating is where the magic truly happens. All‑purpose flour gives structure, while cornstarch creates that feather‑light crunch you crave. Baking powder introduces tiny air pockets, making the crust airy rather than dense. Paprika adds a subtle smoky undertone and a gorgeous color, especially when paired with a pinch of annatto powder. If you’re gluten‑free, replace the flour with a blend of rice flour and tapioca starch; the result is still delightfully crisp.
The Unexpected Star
Buttermilk (or a quick milk‑and‑lemon substitute) is the secret weapon that many overlook. Its slight acidity breaks down protein fibers, yielding a juicier bite, while the fat content adds richness that keeps the coating from absorbing too much oil. If you don’t have buttermilk, combine 1 cup of milk with 1 tablespoon of white vinegar or lemon juice and let it sit for five minutes. This will mimic the tangy creaminess perfectly.
The Final Flourish
Fresh garlic, a pinch of sugar, and a dash of pepper round out the flavor profile, ensuring each bite hits multiple taste receptors. The sugar helps with caramelization, giving the crust a subtle sweetness that balances the salty soy. Black pepper adds a gentle heat that lingers on the tongue without overwhelming the other flavors. Finally, a sprinkle of sea salt just before serving can enhance the overall crunch.
Everything's prepped? Good. Let's get into the real action...
The Method — Step by Step
First, gather your chicken pieces—drumsticks, thighs, or wings work best because they stay juicy inside. Pat them dry with paper towels; this is crucial for a dry‑marinade bond. Toss the chicken into a large bowl, drizzle with soy sauce, minced garlic, and the citrus juice, then massage the mixture so every crevice is coated. Cover and let it marinate for at least 30 minutes, or up to overnight for maximum flavor penetration. That sizzle when it hits the pan? Absolute perfection, but we’ll get there.
While the chicken marinates, prepare the coating. In a shallow dish, whisk together the flour, cornstarch, baking powder, paprika, annatto powder, salt, pepper, garlic powder, and onion powder. This dry mix is your crunchy armor. In a separate bowl, whisk the buttermilk (or milk‑vinegar combo) with a tablespoon of soy sauce and a pinch of sugar. This wet bath will help the coating adhere like a second skin.
Now for the fun part: dredging. Take each marinated chicken piece, dip it into the buttermilk mixture, letting any excess drip off, then roll it in the flour blend until it’s fully covered. Give it a gentle shake to remove excess flour—too much will create a gummy crust. Set the coated pieces on a wire rack for about 10 minutes; this resting period lets the coating set, ensuring it won’t fall off during frying.
Heat a heavy skillet or Dutch oven over medium‑high heat and add enough oil to come halfway up the sides of the chicken pieces—about 1½ inches. The oil should shimmer but not smoke; aim for a temperature of 350°F (175°C). Test the heat by dropping a pinch of the coating into the oil; it should sizzle immediately and turn golden within 30 seconds. This is the moment of truth—if the oil’s too cool, the crust will absorb oil and become greasy.
Carefully lower the chicken into the hot oil, skin side down first. Do not overcrowd the pan; work in batches to maintain temperature. As the chicken cooks, you’ll hear a steady pop, and the edges will start pulling away from the pan—signs that the crust is forming perfectly. Fry each side for about 5‑6 minutes, turning once, until the coating is a deep amber and the internal temperature reaches 165°F (74°C). Remember, the sizzle should stay steady, not frantic.
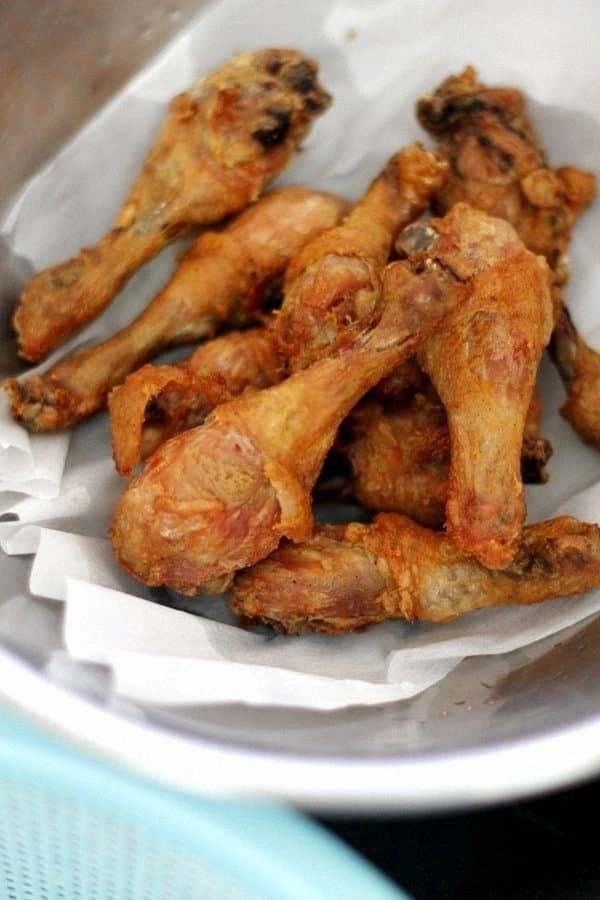
Once fried, transfer the chicken to a clean wire rack set over a baking sheet. This allows excess oil to drain away, keeping the crust crisp. If you’re impatient (like me), sprinkle a pinch of sea salt while the pieces are still hot; this adds an extra pop of flavor and crunch.
Let the chicken rest for 5 minutes before serving. This short rest lets the juices redistribute, ensuring each bite is juicy rather than dry. While it rests, you can whip up a quick dipping sauce—mix equal parts soy sauce, vinegar, a dash of sugar, and a minced chili for a classic Filipino “sawsawan.”
Finally, plate the chicken on a serving platter, drizzle with a little extra sauce if you like, and garnish with sliced scallions or a wedge of calamansi for that final zing. Picture yourself pulling this out of the kitchen, the whole house smelling incredible, and everyone reaching for seconds. That's it — you did it. But hold on, I've got a few more tricks that'll take this to another level...
Insider Tricks for Flawless Results
The Temperature Rule Nobody Follows
Most home cooks set the stove to “medium” and hope for the best, but oil temperature is the secret sauce of perfect fried chicken. Use an instant‑read thermometer and keep the oil between 340°F and 360°F. If the temperature spikes, the crust will darken before the meat cooks through; if it’s too low, the coating soaks up oil and becomes soggy. I once tried to speed things up by cranking the heat—ended up with a burnt shell and raw interior. Keep a close eye, and the result will be a uniform golden crust every time.
Why Your Nose Knows Best
Before you even check the thermometer, trust your nose. A fragrant, nutty aroma signals the Maillard reaction is happening—this is when the sugars and proteins create that irresistible crunch. If the oil smells faintly of raw flour, it’s not hot enough yet. When the scent turns to a toasty, slightly sweet perfume, you’re in the sweet spot. I’ve saved many batches by listening to the kitchen’s olfactory cues rather than obsessing over numbers.
The 5‑Minute Rest That Changes Everything
After frying, many people dive straight into eating, but a brief 5‑minute rest on a wire rack is a game‑changer. This pause lets steam escape, preventing the crust from getting soggy, and allows the juices to settle back into the meat. Skipping this step is like pouring water on a fresh‑baked cookie—it instantly ruins the texture. Trust me, those extra minutes are worth the crisp you’ll get.
Oil Choice Matters More Than You Think
While any neutral oil works, I swear by a blend of peanut oil and canola. Peanut oil has a high smoke point and a subtle nutty flavor that complements the garlic‑soy base, while canola keeps the cost down. Avoid olive oil; its lower smoke point can lead to burnt edges and a bitter aftertaste. If you’re allergic to peanuts, use grapeseed oil—its neutral profile won’t interfere with the flavor.
Double‑Dredge for Extra Crunch
If you crave an even crunchier bite, try a double‑dredge: after the first coat, dip the chicken back into the buttermilk, then roll again in the flour mixture. This adds an extra layer of texture that shatters like delicate glass when you bite. A friend tried this once and ended up with a crust so light it practically floated off the plate—he called it “air‑fried chicken” and we all laughed. Use this trick sparingly; too much can make the crust overly thick.
Creative Twists and Variations
This recipe is a playground. Here are some of my favorite ways to switch things up:
Spicy Sriracha Glaze
After frying, brush the chicken with a mixture of sriracha, honey, and a splash of lime juice. The glaze adds a sweet‑heat balance that pairs beautifully with the salty crust. Great for those who love a kick without overwhelming the flavor.
Herb‑Infused Flour
Swap half the all‑purpose flour for chickpea flour and add dried oregano and thyme to the dry mix. This gives the crust an earthy, herbal note and a slightly nutty flavor that’s perfect for a summer barbecue.
Sweet‑And‑Savory Pineapple
Serve the fried chicken alongside grilled pineapple rings tossed in a light brown‑sugar glaze. The caramelized fruit adds a juicy contrast that brightens the dish, making it feel like a tropical feast.
Garlic‑Butter Drizzle
Finish the chicken with a drizzle of melted butter infused with roasted garlic and a pinch of parsley. This adds richness and a buttery aroma that turns a simple bite into a luxurious experience.
Gluten‑Free Crunch
Replace the flour and cornstarch with a blend of rice flour and potato starch. The texture remains crisp, and the flavor stays true, making it safe for those with gluten sensitivities without sacrificing the crunch.
Cheese‑Stuffed Surprise
Make a pocket in each chicken thigh, stuff it with a slice of mozzarella, then coat and fry as usual. The cheese melts inside, creating a gooey surprise that adds an indulgent twist.
Storing and Bringing It Back to Life
Fridge Storage
Place cooled chicken pieces in an airtight container lined with paper towels to absorb excess oil. They’ll stay juicy for up to 3 days. When you’re ready to eat, reheat in a preheated oven at 375°F (190°C) for 10‑12 minutes, and the crust will regain its crunch.
Freezer Friendly
After the coating sets but before frying, arrange the pieces on a parchment‑lined tray and freeze for 1 hour. Then transfer them to a zip‑top freezer bag. They’ll keep for up to 2 months. When you want to serve, fry directly from frozen—just add an extra 2‑3 minutes to the cooking time.
Best Reheating Method
For leftovers, the secret is a tiny splash of water in a hot skillet. Add the chicken, drizzle a teaspoon of water, cover for 2 minutes, then uncover to let the steam evaporate. This revives the crust without making it soggy, and the meat stays moist.