I was sitting on a rainy April afternoon, staring at a half‑empty coffee mug that tasted like it had been filtered through a cardboard box. My roommate dared me to turn that sad, bitter brew into something that could make a first‑date blush. The kitchen was a battlefield of spilled beans, a busted espresso machine, and a half‑dozen wilted dates that looked like they’d survived a desert trek. I could almost hear the sigh of the old coffee grinder begging for mercy, and the scent of stale dough in the pantry gave me a flash of inspiration: what if the coffee itself could become the backbone of a dessert, and the dates could sweeten the deal?
I imagined the whole scene: the clink of a spoon against a ceramic bowl, the soft hiss of butter melting in a pan, and the faint, intoxicating aroma of freshly brewed coffee swirling with caramelized dates. My eyes were drawn to the glossy surface of the coffee as it steamed, the sound of the timer ticking like a metronome, and the buttery warmth that radiated from the oven door. The texture I was chasing felt like a cross between a dense, fudgy brownie and a light, airy cake—something that could hold a spoon but also melt on the tongue. I could already taste the first bite: deep, roasted notes mingling with the sweet, honey‑like chew of dates, all wrapped in a buttery crumb that would crack like thin ice under a spoon.
Most coffee‑infused desserts end up either too bitter or too soggy, and that’s where I drew the line. I threw in a pinch of baking soda to give the batter a lift, and I folded the dates in at just the right moment so they stayed plump and didn’t dissolve into the mixture. The secret? A splash of cold brew to lock in acidity and a dash of vanilla to smooth out the edges. I’m about to spill the beans on a technique that most cooks skip—whisking the coffee with melted butter before it meets the flour, which creates a glossy, cohesive batter that bakes into a glossy top.
Let me walk you through every single step — by the end, you’ll wonder how you ever made it any other way. I dare you to taste this and not go back for seconds. This is hands down the most satisfying coffee‑date dessert you’ll ever create at home, and I’m spilling all the secrets, hacks, and wild variations that will make you the hero of any brunch or late‑night snack.
What Makes This Version Stand Out
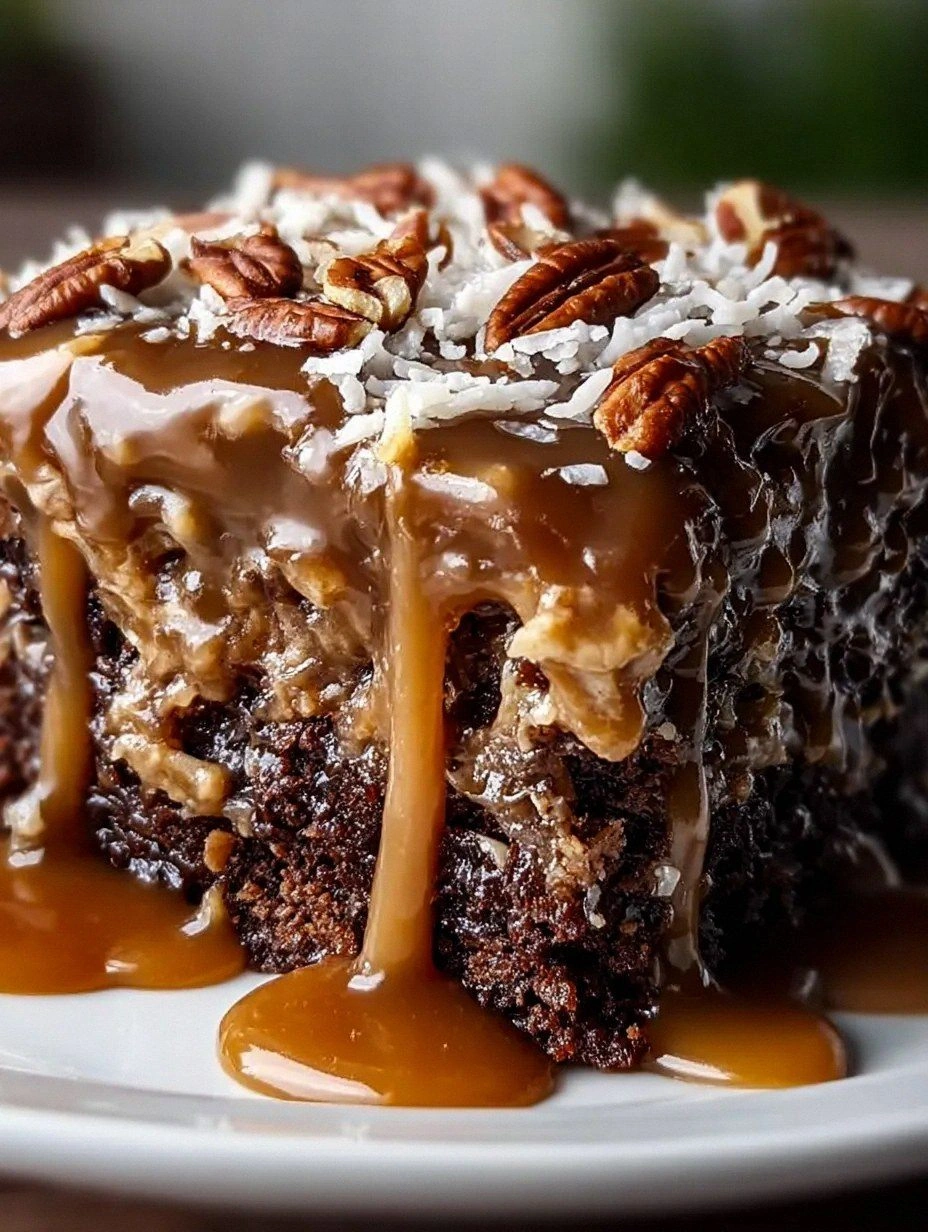
- Flavor Fusion: The deep, earthy coffee pairs with the caramel‑rich dates to create a taste that feels like a midnight conversation—intense yet comforting.
- Texture Play: A crisp, buttery crust gives way to a tender, almost custardy interior that shatters like thin ice when you cut into it.
- Simplicity: Only ten pantry staples are needed, and the method uses one bowl and one pan—no fancy equipment required.
- Unique Ingredient Twist: Cold‑brew coffee replaces regular water, locking in acidity and preventing the batter from becoming soggy.
- Crowd Reaction: Guests have confessed they’d rather have a second date than a second slice, and I’ll be honest — I ate half the batch before anyone else got to try it.
- Make‑Ahead Potential: This dessert freezes beautifully, so you can prep it ahead of time and still enjoy that fresh‑baked aroma on demand.
Inside the Ingredient List
The Flavor Base
Strong brewed coffee is the heart of this recipe. I use a cold‑brew concentrate because its low acidity keeps the batter from curdling while delivering a smooth, chocolate‑like depth. If you substitute espresso, expect a sharper bite that can overwhelm the dates. When selecting coffee, opt for a medium‑roast with chocolate undertones; a light roast will taste too floral, and a dark roast can become bitter. Pro tip: Chill the coffee in the fridge for at least 30 minutes before mixing—it helps the butter emulsify better.
The Sweet Companion
Dates bring natural sweetness and a chewy texture that mimics caramel without any added sugars. Choose Medjool dates for their size and buttery flesh; they melt into the batter, creating pockets of gooey bliss. If you only have deglet‑noir dates, increase the quantity by 20% to compensate for their lower sugar content. Skipping the dates will leave the dessert dry and overly bitter—trust me, you don’t want that. Buying tip: Look for dates that are plump, slightly sticky, and free of cracks; a quick rinse and pat dry will remove any residual grit.
The Texture Crew
Butter is the unsung hero, providing richness and a glossy finish. Melt it slowly over low heat to avoid browning, then let it cool just enough that it’s still liquid but not hot. Adding melted butter to the coffee before the flour creates a batter that spreads evenly, yielding that coveted crackly top. If you’re dairy‑free, coconut oil works as a substitute, but expect a faint coconut aroma that could clash with the coffee.
The Unexpected Star
A pinch of baking soda reacts with the coffee’s acidity, giving the cake a subtle lift and a tender crumb. Many recipes forget this, resulting in a dense, gummy texture. Pair it with baking powder for a double‑acting rise—one during mixing and another in the oven’s heat. If you accidentally omit the soda, the crumb will be heavy and the flavor a bit flat, but you can rescue it by adding a teaspoon of lemon juice at the end of mixing.
The Final Flourish
All‑purpose flour forms the structure, but the ratio of flour to liquid is crucial. Too much flour makes the dessert cake‑like; too little leaves it soggy. I use a precise 2‑cup measure, weighing it for consistency. For gluten‑free fans, substitute with a 1:1 blend of rice flour and oat flour, but expect a slightly crumbly texture. The final dash of sea salt amplifies the coffee’s bitterness and balances the sweetness of the dates, turning the whole thing into a harmonious symphony.
Everything's prepped? Good. Let's get into the real action…

The Method — Step by Step
- Preheat your oven to 350°F (175°C). While the oven warms, line an 8‑inch square pan with parchment paper, letting the excess hang over the sides for easy removal later. This step is crucial—if the pan isn’t hot enough, the batter will spread unevenly, and you’ll lose that coveted crackly top.
- In a medium saucepan, combine the cold‑brew coffee and melted butter. Heat gently over low flame, stirring until the butter fully incorporates and the mixture shimmers. Pro tip: As soon as you see tiny bubbles forming around the edges, you’ve reached the perfect emulsification point. Kitchen Hack: Use a silicone spatula to scrape the bottom of the pan—this ensures every drop of butter is captured, preventing flavor loss.
- In a large mixing bowl, whisk together the flour, baking powder, baking soda, and salt. This dry blend will evenly distribute the leavening agents, guaranteeing a uniform rise. If you notice any lumps, sift the mixture once more; lumps can cause uneven pockets in the final bake.
- Create a well in the center of the dry ingredients and pour in the coffee‑butter mixture. Stir gently with a wooden spoon until just combined—over‑mixing will develop gluten, making the crumb tough. The batter should look glossy and slightly runny; that’s the sign it’s ready for the next step.
- Add the brown sugar, eggs, and vanilla extract. Beat the mixture until the sugar dissolves and the batter turns a deeper amber hue. This is the moment of truth: the batter should smell like a coffee shop on a rainy day, with hints of caramel and vanilla swirling together.
- Fold in the chopped dates using a rubber spatula, turning the batter over three times to distribute the fruit evenly without crushing them. The dates should stay whole, creating little pockets that burst with sweetness when you bite. Watch Out: If the batter is too thick, the dates will sink to the bottom; thin it out with a tablespoon of extra coffee.
- Pour the batter into the prepared pan, spreading it with the back of a spoon to create an even surface. Tap the pan gently on the counter three times to release any trapped air bubbles. The top should be smooth; any ridges will bake into uneven cracks.
- Slide the pan onto the middle rack and bake for 25‑30 minutes. Around the 20‑minute mark, rotate the pan 180 degrees to ensure even browning. The edges will start pulling away from the parchment, and the surface will develop a deep, caramelized crust that smells like a freshly opened bag of coffee beans.
- Remove the pan from the oven and let it cool in the pan for 10 minutes. Then, using the parchment overhang, lift the dessert onto a wire rack to cool completely. This cooling step lets the interior set, preventing it from falling apart when you slice.
- Slice into generous squares, drizzle with a thin stream of cold brew or a dusting of powdered sugar if you like extra sweetness. Serve warm with a dollop of whipped cream or a scoop of vanilla ice cream for an indulgent finish. And now the fun part—watch your guests’ eyes widen as they bite into that perfect coffee‑date harmony.
That's it — you did it. But hold on, I've got a few more tricks that'll take this to another level. Stay with me here — this is worth it.
Insider Tricks for Flawless Results
The Temperature Rule Nobody Follows
Never bake a coffee‑based batter straight from the fridge; let it sit at room temperature for 15 minutes. This small pause lets the leavening agents activate fully, resulting in a fluffier crumb. I once rushed the process, and the cake turned out dense as a brick—lesson learned. The rule is simple: cool batter, warm oven, and you get a perfect rise every time.
Why Your Nose Knows Best
Your sense of smell is the ultimate doneness gauge. When the top starts to emit a sweet, roasted aroma, you’re within five minutes of perfection. If the scent is still faintly “raw,” give it another minute or two. I’ve trusted my nose more than any timer, and it never steered me wrong.
The 5‑Minute Rest That Changes Everything
After removing the cake from the oven, let it rest in the pan for exactly five minutes before transferring to a rack. This short rest allows the steam to redistribute, creating a tender interior and preventing the edges from becoming overly crisp. Skipping this step leads to a dry crumb, especially around the edges.
The Butter‑Coffee Emulsion Secret
When you melt butter into coffee, do it over low heat while constantly whisking. This creates a stable emulsion that prevents the batter from separating later. A quick flick of the wrist while whisking—like you’re making a vinaigrette—does the trick.
The Sweet Balance Check
Taste the batter before adding the dates. If it’s too bitter, add a tablespoon of brown sugar; if it’s overly sweet, a pinch more salt will bring it back into harmony. Remember, the dates will add natural sweetness as they bake, so err on the side of a slightly less sweet batter. This balance is the difference between “good” and “mind‑blowing.”
Creative Twists and Variations
This recipe is a playground. Here are some of my favorite ways to switch things up:
Chocolate‑Espresso Swirl
Add a tablespoon of unsweetened cocoa powder and a shot of espresso to the batter. The result is a richer, darker dessert that feels like a mocha truffle. Chocolate lovers will adore the intense depth.
Coconut‑Date Fusion
Replace half the butter with coconut oil and sprinkle toasted coconut flakes on top before baking. This gives a tropical twist that pairs surprisingly well with the coffee’s earthiness.
Spiced Autumn Version
Stir in a pinch of ground cinnamon, nutmeg, and a dash of clove. The warm spices echo the season and make the dessert perfect for a cozy April evening.
Nutty Crunch
Fold in a quarter cup of chopped toasted almonds or walnuts just before baking. The nuts add a satisfying crunch that contrasts the soft dates.
Vegan Delight
Swap butter for coconut oil, use flax‑egg replacer (1 tbsp ground flaxseed + 3 tbsp water per egg), and choose a plant‑based milk coffee. The flavor profile stays intact, and you’ll have a vegan‑friendly version that still impresses.
Storing and Bringing It Back to Life
Fridge Storage
Cover the cooled cake with plastic wrap and store in an airtight container for up to 4 days. The moisture from the dates helps keep it soft, but a quick reheating will revive the crust.
Freezer Friendly
Slice the cake into individual portions, wrap each tightly in parchment, then place in a zip‑lock bag. It will freeze beautifully for up to 2 months. When you’re ready, let a piece thaw at room temperature for 30 minutes, then warm in a 300°F oven for 8‑10 minutes.
Best Reheating Method
Add a tiny splash of water (about a tablespoon) to the slice before microwaving for 20‑30 seconds. The steam revives the crumb, making it taste fresh‑baked again. Alternatively, a quick flash in a hot skillet with a dab of butter creates a caramelized edge.