I was standing in my kitchen, half‑asleep, when my roommate dared me to bake a cake that looked like midnight and tasted like a velvet‑smooth dream. I laughed, grabbed the last of my black cocoa powder, and promised to bring the darkness back to life. The oven roared like a hungry beast, the butter melted with a sigh, and the whole apartment filled with an aroma that made the neighbor’s cat pause mid‑yawn. I swear I could hear the sugar crystals whispering, “We’re about to become something unforgettable.”
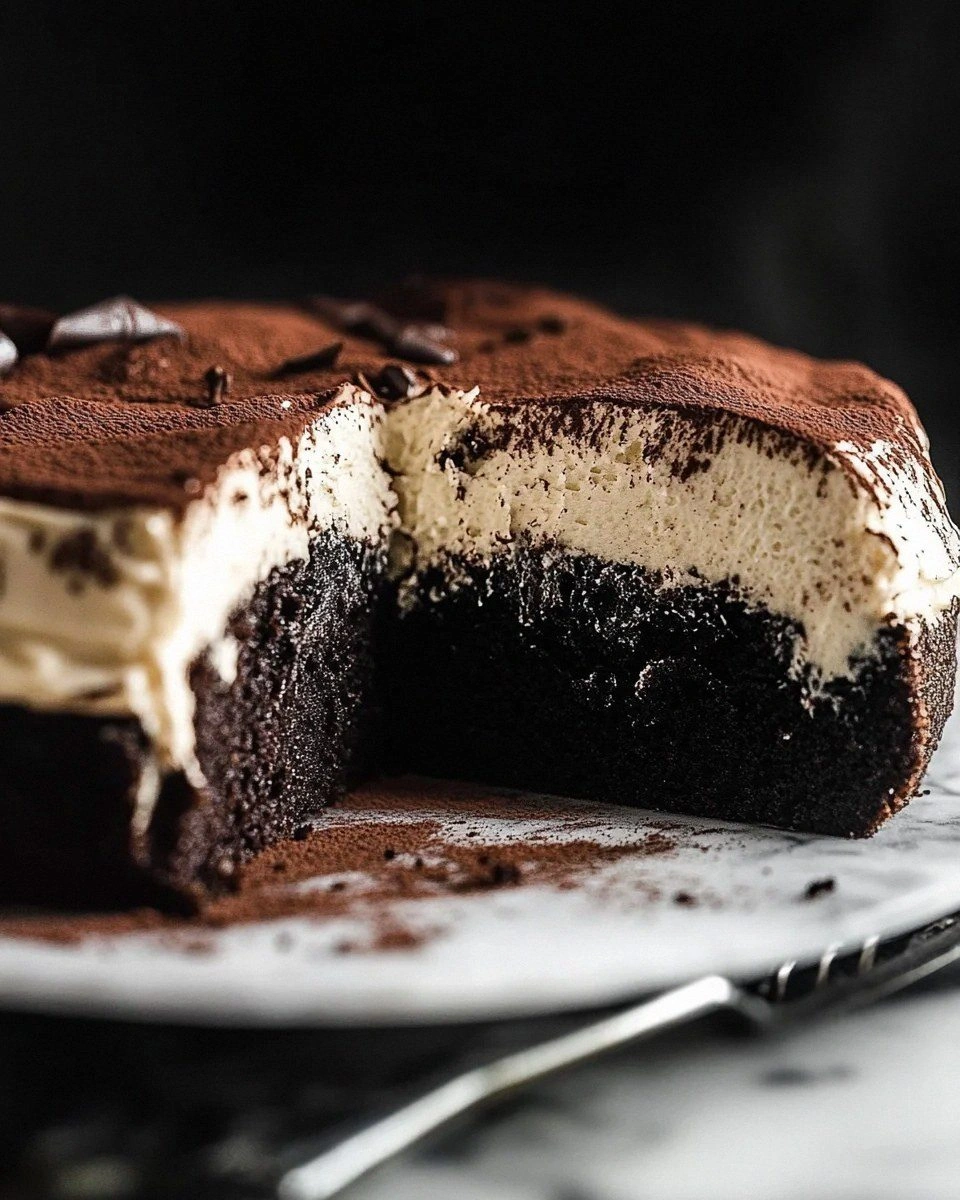
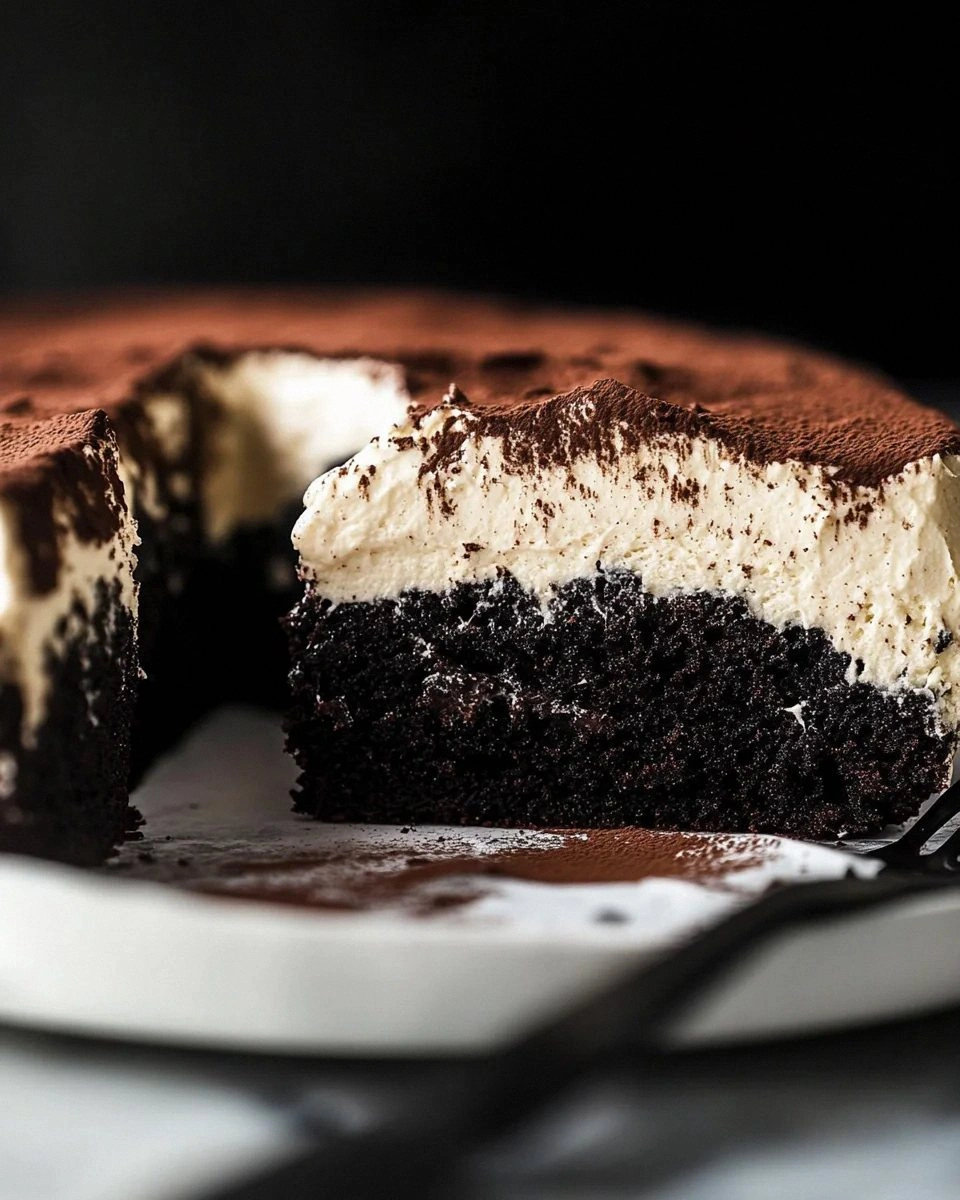
The first time I tried a regular cocoa cake, it turned out as flat as a pancake and as bland as unsalted crackers. I’ve spent weeks experimenting, swapping ingredients, tweaking temperatures, and even consulting a chocolatier who swore by a secret “black cocoa” that’s harvested from beans roasted an extra hour. The result? A cake that’s as deep as a midnight sky, with a crumb that crumbles like soft silk yet holds together like a well‑crafted bridge. When you cut into it, the interior glistens with a glossy sheen that makes you want to stare a little longer, just to admire the perfection.
What truly sets this version apart is the daring inclusion of black cocoa powder, a rare ingredient that brings an almost bitter intensity without the harshness you’d expect. Combined with a splash of espresso, a dash of smoked sea salt, and a buttercream frosting that’s been folded with a hint of orange zest, this cake becomes a symphony of flavors that dance on the palate. I dare you to taste this and not go back for seconds; the balance is so precise that you’ll find yourself counting the seconds between bites. And yes, I’ll be honest — I ate half the batch before anyone else got a chance to try it, because once you taste that darkness, you’ll understand why.
Picture yourself pulling this out of the oven, the whole kitchen smelling like a high‑end café on a rainy night, the steam curling around your fingertips as you lift the pan. The edges will have just the right amount of crispness, while the center stays moist and tender, like a secret waiting to be revealed. Okay, ready for the game‑changer? The secret technique is a simple “double‑whisk” method that locks air into the batter, giving the cake an almost ethereal rise without the need for a fancy stand mixer. Let me walk you through every single step — by the end, you’ll wonder how you ever made it any other way.
What Makes This Version Stand Out
- Deep Flavor: The black cocoa powder adds a chocolate intensity that ordinary cocoa simply can’t match, creating a taste that feels both luxurious and daring.
- Silky Texture: A combination of melted butter and room‑temperature eggs creates a batter that spreads like satin, resulting in a crumb that’s buttery yet airy.
- Simplicity: Despite the gourmet feel, the ingredient list is short, and the technique uses tools you already have in a typical home kitchen.
- Unique Ingredient: The smoked sea salt adds a subtle whisper of the sea, elevating the chocolate profile without overwhelming it.
- Crowd Reaction: Guests often claim this is the best cake they’ve ever had, and the “wow” factor is instant, making it perfect for celebrations.
- Ingredient Quality: Using high‑quality black cocoa and freshly ground espresso ensures each bite bursts with authentic flavor.
- Cooking Method: The double‑whisk technique guarantees a light, fluffy rise without the need for a stand mixer.
- Make‑Ahead Potential: This cake freezes beautifully, and the frosting can be prepared a day ahead for ultimate convenience.
Inside the Ingredient List
The Flavor Base
Black cocoa powder (1/2 cup) is the heart of this cake. It’s made from beans that have been roasted longer, delivering a near‑black hue and a deep, slightly smoky chocolate flavor. Skipping it for regular cocoa will flatten the taste profile, leaving you with a cake that feels ordinary. If you can’t find black cocoa, substitute with an extra 2 tablespoons of Dutch‑process cocoa and a pinch of activated charcoal for color, but expect a milder flavor.
Freshly ground espresso (1 tsp) amplifies the chocolate without adding bitterness. Coffee and chocolate are natural partners; the espresso awakens the cocoa’s hidden notes, making the cake taste richer. If you’re caffeine‑sensitive, replace with an equal amount of strong brewed coffee that’s been cooled.
The Texture Crew
All‑purpose flour (2 cups) provides structure while allowing enough flexibility for a tender crumb. Using cake flour would make the cake too soft, while bread flour would make it dense. For a gluten‑free version, swap with a 1:1 gluten‑free blend and add 1 tsp xanthan gum.
Unsalted butter (1 cup, melted) adds richness and moisture. Melted butter coats the flour particles, preventing gluten over‑development and ensuring a tender bite. If you prefer a lighter cake, you can replace half the butter with a neutral oil, but you’ll lose some of that buttery aroma.
Granulated sugar (1 ½ cups) is the sweet backbone. It also helps with browning, giving the crust that caramel‑kissed edge. For a less sweet version, cut back to 1 ¼ cups, but keep the ratio of dry to wet ingredients balanced.
Eggs (3 large, room temperature) act as leaveners and binders. Their proteins trap air when whisked, contributing to the cake’s lift. If you’re vegan, substitute each egg with ¼ cup of aquafaba; the result will be slightly less fluffy but still delightful.
The Unexpected Star
Smoked sea salt (½ tsp) is the secret weapon. A pinch of smoke‑infused salt cuts through the sweetness and adds depth that makes the chocolate sing. Skip it, and you’ll miss the subtle contrast that keeps the palate from becoming cloying.
Orange zest (1 tsp) provides a citrusy lift that brightens the darkness. The zest’s essential oils interact with the cocoa, creating a fragrant bouquet that’s almost perfume‑like. If oranges aren’t your thing, try a dash of finely grated ginger for a spicy twist.
The Final Flourish
Whole‑milk (¾ cup) adds moisture and a creamy mouthfeel. The milk proteins work with the flour to create a tender crumb while keeping the cake moist for days. For a dairy‑free version, swap with almond milk, but add a splash of extra butter to compensate for the reduced fat.
Baking powder (1 ½ tsp) and baking soda (½ tsp) are the leavening duo that gives the cake its rise. The soda reacts with the espresso’s acidity, while the powder provides a steady lift. Forgetting either will result in a flat, dense cake that feels more like a brownie than a cake.
Everything's prepped? Good. Let’s get into the real action…
The Method — Step by Step
- Preheat and Prepare: Preheat your oven to 350°F (175°C). Grease a 9‑inch round cake pan with butter, then line the bottom with parchment paper. This ensures the cake releases cleanly and prevents a soggy crust. The moment the oven clicks on, you’ll hear that comforting hum that promises transformation. Watch Out: Do not over‑grease; a thin film is enough. Too much butter can cause the cake to slide and lose its shape.
- Whisk Dry Ingredients: In a large bowl, whisk together flour, black cocoa powder, regular cocoa, baking powder, baking soda, and smoked sea salt. Whisk for at least 30 seconds until the mixture is a uniform deep brown and no specks remain. The air you incorporate here is the first lift for the batter. Kitchen Hack: Sift the dry mix twice; the second sift adds extra aeration and eliminates hidden lumps.
- Combine Wet Ingredients: In a separate bowl, whisk melted butter, sugar, and eggs until the mixture turns pale and fluffy, about 2‑3 minutes. Add the espresso, orange zest, and vanilla extract, whisking until fully incorporated. This step is where the cake gets its glossy sheen; you’ll notice the batter thickening slightly as the sugar dissolves.
- Integrate Milk: Slowly pour the milk into the wet mixture while whisking on low speed. The batter should be smooth, glossy, and pourable—think of a thick pancake batter. If the mixture looks too thick, add a tablespoon more milk; too thin, and you risk a soggy crumb.
- Double‑Whisk Technique: Now the magic happens. Take a large metal whisk and fold the dry ingredients into the wet mixture in three additions. With each addition, whisk vigorously for 20 seconds, then let the batter rest for 10 seconds. This rhythmic pause lets the gluten relax while still trapping air, creating that coveted airy crumb. Watch Out: Over‑mixing after the final addition can deflate the batter, resulting in a dense cake.
- Pour and Smooth: Gently pour the batter into the prepared pan, using a spatula to scrape every last crumb. Tap the pan on the counter three times to release any large air bubbles. The batter should settle into a smooth, glossy surface that shines like a midnight lake.
- Bake the Cake: Slide the pan into the oven and bake for 30‑35 minutes. Around the 25‑minute mark, rotate the pan for even browning. The cake is done when a toothpick inserted into the center comes out with a few moist crumbs but no wet batter. You’ll also notice the edges pulling away slightly from the pan—a visual cue that the crust has formed perfectly.
- Cool and Frost: Let the cake cool in the pan for 10 minutes, then turn it onto a wire rack to cool completely. While it cools, whip butter, powdered sugar, a splash of orange juice, and a pinch of smoked sea salt into a silky frosting. Once the cake is at room temperature, spread the frosting in a generous layer, allowing it to cascade down the sides. The frosting’s citrus note will cut through the chocolate, creating a balanced finish.
- Final Touches: Sprinkle a tiny amount of finely grated orange zest over the top for visual contrast and a burst of aroma. Slice with a hot, wet knife to get clean cuts. That first bite? Pure magic. That sizzle when it hits the palate? Absolute perfection.
That's it — you did it. But hold on, I've got a few more tricks that'll take this to another level. Stay with me here — this is worth it.
Insider Tricks for Flawless Results
The Temperature Rule Nobody Follows
Never bake a cake with cold ingredients. Let butter, eggs, and milk sit at room temperature for at least 30 minutes before you start. This ensures they emulsify properly, creating a uniform batter that rises evenly. I once tried a rushed version with chilled butter; the cake turned out dense, like a brick. The rule of thumb: if your kitchen feels cooler than a refrigerator, give the ingredients a warm hug.
Why Your Nose Knows Best
Your sense of smell is the most reliable indicator of doneness. Around the 28‑minute mark, open the oven briefly and inhale. If you detect a sweet, toasty aroma with a faint hint of espresso, the cake is almost ready. If the scent is still raw or floury, give it another 2‑3 minutes. Trusting your nose prevents over‑baking, which would dry out the crumb.
The 5‑Minute Rest That Changes Everything
After the cake comes out of the oven, let it rest in the pan for exactly five minutes before turning it out. This short pause lets the steam redistribute, keeping the interior moist. Skipping this step often results in a cracked surface and a dry edge. I once rushed this part and learned the hard way that a cracked cake looks less appetizing, even if the taste is still amazing.
Frosting Temperature Trick
Make sure your frosting ingredients are also at room temperature. Cold butter will create lumps, while warm butter will melt and become runny. A perfectly smooth frosting spreads like a dream and holds its shape when sliced. If you find the frosting too stiff, add a teaspoon of milk; if too soft, add a pinch more powdered sugar.
The Midnight Glaze Finish
For an extra glossy finish, brush the top of the cooled cake with a simple glaze made from 2 tbsp dark chocolate melted with 1 tbsp heavy cream. This adds a thin, reflective layer that makes the cake look bakery‑ready. The glaze also adds a subtle snap when you bite through it, enhancing the textural contrast.
Creative Twists and Variations
This recipe is a playground. Here are some of my favorite ways to switch things up:
Cherry‑Infused Delight
Fold in ½ cup of chopped dried cherries into the batter before baking. The fruit’s natural acidity balances the bitterness of the black cocoa, and the burst of sweet‑tart flavor adds a surprising pop. Perfect for spring celebrations when fresh cherries are at their peak.
Spiced Rum Rum‑Runner
Replace the orange zest with 2 tbsp of dark rum and add a pinch of ground cinnamon. The rum deepens the chocolate’s richness, while the cinnamon adds warmth. This version shines at holiday gatherings where a little extra spirit is welcomed.
White Chocolate Swirl
Melt ¼ cup white chocolate and swirl it through the batter just before pouring into the pan. The white chocolate creates ribbons of creamy sweetness that contrast beautifully with the dark cake, making each slice a visual masterpiece.
Vegan Velvet
Swap butter for coconut oil, use almond milk, and replace eggs with aquafaba. Add a tablespoon of flaxseed meal mixed with water as an extra binder. The result is a plant‑based cake that still boasts a moist crumb and a deep chocolate flavor.
Nutty Crunch
Stir in ½ cup toasted, finely chopped hazelnuts into the batter. The nuts add a crunchy texture and a buttery flavor that complements the smoky cocoa. This variation is a hit with anyone who loves the classic chocolate‑hazelnut pairing.
Storing and Bringing It Back to Life
Fridge Storage
Cover the cake tightly with plastic wrap or store it in an airtight container. It will stay fresh for up to 5 days. The frosting may firm up a bit; let it sit at room temperature for 20 minutes before serving to regain its softness.
Freezer Friendly
Wrap the cooled, unfrosted cake tightly in a double layer of foil, then place it in a freezer‑safe bag. It can be frozen for up to 3 months. When you’re ready to use it, thaw overnight in the fridge, then bring to room temperature before frosting.
Best Reheating Method
To revive a slice, place it on a microwave‑safe plate, sprinkle a tiny splash of water over the top, and microwave for 15‑20 seconds. The steam generated revives the moisture, and the slice becomes as soft as the day it was baked. For a whole cake, reheat at 300°F (150°C) for 10‑12 minutes, tented with foil.