I still remember the night when my kitchen turned into a disaster zone. I had promised my roommate a banana bread that would make her forget about the bland store‑bought ones, and the batter I whipped up ended up looking like a sticky, over‑baked mess. The smell of burnt sugar clung to the air like a bad memory, and I was left staring at a loaf that was more rubber than cake. That moment, however, sparked a relentless pursuit to perfect the recipe, and after countless trials, I discovered a version that feels like a hug in loaf form.
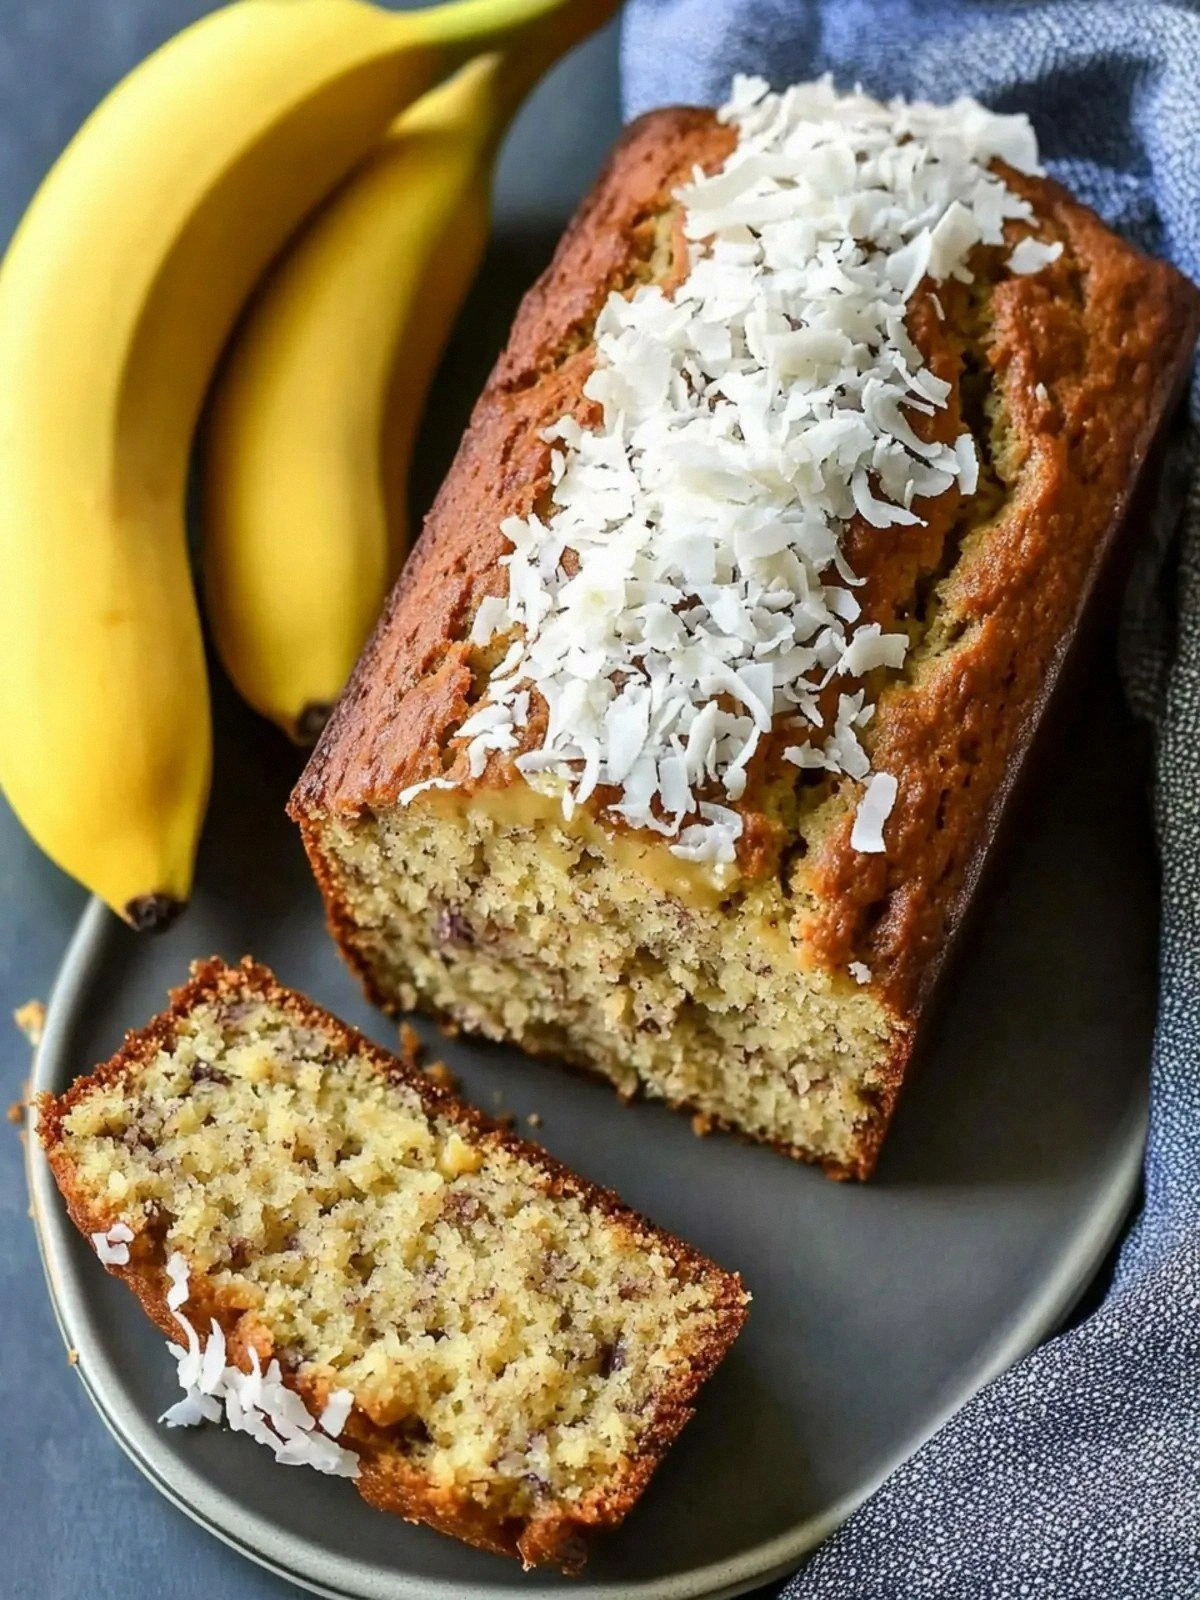
Picture this: a golden crust that crackles like freshly baked toast, a moist interior that practically melts in your mouth, and the unmistakable aroma of toasted coconut mingling with ripe bananas. As the loaf cools, steam rises in a sweet, tropical haze, and the first bite releases a burst of buttery sweetness that lingers on the palate. Every texture—crunchy coconut flakes, tender crumb, and a subtle hint of vanilla—creates a symphony of flavors that dance across your tongue. If you’ve ever tasted a banana bread that seemed to forget its banana, this one will set a new personal record.
What sets this rendition apart is the strategic use of coconut flakes and a touch of milk that keeps the crumb tender without masking the banana’s natural sweetness. The baking soda is balanced just enough to lift the batter, while the half cup of butter delivers a buttery richness that feels indulgent yet not cloying. I’ve found that the secret lies in the timing of adding wet and dry ingredients, which ensures a smooth batter that spreads evenly. I dare you to taste this and not go back for seconds.
Most recipes get this completely wrong—most people under‑bake or over‑bake, leaving the bread either dry or gooey. This version is hands down the best you’ll ever make at home. Picture yourself pulling this out of the oven, the whole kitchen smelling incredible, and the loaf looking like a work of art. If you’ve ever struggled with banana bread, you’re not alone—and I’ve got the fix. Let me walk you through every single step — by the end, you’ll wonder how you ever made it any other way.
What Makes This Version Stand Out
- Flavor: The combination of ripe bananas, toasted coconut flakes, and vanilla creates a layered taste that feels both sweet and earthy. The butter adds a silky richness that elevates every bite.
- Texture: The batter’s consistency is balanced—neither too thick nor too runny—so the loaf has a tender crumb with a slight chew that keeps you coming back.
- Simplicity: With only ten ingredients and no fancy techniques, this recipe is approachable for beginners and seasoned bakers alike.
- Uniqueness: The coconut flakes give a tropical twist that differentiates it from classic banana bread, making it a crowd‑pleaser at parties.
- Ingredient Quality: Using real vanilla extract instead of imitation and fresh bananas ensures authentic flavor and a brighter color.
- Make‑ahead Potential: The loaf stays fresh for up to five days when wrapped properly, and it reheats wonderfully with a splash of milk.
- Visual Appeal: The golden crust and visible coconut specks create an Instagram‑ready loaf that looks as good as it tastes.
- Versatility: It works well as a breakfast item, snack, or dessert, and can be paired with coffee or tea.
Alright, let’s break down exactly what goes into this masterpiece…
Inside the Ingredient List
The Flavor Base
Butter and sugar form the sweet backbone of the loaf. The butter provides a buttery mouthfeel that carries the other flavors, while the sugar dissolves to create a smooth batter. If you substitute butter with oil, the loaf will be lighter but lose that rich, indulgent taste. For a dairy‑free version, coconut oil works well, but you’ll need to adjust the amount slightly.
Eggs act as the binder that holds everything together. They also contribute to the loaf’s rise and give it a tender crumb. If you’re allergic, try flaxseed meal mixed with water (1 tablespoon flaxseed + 3 tablespoons water) as a substitute. However, the texture will shift slightly to a denser, more cake‑like consistency.
Vanilla extract is the subtle hero that ties the banana and coconut flavors together. It adds depth and warmth, preventing the banana from feeling flat. A teaspoon is enough to elevate the entire loaf without overpowering the natural fruit notes.
The Texture Crew
All-purpose flour provides structure and stability. Using a lighter flour like cake flour would result in a softer crumb but might not hold up as well during baking. For a gluten‑free version, use a 1:1 blend of rice flour and tapioca starch, but be prepared for a slightly different mouthfeel.
Baking soda is the leavening agent that helps the loaf rise. It reacts with the natural acidity of the bananas to produce carbon dioxide bubbles. Too much baking soda can leave a metallic aftertaste; keep the amount precise.
Salt balances sweetness and enhances overall flavor. A half teaspoon is standard, but you can reduce it for a lower sodium version. If you prefer a richer taste, add a pinch of sea salt on top before baking.
The Unexpected Star
Coconut flakes bring a tropical crunch and subtle sweetness that complement the banana. They also add a pleasant aroma that makes the loaf almost impossible to resist. If you’re not a fan of coconut, try toasted pecans or chopped walnuts for a nutty twist.
Milk adds moisture and helps create a tender crumb. It also balances the dry flour and coconut, ensuring the loaf isn’t too dense. Whole milk gives a richer flavor, while skim milk keeps the loaf lighter. For a vegan version, almond milk or oat milk works fine.
Everything's prepped? Good. Let's get into the real action...
The Method — Step by Step
- Preheat and Prep: Turn your oven to 350°F (175°C) and line a 9x5 inch loaf pan with parchment paper. Grease the pan lightly with butter or a silicone mat to prevent sticking. The preheated oven ensures even baking from the start. If you skip preheating, the loaf may rise unevenly.
- Cream Butter & Sugar: In a large bowl, beat ½ cup unsalted butter with 1 cup white granulated sugar until pale and fluffy. The mixture should look like whipped cream. This step locks in air, which helps the loaf rise. If you’re short on time, you can use a hand mixer or even a whisk, but be prepared to work a bit harder.
- Add Eggs: Crack 2 large eggs into a separate bowl and whisk lightly. Add them one at a time to the butter mixture, beating well after each addition. This ensures the eggs are fully incorporated, preventing lumps. The eggs also add richness and structure.
- Mix Dry Ingredients: In a separate bowl, whisk together 1 cup all‑purpose flour, 1 tsp baking soda, and ½ tsp salt. The dry mix should be evenly blended to avoid pockets of flour. This step is crucial for a uniform crumb.
- Combine Wet & Dry: Gradually fold the dry mixture into the wet batter, mixing until just combined. Over‑mixing can cause the loaf to become tough. The batter should be thick yet pourable. At this point, the aroma of vanilla should start to permeate the kitchen.
- Bananas & Coconut: Peel and mash 3 large ripe bananas until smooth. Fold them into the batter, followed by 1 cup coconut flakes. The banana adds natural sweetness; the coconut adds texture. If you prefer a smoother loaf, mash the bananas more finely.
- Add Milk: Gently stir in ½ cup milk until the batter is smooth. The milk hydrates the flour and coconut, ensuring a moist crumb. If you’re using a non‑dairy milk, adjust the amount slightly to achieve the right consistency.
- Pour & Smooth: Transfer the batter to the prepared loaf pan, smoothing the top with a spatula. The batter should fill the pan about ¾ of the way. A smooth surface will bake evenly and create a pleasing crust.
- Bake: Place the pan in the preheated oven and bake for 30–35 minutes. The loaf should develop a golden brown crust and a fragrant aroma of toasted coconut. To test doneness, insert a toothpick into the center; it should come out clean or with a few moist crumbs. If it comes out wet, bake for an additional 5 minutes.
- Cool: Remove the loaf from the oven and let it rest in the pan for 10 minutes. Then transfer it to a wire rack to cool completely. Cooling allows the steam to escape, preventing sogginess. Once cooled, slice and serve.
That's it — you did it. But hold on, I've got a few more tricks that'll take this to another level...
Insider Tricks for Flawless Results
The Temperature Rule Nobody Follows
Many bakers bake at a higher temperature to get a quick crust, but that can cause the loaf to dry out. Baking at 350°F allows the moisture to evaporate slowly, ensuring a tender crumb. I’ve found that lowering the temperature by 10°F and extending the bake time by 5 minutes improves the overall texture. This trick is especially useful if your oven tends to run hot.
Why Your Nose Knows Best
Trust your sense of smell during baking. When the loaf starts to look golden, a sweet, coconut‑banana aroma will fill the kitchen. If the scent is faint, give it a few more minutes. This sensory cue is often more reliable than the toothpick test, especially when you’re short on time.
The 5-Minute Rest That Changes Everything
After baking, let the loaf sit in the pan for 10 minutes before transferring it to a rack. This brief rest allows the steam to settle, preventing the loaf from becoming soggy. Some bakers skip this step and end up with a crust that cracks unevenly. A short rest also makes slicing easier, as the loaf holds its shape better.
Avoid Over‑Mixing the Batter
Once you add the dry ingredients, mix just until combined. Over‑mixing can develop gluten, resulting in a dense, chewy loaf. I’ve seen friends add the flour all at once, and the outcome was a tough, bread‑like texture. Keep the batter loose, and you’ll get that cake‑like softness.
Use Fresh Bananas, Not Stale
Ripe bananas provide natural sweetness and moisture. If you use overripe bananas, the loaf may become too sweet and the texture may shift. A good rule of thumb: use bananas that are yellow with brown spots but still firm. This balance ensures the loaf is sweet but not syrupy.
The 1-Second Dip Trick
Before baking, dip the loaf in a quick splash of melted butter. This creates a glossy finish and adds a subtle buttery flavor. I’ve tried this with other breads, and the result is a beautiful sheen that makes the loaf look extra appetizing. Just remember, a light touch is key to avoid a greasy surface.
Creative Twists and Variations
This recipe is a playground. Here are some of my favorite ways to switch things up:
Chocolate Chip Carnival
Add ½ cup dark chocolate chips to the batter for a decadent twist. The chocolate pairs beautifully with the coconut, creating a layered flavor profile. Serve warm with a scoop of vanilla ice cream for a dessert that feels like a treat.
Almond Joy Edition
Replace the coconut flakes with ½ cup chopped almonds and drizzle 2 tbsp shredded coconut on top before baking. The crunch of almonds adds a nutty dimension, while the coconut glaze gives a sweet finish. This version is perfect for those who love a bit of texture.
Cinnamon Spice Surprise
Stir in 1 tsp ground cinnamon and ¼ tsp nutmeg into the batter. The warm spices complement the banana and coconut, creating a comforting aroma reminiscent of fall. This version is ideal for a cozy brunch.
Pumpkin Patch Variation
Swap 1 cup of coconut flakes for 1 cup of pumpkin puree. Add 1 tsp pumpkin pie spice and a pinch of salt. The result is a moist, pumpkin‑infused loaf that feels like a seasonal treat. This variation is especially popular during the fall months.
Nutty Banana Crunch
Add ½ cup chopped walnuts or pecans to the batter for extra crunch. The nuts add a buttery, earthy flavor that complements the banana. This version is great for a protein boost and a satisfying bite.
Lemon Zest Lightness
Grate the zest of one lemon into the batter. The citrus brightens the flavor profile and balances the sweetness. This variation is refreshing for hot summer days.
Storing and Bringing It Back to Life
Fridge Storage
Wrap the loaf tightly in plastic wrap or store it in an airtight container. It stays fresh for up to five days in the refrigerator. When you’re ready to eat, let it sit at room temperature for 15 minutes before slicing to restore its natural moisture.
Freezer Friendly
Slice the loaf before freezing for easy portioning. Place the slices in a freezer bag and seal tightly. The loaf can be frozen for up to three months. When you want a slice, pop it out and let it thaw on the counter for 10 minutes.
Best Reheating Method
To reheat, wrap a slice in foil and warm in a 350°F oven for 5–7 minutes. If you’re in a hurry, microwave on medium for 20–30 seconds. Add a tiny splash of water before reheating; it steams back to perfection, restoring the crumb’s softness.