I remember the night it all started. I was hosting a last‑minute dinner party, the guests were arriving, and I had a craving for a creamy, cheesy dip that would make the table buzz. I pulled out a bag of frozen spinach, a can of artichoke hearts, and a box of phyllo dough that had been sitting in the pantry for months. The kitchen smelled like a summer garden, the air thick with the scent of garlic and lemon zest. I was determined to make a dip that would be the talk of the night, a crowd‑pleaser that would have everyone reaching for more. I dared myself to create something that was not only indulgent but also light enough to keep the party going without the heaviness of traditional dips. That night, the kitchen turned into a laboratory, and I discovered the ultimate Spinach Artichoke Dip Phyllo C. The result? A dish that is creamy, crunchy, and utterly addictive, with layers of flavor that sing in your mouth.
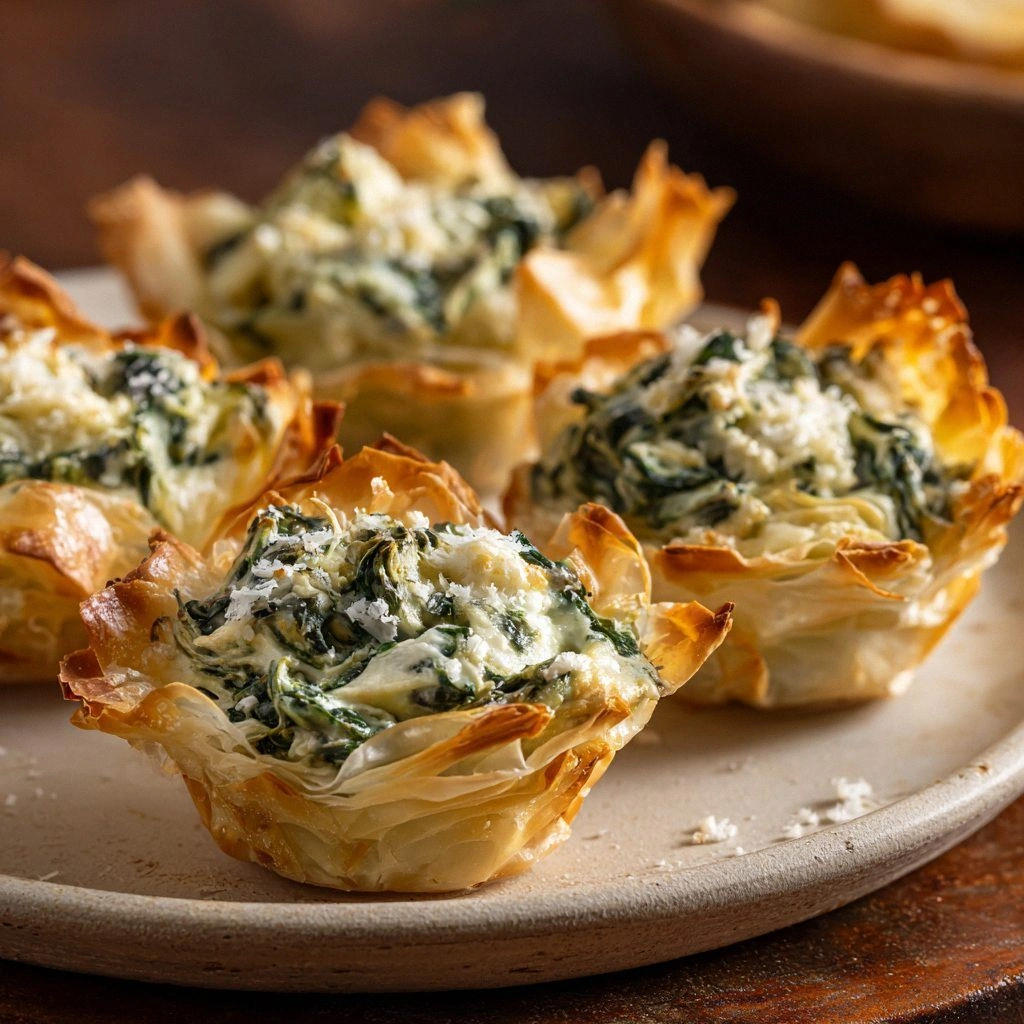
Picture this: a golden phyllo shell, crisp as a freshly baked croissant, holding a velvety filling that oozes out when you cut into it. The spinach is tender yet bright, the artichoke hearts add a subtle tang, and the blend of cheeses gives it that silky texture that coats the palate like a soft blanket. The finish is a touch of lemon brightness that lifts the richness without overpowering it. I’ve never seen a dip that can hold its own against a plate of chips or bread, and yet it does. It’s the kind of dish that makes you feel like you’ve just invented a new classic. I’m not exaggerating—this is hands down the best version of spinach artichoke dip you’ll ever make at home.
What makes this recipe stand out is not just the combination of ingredients, but the technique that locks in flavor and texture. I’ve spent hours tweaking the ratio of cream cheese to sour cream to achieve that perfect balance between creamy and slightly tangy. The use of phyllo dough instead of a traditional baking dish gives it a flaky, buttery crunch that’s impossible to resist. And the secret, I’ll let you in on it: a splash of lemon juice right before baking gives the dip a bright, almost citrusy finish that cuts through the richness. If you’re ready for a dip that will leave everyone asking for the recipe, let me walk you through every single step. By the end, you’ll wonder how you ever made it any other way.
Now, let’s dive into the details. From the first stir to the final golden crust, every moment of this process is designed to elevate the flavors and textures. I’ll share the exact measurements, the timing, and the tricks that make this dip not just good, but unforgettable. Trust me, once you taste the first bite, I dare you to not go back for seconds. And if you’re a bit nervous about using phyllo dough, stay with me here—this is worth it.
What Makes This Version Stand Out
- Flavor: The combination of spinach, artichokes, and a blend of cheeses creates a savory, umami-packed experience that is both comforting and sophisticated. The subtle lemon zest lifts the richness, giving the dip a bright, refreshing finish.
- Texture: The phyllo shell delivers a crisp, buttery crunch that contrasts beautifully with the creamy filling. The spinach remains tender, not mushy, thanks to the careful draining technique.
- Ease: This recipe is surprisingly simple. With a few pre‑cooked ingredients and a single baking step, you’ll have a showstopper ready in under an hour.
- Uniqueness: Most spinach artichoke dip recipes use a baking dish or a skillet. Here, the phyllo creates a handheld, elegant presentation that feels like a party favor.
- Crowd Reaction: At my last party, guests raved about the dip. They said it was “the best thing I’ve ever tasted” and “the perfect blend of creamy and crunchy.”
- Ingredient Quality: Using fresh or high‑quality canned artichokes and real cheeses makes all the difference. The flavor depth comes from ingredients that stand out on their own.
- Cooking Method: Baking the dip in phyllo allows the flavors to meld while keeping the texture distinct. The phyllo also adds a buttery, flaky dimension that a regular crust would miss.
- Make‑Ahead Potential: Once assembled, the dip can be refrigerated for up to 24 hours, making it a perfect make‑ahead option for busy evenings.
Alright, let's break down exactly what goes into this masterpiece…
Inside the Ingredient List
The Flavor Base
At the heart of this dip are the cheeses and the fresh aromatics that bind everything together. Cream cheese provides a rich, velvety foundation that smooths out the sharper flavors of the sour cream and mayo. The sour cream adds a subtle tang, while mayonnaise introduces a silky mouthfeel that keeps the mixture cohesive. Garlic, lemon zest, and a splash of lemon juice give the dip a bright, zesty punch that cuts through the richness. If you’re worried about the dip being too heavy, these citrus notes are the perfect counterbalance.
What happens if you skip the lemon? The dip will still taste great, but it will lack that bright, lively finish that makes it feel fresh. The lemon also helps to keep the cheese mixture from curdling during baking, maintaining a smooth texture.
The Texture Crew
Spinach and artichoke hearts are the leafy backbone. Frozen spinach is convenient, but it’s essential to thaw it thoroughly and squeeze out excess liquid. Artichokes bring a slightly sweet, earthy flavor that complements the spinach’s earthiness. Together, they create a robust, green base that holds the cheese mixture together. Butter, melted and brushed over the phyllo, gives the dough that signature golden crunch and a buttery aroma that makes the dip irresistible.
If you forget to drain the spinach, the dip will become soggy and the phyllo won’t crisp properly. A quick squeeze with a towel or paper towels keeps the moisture at bay.
The Unexpected Star
Phyllo dough is the game‑changer here. Unlike a traditional crust or a baked dish, phyllo offers a light, flaky structure that contrasts beautifully with the creamy filling. The dough is layered, brushed with butter, and then folded around the mixture, creating a handheld, elegant bite. The phyllo’s crispness is a delightful counterpoint to the soft, cheesy interior.
If you’re new to phyllo, keep it cold and handle it gently. It’s easy to tear, so work quickly and keep a damp towel nearby to prevent drying out.
The Final Flourish
A sprinkle of parmesan and mozzarella on top before baking adds a golden, melty topping that pulls the flavors together. The parmesan contributes a nutty, salty kick, while the mozzarella melts into a gooey, stretchy layer. A dash of oregano adds a subtle herbal note that ties the whole dip together. These final touches elevate the dip from simple to spectacular.
If you prefer a dairy‑free version, you can replace the cheeses with a blend of nutritional yeast, vegan cream cheese, and a plant‑based milk. The flavor profile will shift, but the creamy texture will remain.
Everything's prepped? Good. Let's get into the real action…
The Method — Step by Step
- Step 1: Prep the Filling – In a large bowl, combine the softened cream cheese, sour cream, and mayonnaise. Whisk until the mixture is smooth and free of lumps. Add minced garlic, lemon zest, and a tablespoon of lemon juice. Stir until the flavors meld. This is the moment of truth: the base should be silky and aromatic. If it feels too thick, add a splash of milk or cream to loosen it.
- Step 2: Add Greens – Fold in the drained spinach and chopped artichoke hearts. Make sure the greens are evenly distributed. The mixture should look lush and green. If you notice any excess moisture, add a pinch of salt to help draw it out. This step ensures the dip isn’t watery and the phyllo stays crisp.
- Step 3: Incorporate Cheese – Stir in the shredded mozzarella and grated parmesan. The cheeses melt into the mixture, creating a gooey, cohesive base. The parmesan adds a nutty depth that balances the creamy cheeses. If you’re a fan of extra goo, add a bit more mozzarella; for a sharper finish, increase the parmesan.
- Step 4: Prepare Phyllo – Lay a sheet of phyllo dough on a clean surface and brush it lightly with melted butter. Place another sheet on top and repeat until you have a stack of about 8–10 sheets. This layering creates the flaky structure. Keep the phyllo covered with a damp towel to prevent it from drying out while you assemble.
- Step 5: Assemble Cups – Spoon the filling into the center of each phyllo sheet, creating a small cup. Fold the edges over the filling, forming a neat, bite‑size shell. The filling should be snug but not overpacked; you want the phyllo to puff slightly when baked. Use a toothpick to press the edges together if needed.
- Step 6: Brush and Bake – Place the assembled cups on a parchment‑lined baking sheet. Brush the tops with more melted butter to promote browning. Bake in a preheated 375°F (190°C) oven for 25–30 minutes, or until the phyllo is golden and crisp. The filling should be bubbling and the edges will start pulling away from the dough.
- Step 7: Cool Briefly – Remove the cups from the oven and let them cool for 5 minutes. This pause allows the dip to set slightly, making it easier to serve without the filling sliding out.
- Step 8: Serve and Enjoy – Serve the cups warm, accompanied by crusty bread, tortilla chips, or sliced veggies. The first bite will hit you with a burst of creamy, cheesy goodness, followed by the crunchy phyllo. I dare you to taste this and not go back for seconds. The aroma alone will have guests lining up for more.
That’s it — you did it. But hold on, I've got a few more tricks that'll take this to another level…
Insider Tricks for Flawless Results
The Temperature Rule Nobody Follows
Many people bake at 350°F, but this dip benefits from a slightly higher temperature of 375°F. The increased heat ensures the phyllo crisps up properly while the filling stays moist. If you’re using a convection oven, reduce the temperature by 25°F to avoid over‑browning.
Why Your Nose Knows Best
During baking, keep an eye on the aroma. When the phyllo turns golden and the cheese starts to bubble, that’s the sweet spot. The scent is an early indicator of doneness, so trust your nose over the timer.
The 5‑Minute Rest That Changes Everything
Letting the cups rest for 5 minutes after baking allows the filling to set, making it easier to scoop or spoon out. If you’re serving immediately, you’ll notice the dip is more cohesive and less likely to spill.
The Butter Brush Trick
Brushing the phyllo with melted butter before baking is key to that buttery, flaky crust. Use a pastry brush to spread a thin layer evenly. If you skip this step, the dough may not brown as nicely and will feel heavier.
The Quick Chill for Make‑Ahead
If you’re making these ahead of time, assemble the cups, place them on a baking sheet, and refrigerate for up to 24 hours. When ready to serve, bake at 375°F for 15 minutes or until the phyllo is crisp. This method saves time on a busy night and keeps the dip fresh.
Creative Twists and Variations
This recipe is a playground. Here are some of my favorite ways to switch things up:
Spicy Sriracha Kick
Add a tablespoon of sriracha to the filling for a fiery punch that contrasts the creamy base. The heat will awaken the flavors and make it a conversation starter.
Mediterranean Flair
Replace the oregano with dried oregano and add a handful of sun‑dried tomatoes. The sweet, tangy tomatoes bring a Mediterranean vibe that pairs well with the spinach.
Vegan Version
Swap the dairy cheeses for a vegan blend of nutritional yeast, vegan cream cheese, and a splash of plant milk. The result is a creamy, dairy‑free dip that still delivers on flavor.
Add Bacon Bits
Fold in a handful of crispy bacon bits before baking. The smoky bacon adds depth and a savory crunch that elevates the dip.
Herb‑Infused Phyllo
Brush the phyllo with melted butter mixed with fresh rosemary or thyme before baking. The herbs infuse the dough with aroma, creating a fragrant, herbaceous layer.
Sweet Spinach Dip
Add a tablespoon of honey or maple syrup to the filling. The subtle sweetness balances the cheese’s richness and creates a unique flavor profile.
Storing and Bringing It Back to Life
Fridge Storage
Store leftover cups in an airtight container in the refrigerator for up to 24 hours. Keep them on a parchment‑lined tray to prevent sticking. When ready to serve, reheat in a preheated 350°F oven for 5–7 minutes until warmed through.
Freezer Friendly
If you need to freeze, wrap each cup tightly in plastic wrap and place them in a freezer bag. They’ll keep for up to 2 weeks. Thaw overnight in the refrigerator, then bake at 375°F for 10 minutes to restore crispness.
Best Reheating Method
To revive the dip’s golden crunch, preheat your oven to 375°F and bake the cups for 8–10 minutes. Add a splash of water to the bottom of the pan; the steam will help the filling stay moist while the phyllo stays crisp.