I still remember the first time I tried to make stained glass cookies for a holiday party. The kitchen was a warzone of melted sugar, shattered candy shards, and a lingering scent that smelled like a carnival after a rainstorm. My friends were skeptical, the oven timer was my only ally, and I was desperately trying not to set the whole house on fire while the batter turned into a sticky mess. By the end, I had a tray of dull, crumbly circles that looked more like sad doughnuts than the radiant, jewel‑like treats I’d imagined. That disaster sparked a fierce determination: I would crack the code and create the ultimate version that even a candy‑phobic aunt would adore.
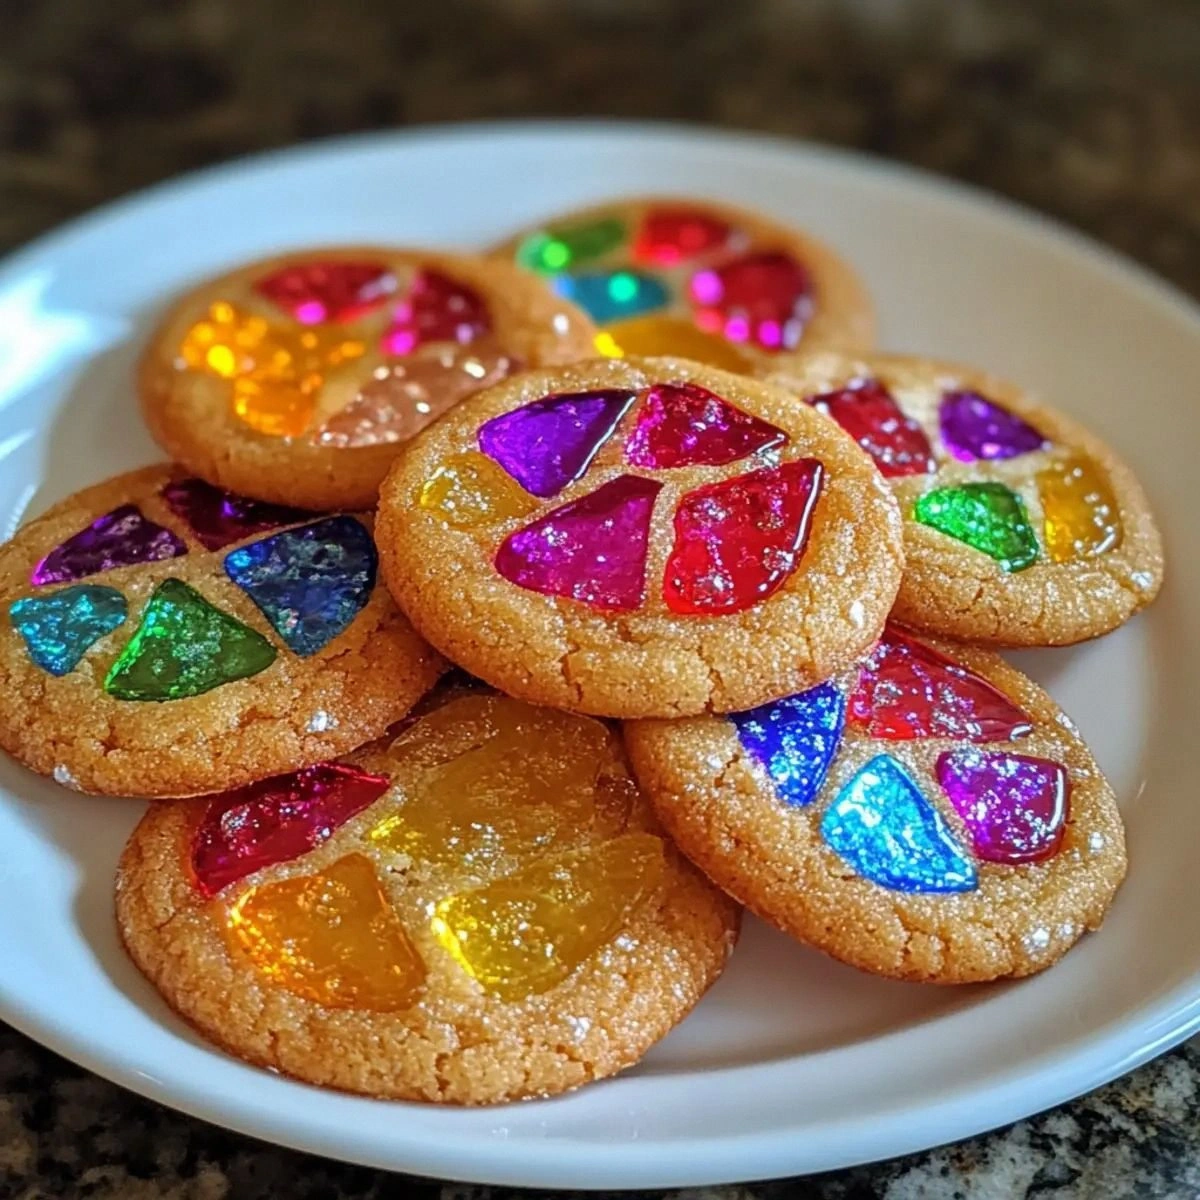
Fast forward a few weeks of trial, error, and a lot of late‑night YouTube tutorials, and I finally nailed it. Imagine a cookie that snaps cleanly at the edge, revealing a kaleidoscope of candy shards that glisten like sunrise on a frosted window. The dough is buttery enough to melt in your mouth, yet sturdy enough to hold the candy in place as it bakes. The aroma that fills the kitchen is an intoxicating blend of caramelized sugar, toasted butter, and a faint hint of vanilla that makes you want to hug the oven door. When you bite in, the outer crust crunches with a satisfying snap, and the interior bursts with sweet, molten candy that oozes like liquid fireworks.
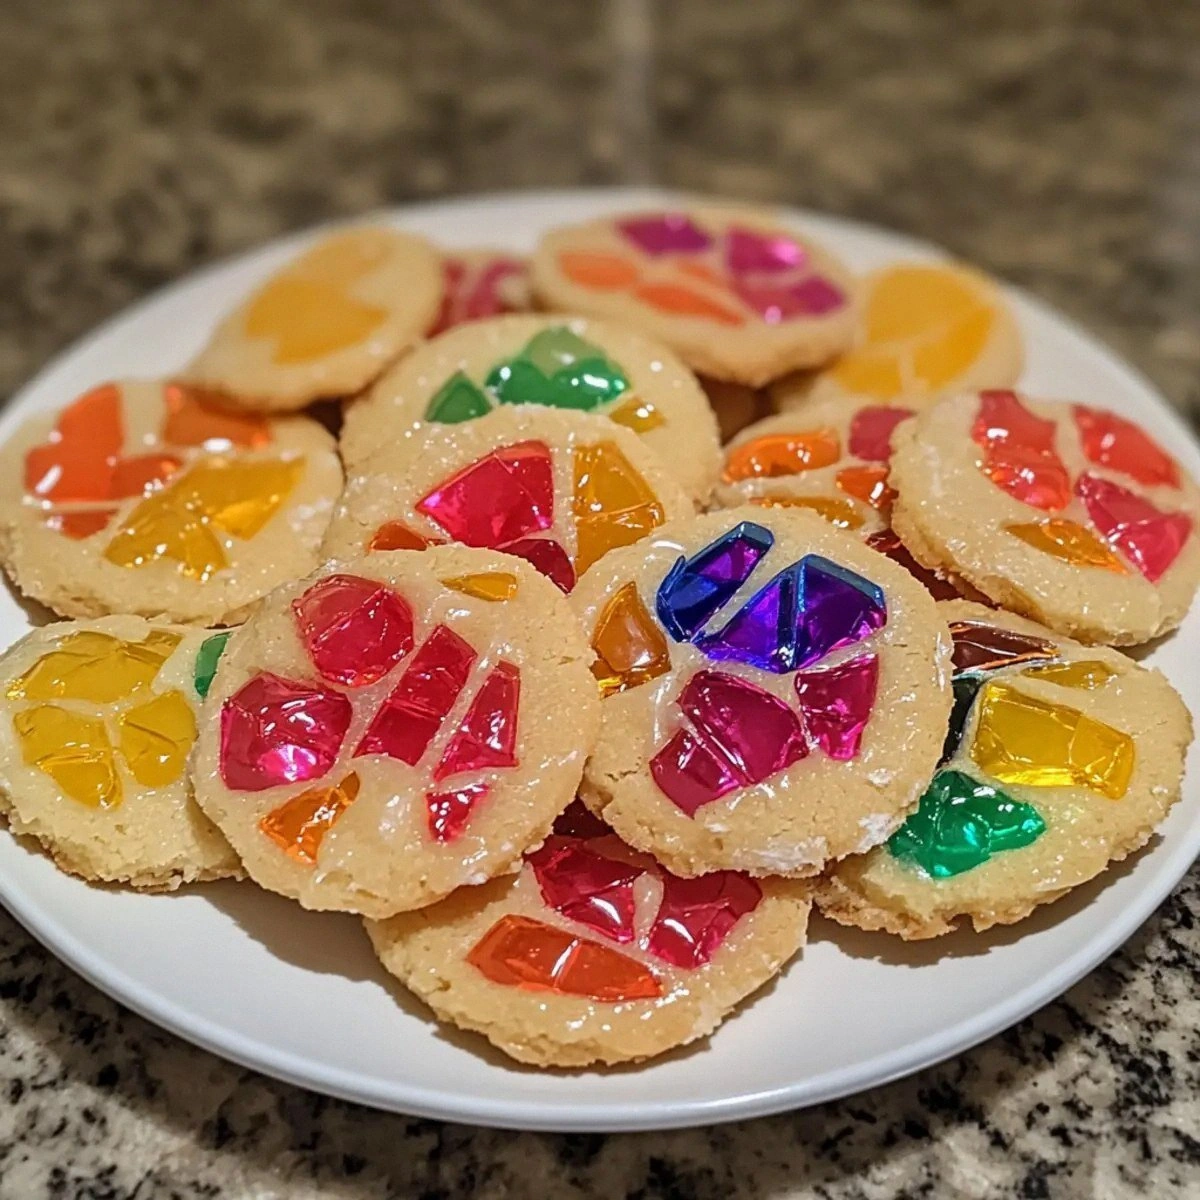
What makes this version truly stand out is a secret technique I discovered while watching a pastry chef crush hard candies with a rolling pin—an approach that distributes the candy evenly without turning the dough into a sugary paste. I also swapped regular butter for a slightly chilled, high‑fat variety, which creates a tender crumb while keeping the cookie from spreading too much. The result? A cookie that looks like a piece of stained glass, tastes like a carnival, and holds together like a well‑engineered piece of art. I dare you to taste this and not go back for seconds.
Let me walk you through every single step — by the end, you'll wonder how you ever made it any other way. Okay, ready for the game‑changer? This next part? Pure magic. Stay with me here — this is worth it.
What Makes This Version Stand Out
- Vibrant Color: The crushed hard candies melt just enough to create a glass‑like sheen while retaining distinct shards that catch the light, making each bite a visual treat.
- Balanced Sweetness: By using a modest amount of granulated sugar in the dough, the cookies stay sweet without being cloying, letting the candy’s flavor shine.
- Perfect Texture: A buttery, slightly crisp edge gives way to a soft, chewy center that holds the candy shards like a secret treasure.
- Simple Technique: No fancy equipment—just a rolling pin, a zip‑top bag, and a trusty oven. Most recipes get this completely wrong. Here’s what actually works.
- Crowd‑Pleaser: Guests often comment that the cookies look like miniature stained‑glass windows, and the taste makes them swoon—hand‑crafted art you can eat.
- Make‑Ahead Friendly: The dough can be chilled for up to 24 hours, and the baked cookies keep their sparkle for days, perfect for party prep.
- Ingredient Quality: Using real butter and premium hard candies elevates the flavor profile, turning a simple cookie into a gourmet experience.
Inside the Ingredient List
The Flavor Base
All‑Purpose Flour forms the structural backbone of the cookie, providing the necessary gluten network to hold the candy shards in place. Using a full‑cup measure ensures the dough isn’t too wet, which would cause the candy to sink and lose its dazzling effect. If you substitute with cake flour, expect a more delicate crumb but risk a softer edge that may not snap cleanly. For the best results, sift the flour once to aerate it and prevent clumps.
The Texture Crew
Butter is the star of the texture department. Its fat content creates a tender, melt‑in‑your‑mouth crumb while also helping the cookie spread just enough to showcase the candy. I recommend unsalted, high‑fat European‑style butter; its lower water content means a crisper edge. If you only have salted butter, reduce any added salt accordingly. The granulated sugar not only sweetens but also contributes to the caramelization that gives the cookie its golden hue.
The Unexpected Star
Crushed hard candies are the secret weapon that transforms an ordinary cookie into a stained‑glass masterpiece. Their sugar crystals melt at a higher temperature than regular sugar, creating those beautiful, glassy shards without turning the whole cookie into a candy pool. Feel free to experiment with different candy colors—peppermint, fruit drops, or even sour belts—to customize the palette. If you can’t find hard candies, try breaking up rock candy or using a mix of pastel M&Ms for a softer look.
The Final Flourish
Baking Soda is the leavening agent that gives the cookie a gentle rise, ensuring the interior stays soft while the edges become crisp. Too much soda can cause the cookies to spread excessively, losing the stained‑glass effect. One teaspoon is the sweet spot for a batch that holds its shape. Eggs act as a binder, adding richness and helping the dough achieve that perfect balance between chewiness and firmness. If you’re avoiding eggs, a tablespoon of unsweetened applesauce can substitute, though the texture will be slightly different.
Everything's prepped? Good. Let's get into the real action...
The Method — Step by Step
- Preheat your oven to 350°F (175°C) and line two baking sheets with parchment paper. While the oven warms, take a moment to inhale the buttery aroma that will soon fill the kitchen—this is the moment of truth, and it smells like a promise.
- In a large mixing bowl, whisk together the flour, baking soda, and a pinch of salt until fully combined. The dry mixture should look like a fine, uniform snow—this ensures even distribution of the leavening agent, preventing any bitter pockets.
- In a separate bowl, cream the chilled butter with the granulated sugar using a handheld mixer on medium speed. Keep an eye on the color; it should turn a pale, creamy yellow and the mixture will look fluffy, almost like clouds.
- Add the eggs one at a time, beating well after each addition. The batter should become glossy and smooth, a sign that the emulsification is spot on. If the mixture looks curdled, keep mixing—eventually it will come together.
- Gradually fold the dry ingredients into the wet mixture using a spatula. Scrape the sides of the bowl to ensure no flour pockets remain. The dough will be thick but pliable—don’t over‑mix, or you’ll develop too much gluten and lose that tender crumb.
- Place the crushed hard candies into a zip‑top bag and give them a gentle tap with a rolling pin until they’re roughly the size of tiny pebbles. You want a mix of sizes for visual interest; don’t pulverize them into powder.
- Gently fold the candy shards into the dough, being careful not to crush them further. The dough should now be speckled with colorful bits that will melt into stained‑glass windows as they bake. If the dough feels too sticky, chill it for 10 minutes before shaping.
- Using a tablespoon or a small ice‑cream scoop, portion out dough balls onto the prepared baking sheets, spacing them about 2 inches apart. Lightly press each ball flat with the back of a spoon to create a uniform thickness of about ¼ inch. This ensures even baking and a consistent glass‑like surface.
- Slide the trays into the oven and bake for 12‑15 minutes, or until the edges turn a light golden brown and the candy begins to melt and bubble. You’ll hear a faint crackle as the sugar caramelizes—That sizzle when it hits the pan? Absolute perfection.
- Remove the cookies and let them cool on the baking sheet for 5 minutes before transferring to a wire rack. As they set, the candy shards solidify into glossy, translucent pieces, creating that signature stained‑glass look. Picture yourself pulling this out of the oven, the whole kitchen smelling incredible...
That's it — you did it. But hold on, I've got a few more tricks that'll take this to another level. Trust me, the next batch will have you bragging at every gathering.
Insider Tricks for Flawless Results
The Temperature Rule Nobody Follows
Always start with a cold butter block and a cool dough. When the dough is chilled for at least 15 minutes before baking, the cookies spread less, preserving the intricate candy design. I once baked a batch straight from the counter and ended up with a melted mess—lesson learned. This tiny pause makes the difference between a polished window and a sugary puddle.
Why Your Nose Knows Best
Your sense of smell is a reliable cue for doneness. Around the 12‑minute mark, the kitchen will fill with a buttery caramel scent that signals the edges are just right. If you smell a sharp burnt odor, pull the trays immediately—over‑baking turns those beautiful shards into bitter glass.
The 5‑Minute Rest That Changes Everything
After baking, let the cookies rest on the sheet for exactly five minutes. This brief rest allows the candy to set fully, preventing cracks when you move them. I once tried to transfer them too early and ended up with shattered pieces, which was heartbreaking. Patience here pays off in flawless, intact stained‑glass windows.
The One‑Spoon Flip
If you want a uniform thickness, use the back of a spoon to flatten each dough ball to the same height. This ensures every cookie bakes evenly and the candy melts uniformly, creating a consistent visual effect. A friend tried to eyeball it and ended up with some cookies that were too thick and others too thin—uneven results.
The Secret of the Sugar‑Dust Finish
Lightly dust the finished cookies with a pinch of powdered sugar while they’re still warm. The fine sugar clings to the melted candy, adding a subtle sparkle that mimics stained glass leading. It’s a tiny step that elevates the presentation from good to show‑stopping.
Creative Twists and Variations
This recipe is a playground. Here are some of my favorite ways to switch things up:
Citrus Burst
Swap half of the hard candies for candied orange peel and a splash of lemon zest in the dough. The citrus notes cut through the sweetness, delivering a bright, festive flavor that pairs beautifully with holiday décor.
Chocolate‑Covered Delight
After the cookies have cooled, dip half of each one in melted dark chocolate and sprinkle with sea salt. The contrast of bitter chocolate and sweet candy creates a sophisticated taste that impresses even the most discerning palate.
Nutty Crunch
Fold in ½ cup of finely chopped toasted almonds or pistachios along with the candy shards. The nutty crunch adds texture depth and a subtle earthy flavor that balances the sugary glaze.
Spiced Holiday
Add ½ teaspoon of ground cinnamon and a pinch of ground nutmeg to the flour mixture. The warm spices give the cookies a cozy, wintery vibe—perfect for a Christmas gathering.
Vegan Velvet
Replace butter with coconut oil, use flaxseed eggs (2 tbsp ground flax + 6 tbsp water), and choose vegan hard candies. The result is a plant‑based version that still delivers that dazzling stained‑glass effect.
Mini Bite‑Size
Form the dough into petite 1‑inch balls and bake for 8‑10 minutes. These bite‑size wonders are perfect for cocktail parties, allowing guests to pop a few without committing to a full‑sized cookie.
Storing and Bringing It Back to Life
Fridge Storage
Place cooled cookies in an airtight container with a paper towel layer to absorb excess moisture. Store them in the refrigerator for up to one week. The chilled environment keeps the candy shards from melting, preserving their glass‑like appearance.
Freezer Friendly
For longer storage, arrange cookies in a single layer on a parchment‑lined tray and freeze for 2‑3 hours. Transfer them to a zip‑top freezer bag, removing as much air as possible. They’ll stay fresh for up to three months. When you’re ready to serve, let them thaw at room temperature for 15 minutes.
Best Reheating Method
To revive that fresh‑out‑of‑the‑oven sparkle, preheat the oven to 300°F (150°C), place cookies on a baking sheet, and add a tiny splash of water (about 1 tsp) to the sheet’s edge. The steam helps the candy re‑gloss, while the gentle heat restores the crisp edge. In just 5‑7 minutes, you’ll have cookies that taste like they just came out of the oven.