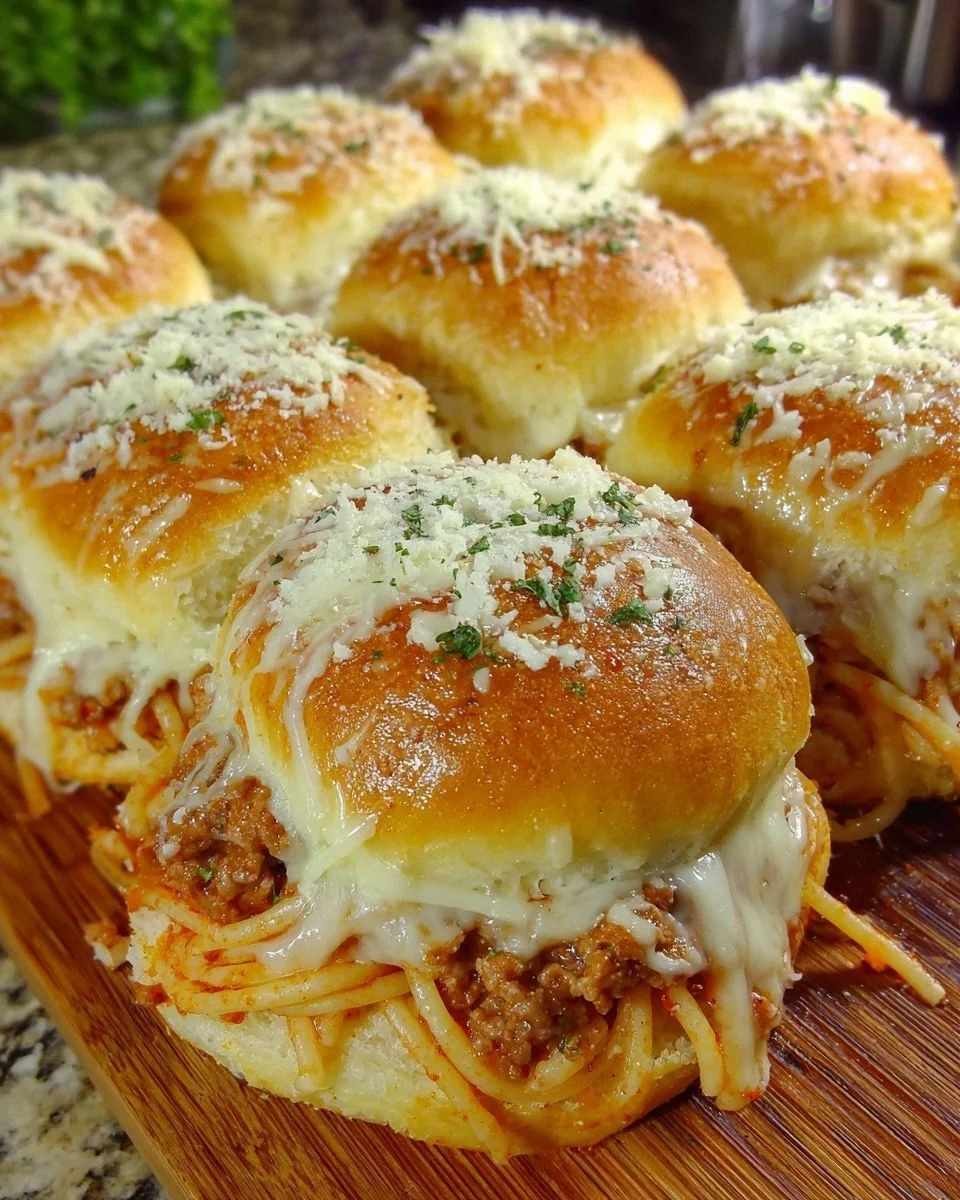
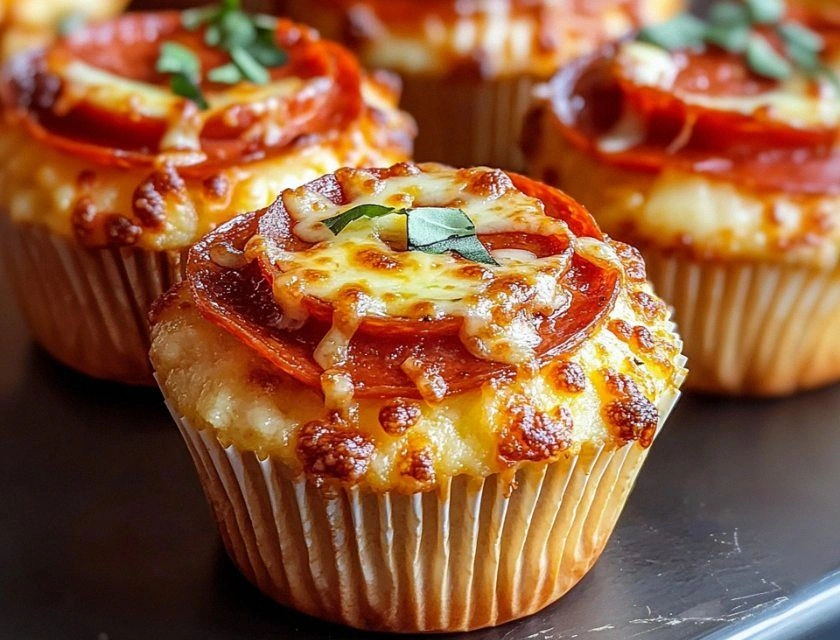
Picture this: it's 2 a.m. on a Tuesday, your pajamas are inside-out, and your roommate just dared you to create something that would "change the pizza game forever." I was standing in my cramped Chicago apartment, staring at a muffin tin and a half-eaten deep dish pizza, when the lightning bolt hit. What if I could capture that glorious cheese pull, that buttery crust, that mountain of toppings, but in a handheld cupcake form that wouldn't require a knife and fork? The first attempt looked like a crime scene, but the smell—oh, that smell—had my neighbors knocking on the door before the timer even buzzed.
Fast forward through three burned batches, one minor cheese explosion, and what my landlord still calls "the great tomato sauce incident," and here we are. These Deep Dish Pizza Cupcakes are everything you never knew you needed: crispy edges that shatter like thin ice, revealing molten cheese that stretches for days, all cradled in a golden crust that's somehow both tender and sturdy enough to hold its shape. I dare you to taste one and not go back for seconds—actually, I double-dog dare you, because I ate six in a row during recipe testing and I'm not even sorry.
The magic happens when you press the dough into muffin tins, creating these perfect little vessels that get impossibly crispy on the outside while staying pillowy inside. Most recipes get this completely wrong by using regular pizza dough, which turns tough and chewy. Here's what actually works: a hybrid dough that's part pizza, part biscuit, with a secret ingredient that keeps everything tender even after reheating. That sizzle when the cheese hits the hot pan? Absolute perfection.
What makes this version stand out from every other "pizza muffin" recipe cluttering the internet is the technique I stumbled upon after my fourth batch. Instead of just stuffing raw dough with toppings, we pre-bake the crust until it's partially set, then layer in our fillings like we're building mini lasagnas. The result? No soggy bottoms, no cheese leakage, just pure pizza perfection in cupcake form. Stay with me here—this is worth it.
What Makes This Version Stand Out
Cheese Strategy: We're using a three-cheese blend that melts into perfect layers—mozzarella for stretch, provolone for flavor, and a touch of Parmesan for those crispy edges that'll have you fighting over the last one. Most recipes just throw in shredded cheese and call it a day, but we're creating distinct melty pockets that stay gooey even after cooling.
Crust Innovation: The dough includes a secret ingredient—cream cheese—that keeps everything tender while still achieving that signature deep-dish crunch. Traditional recipes skip this and end up with hockey pucks by the time they're cool enough to eat.
Assembly Method: Instead of just dumping toppings into raw dough, we par-bake the crust first, then build layers like a savory parfait. This prevents the dreaded cheese tsunami that happens when you bite into most pizza cupcakes and everything slides out onto your shirt.
Flavor Bomb Base: The sauce isn't just jarred marinara—it's a concentrated reduction that clings to every surface like velvet, packed with garlic, oregano, and a touch of honey that balances the acidity. Most home cooks skip this step and wonder why their pizza tastes flat.
Make-Ahead Magic: These freeze beautifully and reheat in the air fryer for that just-baked texture. I make triple batches on Sundays and portion them out for emergency snacking situations—which, let's be honest, is every Tuesday through Thursday in my house.
Crowd Psychology: Serve these at a party and watch grown adults turn into competitive vultures. I've seen polite dinner parties devolve into finger-burning feeding frenzies because nobody wants to share the last cupcake. They're that good.
Texture Play: Each bite gives you four distinct textures—shattering crust edges, soft dough interior, stretchy cheese layers, and the pop of your chosen toppings. It's like a symphony of sensations that makes regular pizza seem boring by comparison.
Inside the Ingredient List
The Flavor Foundation
Let's talk dough, because this is where most recipes completely miss the mark. We're using bread flour for its higher protein content, which creates those beautiful gluten strands that give structure without toughness. The cream cheese isn't just for richness—it contains stabilizers that prevent the crust from becoming brittle during the high-heat baking. If you skip it, you'll get something that tastes like cardboard had a baby with a cracker. Not cute.
The olive oil in the dough serves dual purposes—it tenderizes the gluten and helps achieve that golden-brown color that makes people weak in the knees. Don't substitute with vegetable oil unless you want your kitchen to smell like a fast-food fryer. Trust me, I tried it once and my cat wouldn't come near me for three days.
The Cheese Trinity
Mozzarella gets all the glory, but provolone is the unsung hero here—it melts into this silky smoothness that mozzarella alone can't achieve. The Parmesan isn't just for sprinkling on top; we fold some into the dough for those irresistible umami bombs in every bite. Fresh mozzarella would seem fancy, but it releases too much moisture and turns your cupcakes into soup. Stick with the low-moisture version that comes in bricks, not the water-packed balls that seem sophisticated but will betray you every time.
Here's what happens if you try to cheap out and use pre-shredded cheese: the anti-caking agents prevent proper melting, leaving you with a gritty, separated mess that tastes like disappointment and broken dreams. Buy the blocks and shred yourself—your future self will thank you when you're pulling apart that perfect cheese stretch for Instagram.
The Sauce Situation
Canned San Marzano tomatoes aren't just food blogger snobbery—they're actually less acidic than regular canned tomatoes, which means you don't need to add sugar to balance the sauce. The garlic gets micro-planed so it dissolves completely into the sauce, no weird chunks to bite into. Oregano might seem basic, but combined with a touch of fennel seed, it creates that authentic pizzeria flavor that'll have people asking if you ordered delivery from the good place.
The honey isn't about sweetness—it's about rounding out the harsh edges that develop when tomatoes cook down. Skip it and your sauce will taste sharp, like it has something to prove. We're making comfort food here, not entering a sourness competition.
The Unexpected Game-Changers
Cornmeal on the bottom of each cup isn't traditional, but it creates this incredible textural contrast and prevents sticking without using excess oil. A touch of honey in the dough helps with browning and adds subtle complexity that makes people ask "what's your secret?" The egg wash isn't just for looks—it creates a barrier that keeps the sauce from soaking into the crust, maintaining that crucial crunch factor.
Fresh basil gets added after baking because heat destroys its delicate flavor compounds. Dried basil would be a crime against humanity here—don't do it unless you want your house to smell like a pizza-themed candle from the dollar store.
The Method — Step by Step
- Start by blooming your yeast in warm water that's exactly 110°F—too hot and you'll murder the poor microorganisms, too cold and they'll sulk and refuse to work. Add a pinch of sugar to give them a little snack; happy yeast makes fluffy dough. Whisk it gently and let it sit until it looks like a foamy beer head, about 5 minutes. If nothing happens, your yeast is dead and you need to start over—don't try to power through with dead yeast unless you enjoy eating frisbees.
- While the yeast gets its party started, whisk together your flour, salt, and a touch of sugar in a large bowl. The salt goes on the opposite side from where you'll add the yeast mixture because direct contact can shock the yeast into submission. Make a well in the center like you're creating a flour volcano, then pour in the foamy yeast mixture along with the olive oil and softened cream cheese. Use a wooden spoon to bring it together until it forms a shaggy mass that looks like it could use a hug.
- Now comes the therapeutic part—kneading. Turn the dough onto a lightly floured surface and knead for 8-10 minutes until it becomes smooth and elastic. It'll go through an ugly phase where it looks like brain matter, but keep going. The dough is ready when you can stretch a small piece thin enough to see light through without it tearing immediately. This is called the windowpane test, and passing it means you've developed enough gluten to support all that cheesy goodness.
- Form the dough into a ball and place it in an oiled bowl, turning once to coat. Cover with plastic wrap and let rise in a warm spot until doubled, about 1 to 1.5 hours. I like to put it in my oven with the light on—it creates just enough warmth without being too hot. Don't rush this step; good things come to those who wait, and rushing the rise leads to dense, sad cupcakes that nobody wants to eat.
- While the dough rises, make your sauce. Heat olive oil in a saucepan over medium heat until it shimmers like a mirage. Add the micro-planed garlic and cook just until fragrant—about 30 seconds—then immediately pour in your crushed tomatoes. Add the oregano, fennel, honey, and a pinch of salt. Let it simmer gently until reduced by half, stirring occasionally. It should coat the back of a spoon like liquid velvet. This takes about 20-25 minutes, so don't wander off and start scrolling social media or you'll end up with tomato paste.
- Punch down the risen dough (this is surprisingly satisfying) and divide it into 12 equal pieces. Grease your muffin tin well with butter or spray, then dust each cup with cornmeal—tap out the excess. Take each piece of dough and press it into a cup, working it up the sides until it forms a little dough bowl. The dough should come up about three-quarters of the way. If it keeps springing back, let it rest for 5 minutes to relax the gluten, then continue.
- Here's the game-changer: par-bake the crusts at 400°F for 8 minutes. They should look set but not browned. This step is crucial—it prevents the dreaded soggy bottom and gives you that crispy edge that makes people close their eyes when they bite into it. Watch them closely; they go from perfect to over-browned faster than you can say "pizza."
- Now build your masterpieces. Start with a sprinkle of mozzarella, add a spoonful of sauce (don't drown them), then more cheese, then your toppings, finishing with a final cheese blanket. Press everything down gently—think tucking in a baby, not squashing a bug. Overfill them and you'll have cheese volcanoes erupting in your oven, which sounds fun until you're scraping burnt cheese off the heating elements.
- Bake at 400°F for 15-18 minutes until the cheese is bubbling and the edges are golden brown. The smell will drive you insane—resist opening the oven door too early or they'll collapse. When they're done, let them cool for 5 minutes in the pan. This rest is crucial; it lets the cheese set slightly so you can remove them without everything falling apart. Run a small knife around the edges to loosen, then pop them out onto a serving platter.
- Finish with fresh basil and a drizzle of good olive oil. Serve immediately while the cheese is still stretchy and the crust is crisp. If you need to reheat them later, the air fryer at 350°F for 3-4 minutes brings back that just-baked texture better than anything else. Microwave at your own risk—they'll get rubbery and sad, and nobody wants sad pizza cupcakes.
Insider Tricks for Flawless Results
The Temperature Rule Nobody Follows
Your ingredients should be at room temperature before you start—especially the cream cheese and eggs. Cold cream cheese won't incorporate properly and leaves little nuggets of white in your dough that look like mini marshmallows but taste like disappointment. I learned this the hard way when I tried to rush through a batch for a football party and ended up with what my friends still call "polka dot pizza cupcakes."
The water for blooming yeast needs to feel like warm bath water—not hot, not tepid. If you wouldn't put a baby in it, it's too hot. If you can't feel any warmth on your wrist, it's too cold. This isn't the place to wing it; yeast is pickier than a toddler at dinnertime.
Why Your Nose Knows Best
The sauce is done when it goes from smelling bright and acidic to rich and complex. It's like the tomatoes went from being teenagers to sophisticated adults who know what they want. This transformation usually happens around the 20-minute mark, but trust your nose over the clock. If it still smells sharp and tomato-y, keep going. If it starts to smell slightly caramelized and you want to eat it with a spoon, you're there.
The same goes for the baking stage. When your kitchen starts smelling like a Chicago pizzeria and neighbors start "casually" walking past your door, they're probably done. The smell is your most reliable timer—ovens vary, but noses are pretty consistent.
The 5-Minute Rest That Changes Everything
After baking, let them rest in the pan for exactly 5 minutes—not 3, not 7. Too short and they'll fall apart when you remove them. Too long and they'll start steaming themselves soggy. Set a timer and use those minutes to clear counter space, grab serving plates, and mentally prepare yourself for the cheese pull photoshoot that's about to happen.
This rest also lets the cheese settle slightly, so when you do break them open, you get that Instagram-worthy stretch instead of a cheese avalanche. A friend tried skipping this step once—let's just say it didn't end well, and her white shirt became a permanent reminder about patience.
The Cheese Layering Secret
Always start and end with cheese. The bottom layer creates a barrier that prevents the sauce from soaking into the crust, while the top layer browns beautifully and holds everything together. Think of cheese as both the foundation and the roof of your pizza cupcake house. Skip either layer and you'll end up with structural failures that would make an engineer weep.
Don't overdo it with the cheese between layers—you want enough to create that melty factor, but too much and it becomes a greasy mess. About a tablespoon per layer is perfect; resist the urge to make it rain cheese like you're trying to impress someone on a cooking show.
The Fresh vs. Dried Herb Timing
Fresh herbs go on after baking, dried herbs go into the sauce. Fresh herbs lose their vibrancy when cooked, while dried herbs need heat to release their essential oils. This isn't the time to get creative and switch them around unless you enjoy eating expensive nothing-flavored leaves. I once added fresh oregano to the sauce and it tasted like I'd accidentally dropped in some lawn clippings.
Chiffonade your basil by stacking leaves, rolling them like a cigar, and slicing thinly. This creates those beautiful green ribbons that make people think you went to culinary school when really you just learned it from a YouTube video at 3 a.m.
The Reheat Revolution
Never microwave these babies unless you enjoy rubbery crust and separated cheese. The air fryer is your best friend for reheating—350°F for 3-4 minutes and they're almost better than fresh. No air fryer? A 400°F oven for 8-10 minutes works too. Add a small piece of bread to the container when storing in the fridge; it absorbs excess moisture and keeps your crust from getting soggy.
If you're freezing them, wrap each cooled cupcake individually in plastic wrap, then foil. They'll keep for up to 3 months, though they've never lasted more than a week in my house. To reheat from frozen, don't thaw—just add 2-3 extra minutes to the air fryer time. They're like pizza ice cubes that transform into hot deliciousness.
Creative Twists and Variations
This recipe is a playground. Here are some of my favorite ways to switch things up:
The Breakfast Bomb
Swap the marinara for sausage gravy, add crumbled breakfast sausage and scrambled eggs, top with cheddar and chives. Serve these at brunch and watch people lose their minds. The runny yolk center when you break them open? Pure breakfast sorcery. Pro tip: undercook the scrambled eggs slightly since they'll continue cooking in the oven.
The Buffalo Chicken Blaze
Replace sauce with buffalo wing sauce, add shredded chicken tossed in more buffalo sauce, finish with blue cheese crumbles and celery seed. These disappear faster than free samples at Costco. The contrast between the spicy chicken and cooling blue cheese creates that perfect balance that makes you reach for just one more. I'll be honest—I ate half the batch before anyone else got to try it.
The Veggie Supreme
Load them up with roasted vegetables—zucchini, bell peppers, mushrooms, artichoke hearts. The key is roasting the veggies first to remove excess moisture. Add goat cheese with the mozzarella for tang, and finish with balsamic glaze. Even carnivores devour these. The caramelized vegetables create deep, complex flavors that make you forget there's no meat.
The Hawaiian Hurricane
Controversial but irresistible—pineapple, ham, and a touch of jalapeño for heat. The sweet and spicy combo is addictive. Use fresh pineapple if possible; canned is too wet and makes everything soggy. The jalapeño isn't optional—it cuts through the sweetness and adds complexity that takes this from "why would you" to "oh, I get it now."
The White Pizza Wonder
Skip the tomato sauce entirely. Use ricotta mixed with garlic and herbs as your base, add mozzarella, provolone, and finish with spinach and artichoke hearts. It's like your favorite white pizza and spinach-artichoke dip had a beautiful baby. These are dangerously good cold out of the fridge at midnight.
The BBQ Beast
Replace marinara with your favorite BBQ sauce, add pulled pork or chicken, red onions, and finish with cilantro. The sweet-smoky combination is summer in cupcake form. Use a tangy BBQ sauce to balance the richness of the cheese. These are what you make when you want to impress people at a potluck but still want them to think you're casually cool about it.
Storing and Bringing It Back to Life
Fridge Storage
Store cooled cupcakes in an airtight container with a paper towel on top to absorb moisture. They'll keep for up to 4 days in the refrigerator, though they're best within the first 48 hours. Layer them between parchment paper if you're stacking them—nobody wants to chisel apart conjoined pizza twins. The key is letting them cool completely before storing; trapping warm cupcakes creates condensation, which is the enemy of crispy crust.
Freezer Friendly
These freeze beautifully for up to 3 months. Wrap each cooled cupcake individually in plastic wrap, then aluminum foil. Label them with the date because future you will forget what they are and mistake them for mysterious savory muffins. Freeze them on a baking sheet first, then transfer to a freezer bag—this prevents them from getting squished into weird shapes that won't fit in your air fryer later.
Best Reheating Method
Air fryer is king—350°F for 3-4 minutes from the fridge, 5-6 minutes from frozen. No air fryer? A 400°F oven works too—8-10 minutes for refrigerated, 12-15 for frozen. Add a tiny splash of water to the container before reheating; it creates steam that brings back the fresh-baked texture. The microwave is only acceptable if you're desperate and don't mind rubbery crust—sometimes needs must, but don't tell anyone I said that.