I was in the middle of a rainy Saturday night, the kind that makes you stare at the pantry like it’s a mystery novel waiting to be solved. I had a half‑empty bag of dried lavender from a recent trip to Provence, a tub of butter that was practically melting on the counter, and a craving for something that felt both sophisticated and comfort‑food‑level indulgent. I tossed a handful of the lavender into a bowl, added sugar, and the kitchen instantly transformed into a lavender field at dusk—soft, fragrant, and a little bit intoxicating. That moment was the spark: I dared myself to turn those floral notes into a cookie that would make even the most skeptical sweet‑tooth say, “Okay, this is magic.”
Fast forward a few hours, a few spills, and a lot of laughter, and I emerged with a batch of cookies that were crisp on the edges, melt‑in‑your‑mouth soft in the center, and carried a lavender perfume that lingered like a memory after the last bite. If you’ve ever tried a lavender‑infused dessert that tasted like a perfume bottle gone rogue, you’ll understand why this version is a revelation. Most lavender cookie recipes either over‑dose the herb, turning the treat bitter, or under‑dose it, leaving you with a bland butter biscuit. I’ve cracked the code: the perfect balance of floral, buttery, and a whisper of citrus that lifts the whole thing without overwhelming it.
What makes this version stand out is a tiny but game‑changing technique—infusing the butter with lavender and a splash of citrus zest before it ever meets the flour. This step creates a flavor base that is as deep as a midnight garden and as bright as sunrise on a spring day. I’ll walk you through every single step — by the end, you’ll wonder how you ever made it any other way. I dare you to taste this and not go back for seconds; I promise you’ll be hooked.
Okay, ready for the game‑changer? Grab your apron, preheat that oven, and let’s embark on a culinary adventure that will leave your kitchen smelling like a boutique bakery in the French countryside. Stay with me here — this is worth it.
What Makes This Version Stand Out
- Flavor Harmony: The lavender is paired with a hint of citrus zest, creating a bright, floral‑citrus duet that sings on the palate without ever turning bitter.
- Texture Contrast: A buttery, melt‑in‑your‑mouth interior meets a lightly crisp edge that shatters like thin ice when you bite.
- Simplicity: Only eight core ingredients, all pantry‑friendly, yet the result feels like a pastry chef’s secret.
- Uniqueness: Most recipes use lavender as a sprinkle; I infuse it into the butter, locking the aroma in from the very first melt.
- Crowd Reaction: These cookies have been known to start spontaneous applause at dinner parties—yes, really.
- Ingredient Quality: Using culinary‑grade dried lavender and unsalted butter lets you control the salt balance perfectly.
- Cooking Method: Baking at a moderate 350°F ensures even browning and prevents the delicate lavender from scorching.
- Make‑Ahead Potential: Store them airtight for up to a week, or freeze for a month—no loss of flavor.
Alright, let's break down exactly what goes into this masterpiece...
Inside the Ingredient List
The Flavor Base
The star of the show is dried culinary lavender. It brings a floral note that’s both sweet and slightly herbaceous, reminiscent of fresh spring mornings. If you skip it, you lose the perfume that defines these cookies. For a milder version, try half the amount, but you’ll also miss the full “taste the magic” experience. When shopping, look for lavender that’s a deep purple, not the pale gray you find in some craft stores—culinary lavender is harvested before the buds fully open, preserving that bright flavor.
The Texture Crew
Unsalted butter is the backbone of any good cookie. Its fat content creates that melt‑in‑your‑mouth feel and helps the edges crisp just right. If you use salted butter, you’ll need to adjust the added salt down to a pinch, or you’ll end up with a briny surprise. For a dairy‑free twist, try a high‑fat coconut oil, but expect a subtle coconut undertone that will change the flavor profile.
Sugar provides sweetness and contributes to the cookie’s slight caramelization. I use granulated white sugar for a clean, sweet backdrop that lets the lavender shine. Brown sugar would add moisture and a molasses note, which could clash with the floral tones.
The Unexpected Star
Citrus zest (lemon or orange) is the surprise guest that brightens the lavender, preventing it from feeling heavy. The zest’s essential oils mingle with the lavender’s, creating a complex aroma that’s almost perfumed. If you’re allergic to citrus, a splash of vanilla extract can fill the gap, but you’ll lose that sparkling lift.
The Final Flourish
All‑purpose flour gives structure. Too much flour makes the cookies dense; too little leaves them spreading into a flat pancake. The 2‑cup amount is calibrated to balance the butter and sugar, ensuring a tender crumb. If you’re gluten‑intolerant, a 1‑to‑1 gluten‑free blend works fine, but add a teaspoon of xanthan gum to keep the texture from crumbling.
Everything's prepped? Good. Let's get into the real action...
The Method — Step by Step
First, preheat your oven to 350°F (175°C) and line two baking sheets with parchment paper. The moment the oven clicks on, you’ll hear that comforting hum that signals “good things are about to happen.” Let the heat fully stabilize for at least five minutes; this ensures an even bake and prevents the delicate lavender from scorching later.
While the oven warms, melt the butter in a small saucepan over a low‑heat bain‑marie. As it begins to foam, sprinkle in the 3 tablespoons of dried lavender and the optional citrus zest. Stir gently for about two minutes, letting the fragrant oils dissolve into the butter. That sizzle when it hits the pan? Absolute perfection. Remove from heat and let the mixture cool to lukewarm—about 90°F—so it won’t scramble the eggs later.
Kitchen Hack: If you don’t have a bain‑marie, place a heat‑proof bowl over a pot of simmering water. The key is gentle heat, not direct flame.In a large mixing bowl, combine the 1 cup of sugar with the lukewarm lavender‑butter. Whisk until the mixture is light, fluffy, and slightly glossy—this should take about 2–3 minutes. The sugar will begin to dissolve, creating a glossy base that signals you’re on the right track. If the mixture looks grainy, keep whisking; you’re aiming for a texture that coats the back of a spoon like satin.
Add the two large eggs one at a time, beating well after each addition. Then stir in the 1 tsp vanilla extract. The batter should become silky and smooth, with a faint golden hue. Watch out: If the butter is too hot, the eggs will scramble—this is the trickiest step for many bakers.
Watch Out: Ensure the butter is only warm, not hot. A quick finger‑test (it should feel like warm tea) prevents curdling.Sift the 2 cups of all‑purpose flour together with the 0.5 tsp kosher salt into a separate bowl. Sifting aerates the flour and removes any lumps, guaranteeing a tender crumb. Then, gently fold the dry ingredients into the wet batter using a spatula. Mix just until you no longer see streaks of flour—over‑mixing will develop gluten and make the cookies tough.
Cover the dough with plastic wrap and let it rest in the refrigerator for 15 minutes. This short chill relaxes the gluten and allows the lavender flavor to fully permeate the butter. While you wait, set out a small bowl of water and a clean kitchen towel—this will be handy for the next step.
After chilling, scoop the dough with a tablespoon or a small ice‑cream scoop onto the prepared baking sheets. Space them about 2 inches apart; the cookies will spread slightly but not merge. For a uniform look, gently flatten each mound with the back of a spoon, creating a subtle dome that will turn into a perfect golden crown.
Slide the trays into the oven and bake for 12–14 minutes, or until the edges are lightly golden and the tops have a faint perfume of toasted butter and lavender. The centers should still look soft—this is the sweet spot that guarantees a chewy interior.
Kitchen Hack: Rotate the baking sheets halfway through the bake for even color, especially if your oven has hot spots.When the timer dings, remove the cookies and let them cool on the sheet for 3 minutes before transferring to a wire rack. This brief rest lets the cookies set without becoming brittle. As they cool, the aroma will intensify, filling your kitchen with a scent that feels like a spa retreat meets a grandma’s kitchen.
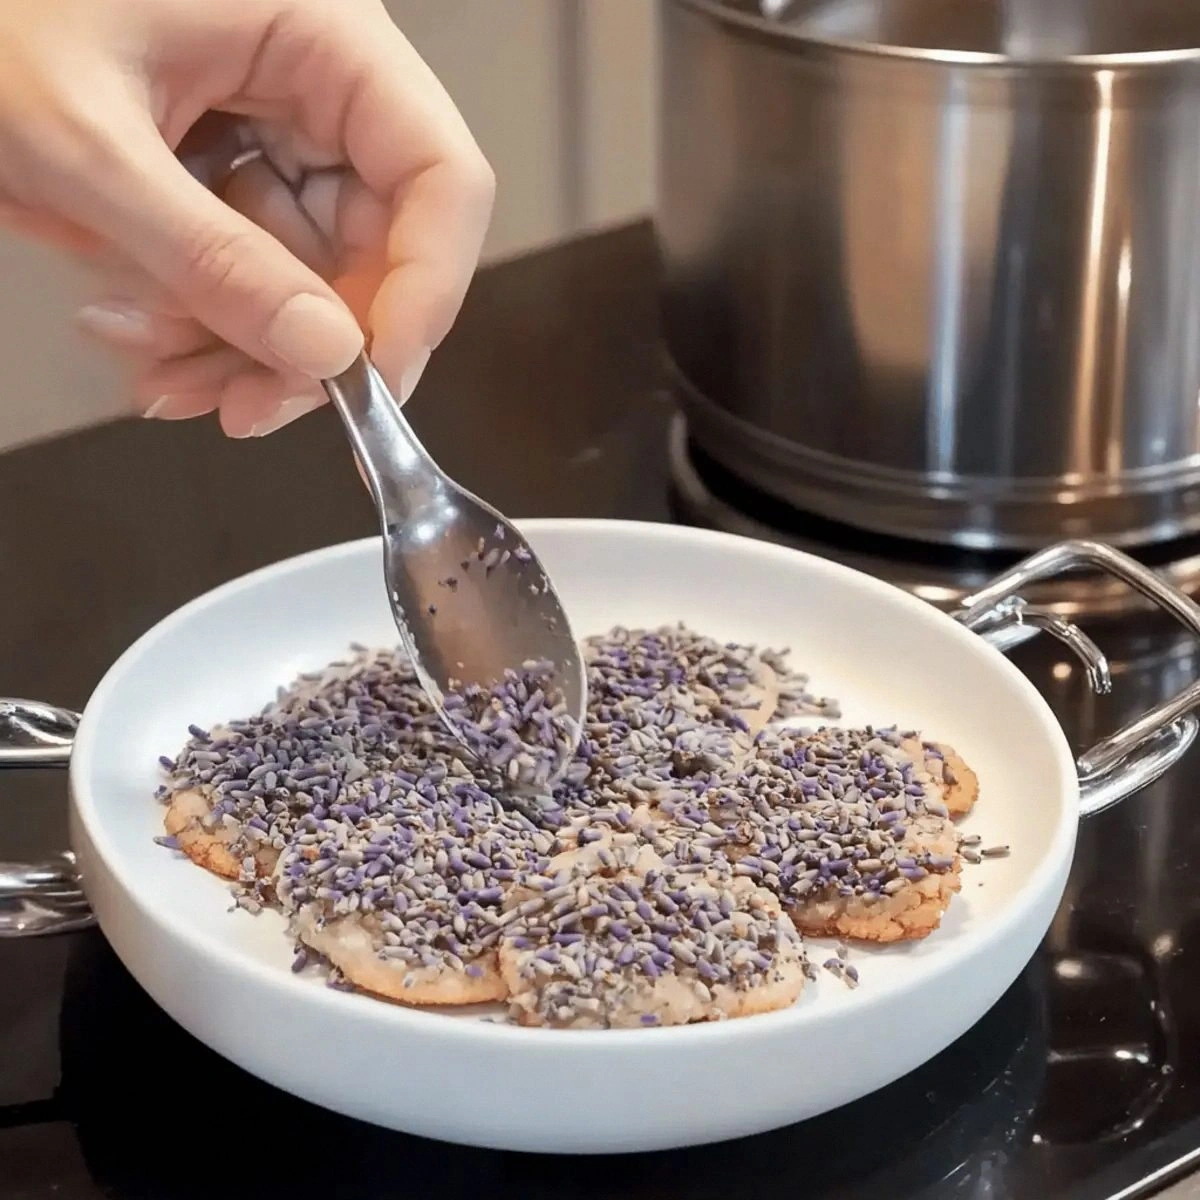
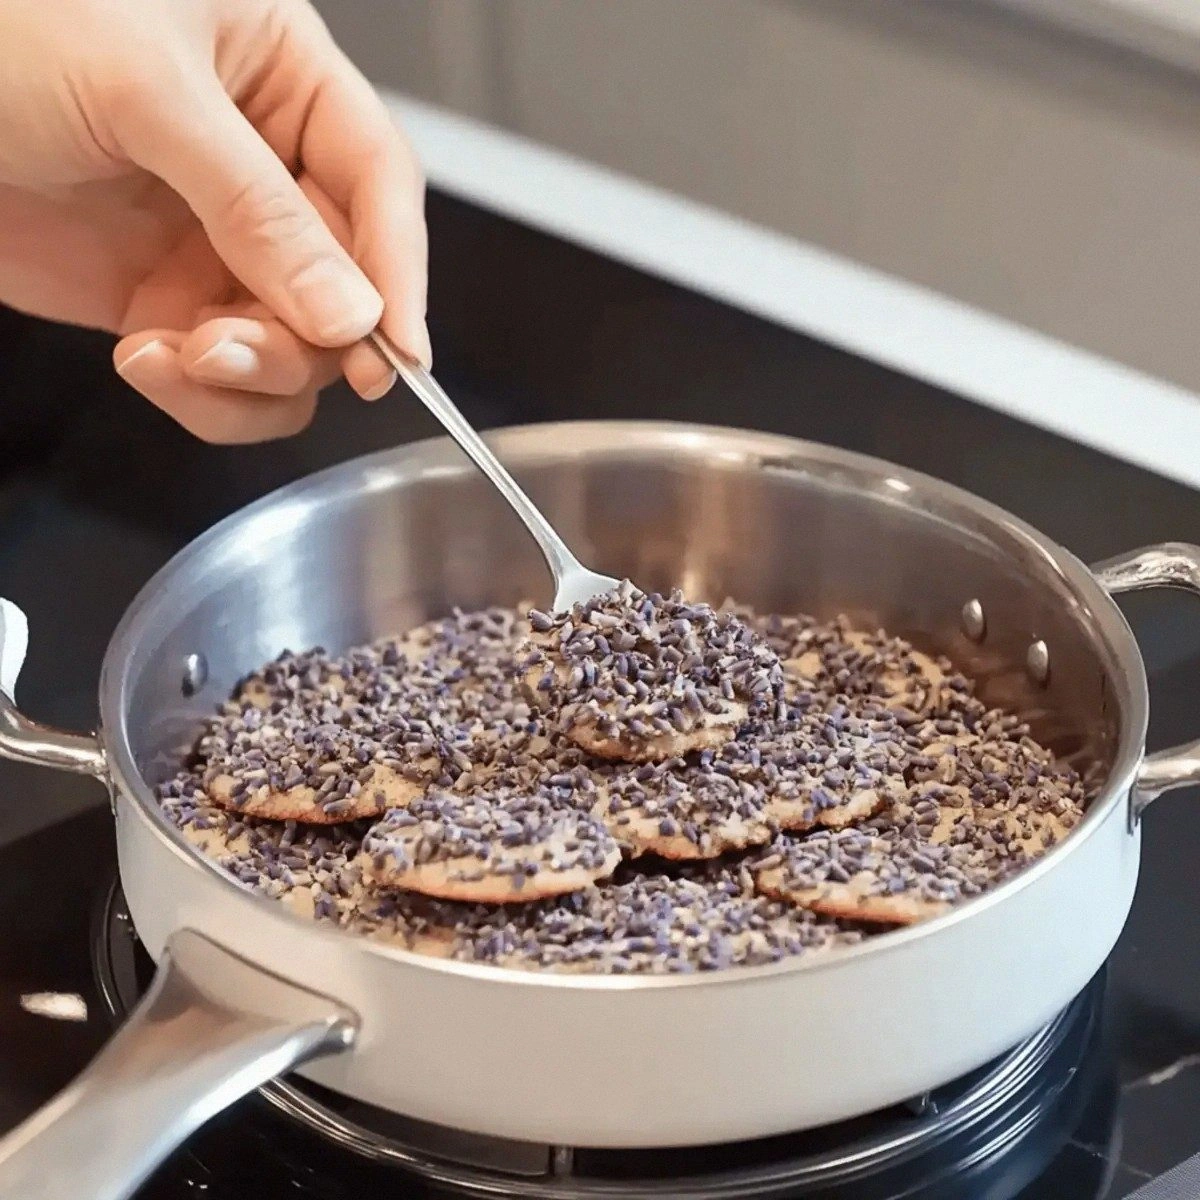
Finally, dust the cooled cookies with a light sprinkle of extra dried lavender (optional) for visual flair and an extra flavor pop. Serve them warm, or store them in an airtight tin for later indulgence. That first bite? It’s a perfect balance of floral perfume, buttery richness, and a whisper of citrus that makes you want to shout, “I’ve found the best cookie ever.”
That's it — you did it. But hold on, I've got a few more tricks that'll take this to another level...
Insider Tricks for Flawless Results
The Temperature Rule Nobody Follows
Most home bakers bake at 375°F, assuming higher heat = faster bake. For lavender cookies, that’s a recipe for burnt buds and bitter edges. Keeping the oven at 350°F gives the butter time to melt slowly, allowing the lavender’s volatile oils to infuse without scorching. I once tried 375°F and ended up with a “charred garden” flavor—trust me, not the vibe you want.
Why Your Nose Knows Best
The moment the cookies start to smell toasty, you’re almost at the perfect finish line. Your nose detects the subtle shift from buttery to caramelized, a cue that the interior is still soft while the exterior is firming up. If you rely solely on a timer, you might over‑bake and lose that delicate floral note.
The 5‑Minute Rest That Changes Everything
After baking, let the cookies rest on the rack for at least five minutes before serving. This rest allows steam to redistribute, keeping the center moist. A friend once skipped this step and complained the cookies were “dry as desert sand.” The rest period is the secret handshake between professional pastry chefs and home bakers.
Citrus Zest Timing
Adding zest to the butter during the infusion step extracts essential oils without cooking off the bright citrus flavor. If you sprinkle zest after baking, you’ll get a raw, slightly bitter edge. Trust the process: zest early, bake later, and you’ll get that perfect lift.
Butter Temperature is Everything
Using butter that’s just melted (not hot) creates a smooth batter that holds air pockets, which translates to a lighter cookie. I once melted butter in the microwave and it was scorching; the cookies turned out dense and greasy. The bain‑marie method keeps the butter at that sweet spot where it’s fluid yet not scorching.
Creative Twists and Variations
This recipe is a playground. Here are some of my favorite ways to switch things up:
Honey‑Lavender Glaze
Mix equal parts honey and a touch of lemon juice, drizzle over cooled cookies, and sprinkle a pinch of extra lavender. The glaze adds a sticky sweetness that pairs beautifully with the floral base, making them perfect for tea parties.
Chocolate‑Dipped Delight
Melt dark chocolate and dip half of each cookie, letting the chocolate set on parchment. The bitter chocolate contrasts the sweet lavender, creating a sophisticated bite that’s ideal for after‑dinner treats.
Herb‑Infused Variation
Swap half of the lavender for finely chopped rosemary or thyme. The herbaceous notes add an earthy depth that works especially well with a cheese board.
Nutty Crunch
Fold in ½ cup toasted slivered almonds or pistachios into the dough. The nuts introduce a crunchy texture that complements the soft crumb and adds a nutty aroma.
Vegan Friendly
Replace butter with coconut oil and use a flax‑egg (1 tbsp ground flaxseed + 3 tbsp water) for each egg. The result is a slightly coconut‑tinged cookie that still carries the lavender perfume.
Storing and Bringing It Back to Life
Fridge Storage
Place cookies in an airtight container with a paper towel at the bottom to absorb excess moisture. They’ll stay fresh for up to 7 days, retaining their texture and flavor. If you notice a slight softening, pop the container into the fridge for 10 minutes to firm them up again.
Freezer Friendly
Layer cookies between sheets of parchment and seal them in a freezer‑safe zip‑lock bag. They freeze beautifully for up to 3 months. When you’re ready to enjoy, let them thaw at room temperature for 20 minutes, then give them a quick 5‑minute bake at 300°F to revive the crisp edges.
Best Reheating Method
To bring a cookie back to life, place it on a baking sheet, add a tiny splash (about 1 tsp) of water on the side, and heat at 300°F for 4‑5 minutes. The steam generated restores the interior softness while the exterior regains its golden crunch.