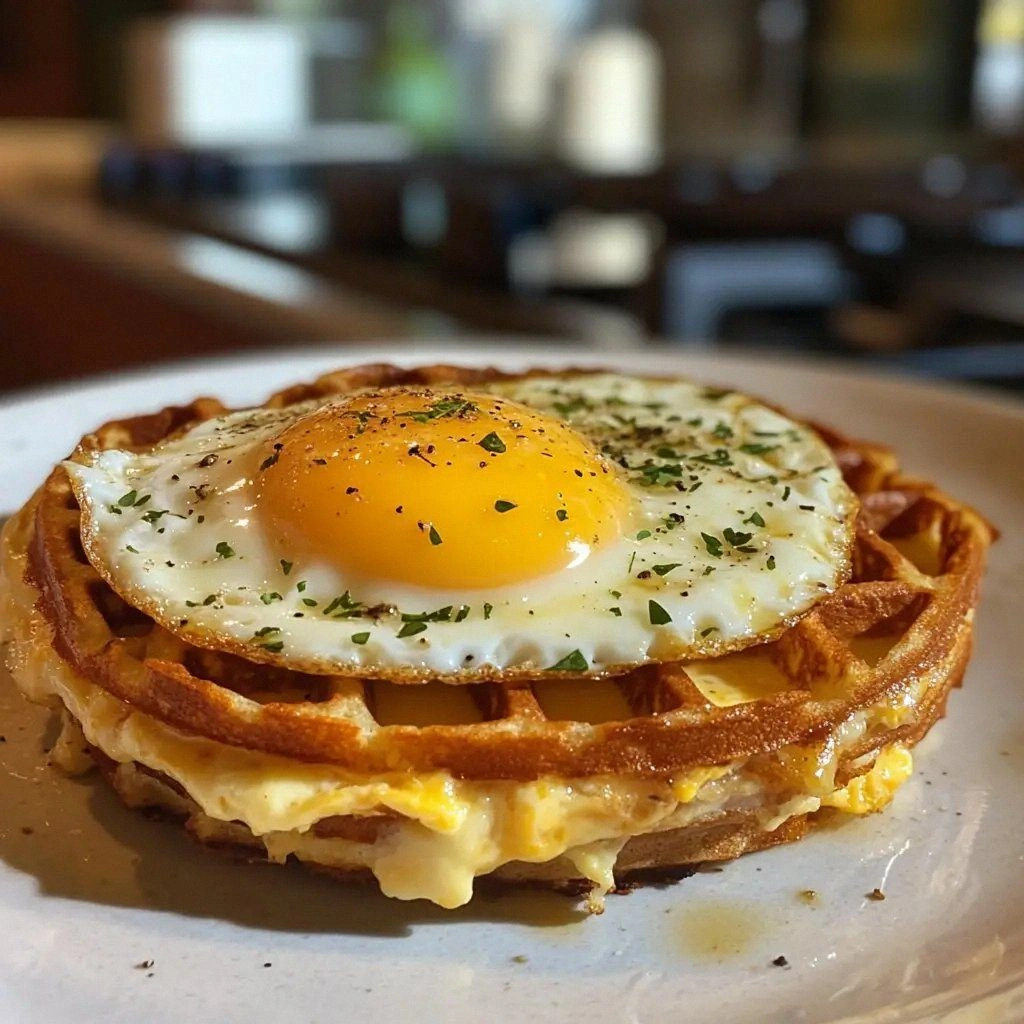
I was halfway through a midnight snack, eyes glued to the fridge, when the inevitable happened: the cheese container slipped from my grip, splattering like a white snowstorm across the counter. The panic that followed was a symphony of sizzling pans and the faint smell of burnt toast. In that chaotic moment, a friend dared me to make something delicious out of nothing but an egg and a handful of shredded cheese. I stared at the empty pantry and thought, “If I can survive a cheese disaster, I can definitely survive this.” That dare turned into a culinary epiphany that would change my low‑carb breakfast game forever.
The kitchen smelled of anticipation, the air thick with the promise of melted cheese. My eyes were drawn to the glossy surface of the beaten egg, a golden canvas waiting for its first brushstroke. The faint hum of the oven preheating felt like a drumbeat, counting down to the moment when the chaffle would rise. The sound of the whisk slicing through the mixture was a gentle, rhythmic lullaby that made my heart race with excitement. As I poured the batter onto the hot pan, the sizzle that erupted was a burst of applause, announcing the birth of a new breakfast legend.
This isn’t just another low‑carb pancake; it’s a revolution in texture, flavor, and convenience. The result is a golden, airy exterior that cracks like brittle ice, giving way to a molten, cheese‑laden center that feels like a warm hug. What sets this version apart is the simple yet genius technique of letting the batter rest for a few minutes, allowing the cheese to fully integrate and the egg to thicken without over‑cooking. I dare you to taste this and not go back for seconds. And if you’ve ever struggled with bland low‑carb breakfasts, you’re not alone — this is hands down the best version you'll ever make at home.
Picture yourself pulling this from the oven, the whole kitchen smelling incredible, and the timer buzzing like a satisfied drum. The edges are crisp, the inside is fluffy, and the aroma is so inviting it practically writes its own recipe. I’ll be honest — I ate half the batch before anyone else got to try it. Let me walk you through every single step — by the end, you'll wonder how you ever made it any other way.
What Makes This Version Stand Out
- Taste: The cheese melts into a silky, savory sauce that coats every bite, while the egg provides a subtle, protein‑rich backbone. The result is a flavor profile that feels indulgent without the guilt.
- Texture: The batter’s airy lift creates a light, fluffy interior that contrasts perfectly with the crunchy, golden crust. It’s like biting into a cloud that suddenly gives way to molten cheese.
- Simplicity: With just four ingredients, the recipe cuts through the overwhelm of complicated low‑carb menus. You can whip it up in under 15 minutes, making it ideal for busy mornings.
- Uniqueness: Unlike traditional pancakes, the chaffle’s shape is a hybrid of a waffle and a skillet pancake, giving it a distinctive silhouette that looks as good as it tastes.
- Crowd Reaction: Friends who are skeptical of low‑carb options are instantly converted, often asking for seconds and then a full plate of variations.
- Ingredient Quality: Using fresh, high‑quality cheese and a whole egg ensures maximum flavor and nutritional density, turning a simple dish into a protein‑packed powerhouse.
- Cooking Method: Baking instead of frying reduces fat content while still delivering that coveted crispy edge, making it a healthier alternative to traditional fried breakfasts.
- Make‑Ahead Potential: Chaffles keep well in the fridge and can be reheated in a toaster oven, allowing you to prepare a batch in advance for the whole week.
Inside the Ingredient List
The Flavor Base
Shredded cheese is the heart of this dish, providing depth, umami, and a luscious melt. Opt for a blend of sharp cheddar and mozzarella to balance sharpness with creaminess. Skipping cheese turns the chaffle into a plain egg cake, losing that signature gooey center. When choosing cheese, look for a block that’s fresh, not pre‑shredded with additives, to ensure maximum melt.
The Texture Crew
The large egg is the structural glue that holds the batter together. Its proteins coagulate during baking, creating a stable, airy framework. Without the egg, the batter would collapse and result in a dense, crumbly mess. If you’re vegan, try a flaxseed “egg” substitute, though the texture will be noticeably different.
The Unexpected Star
Salt is the quiet hero that amplifies every flavor note. Even a tiny pinch can elevate the cheese’s richness and bring out the egg’s natural sweetness. Skipping salt can leave the chaffle flat and bland, so keep the pinch handy. For a low‑sodium version, use a salt‑free seasoning blend.
The Final Flourish
Pepper adds a subtle kick that cuts through the richness. A light dusting of freshly ground black pepper balances the creamy center and brightens the overall taste. If you prefer a smoky flavor, try a pinch of smoked paprika instead. This small tweak can transform the dish into a new flavor adventure.
The Method — Step by Step
- Step 1: Preheat your oven to 400°F (200°C). Line a baking sheet with parchment paper or a silicone mat to prevent sticking. This is the moment of truth, where anticipation meets the heat that will transform your batter. A hot surface ensures a crisp edge; a cool one will result in a soggy center. As the oven warms, imagine the golden crust forming, and let that image guide your next move.
- Step 2: In a bowl, whisk the large egg until the whites and yolks are fully blended. Add the shredded cheese, pinch of salt, and pepper. Whisk until the mixture is smooth and the cheese starts to melt into a creamy consistency. The whisking process incorporates air, which is essential for that airy interior. If you’re feeling adventurous, add a splash of milk for an even silkier batter.
- Step 3: Let the batter sit for 5 minutes. This brief rest allows the cheese to fully integrate and the egg proteins to relax, resulting in a batter that’s easier to shape and cooks evenly. During this time, you can set your serving plates or prep any optional toppings like chopped chives or smoked salmon. The aroma of the resting batter is a subtle prelude to the final dish, and it’s worth the pause.
- Step 4: Spoon the batter onto the preheated pan, using about 2 tablespoons per chaffle. Spread it into a circle about 3 inches in diameter. The batter should be thick enough to hold its shape but thin enough to cook through quickly. If you’re using a skillet, heat it for a minute before adding the batter to ensure instant sizzle. This sizzling sound is a sign that the edges are beginning to set.
- Step 5: Bake for 12–15 minutes, or until the edges are golden brown and the center is set. Watch the edges pull away from the pan; that’s the cue that the chaffle is ready. If you’re unsure, insert a toothpick in the center; it should come out clean. This step is the trickiest because over‑baking turns the interior dry. Keep a close eye on the color and texture.
- Step 6: Remove the chaffle from the oven and let it rest on a wire rack for 2 minutes. This brief rest allows the steam to escape and the interior to set fully. The result is a chaffle that holds its shape and doesn’t crumble when you cut into it. If you’re in a hurry, you can serve it immediately, but the rest enhances the texture.
- Step 7: Serve the chaffle warm, topped with optional additions such as a dollop of sour cream, sliced avocado, or a sprinkle of fresh herbs. The contrast between the creamy topping and the crispy edge elevates the dish to gourmet status. Pair it with a side of fresh berries for a balanced breakfast that satisfies both taste and nutrition.
- Step 8: If you prefer a double‑layered chaffle, simply repeat steps 4–7 with a second batter. This creates a thicker, more substantial bite that feels like a mini‑cake. It’s perfect for a brunch gathering or for when you need a filling meal that’s still low carb.
That’s it — you did it. But hold on, I've got a few more tricks that will take this to another level, ensuring every chaffle is a masterpiece.
Insider Tricks for Flawless Results
The Temperature Rule Nobody Follows
Many people bake at a lower temperature, assuming it will cook the center more evenly. In reality, a high heat (400°F) is essential for a crisp exterior. The rapid sear locks in moisture, preventing the cheese from drying out. I once baked at 350°F and the chaffle came out soggy; the lesson was clear: heat is your best friend.
Why Your Nose Knows Best
Before you even touch the oven, listen to that familiar, buttery aroma rising from the pan. It’s your body’s way of signaling that the chaffle is almost ready. Trusting that scent can save you from over‑baking, a common mistake that turns a golden delight into a dry slab.
The 5-Minute Rest That Changes Everything
After baking, letting the chaffle rest for exactly five minutes allows steam to redistribute. This step ensures that the interior remains tender and the edges stay crisp. Skipping it results in a slightly gummy center that clings to the knife.
Avoiding the Cheese Burn
If you’re using a high‑cheese ratio, keep the baking sheet on the middle rack. This placement prevents the cheese from scorching while still allowing the edges to brown. A simple rack adjustment can mean the difference between a perfect chaffle and a burnt disappointment.
The Right Pan Size
A 6‑inch skillet is ideal for a single chaffle; it ensures even heat distribution. A larger pan may cause the batter to spread too thin, leading to uneven cooking. For batches, consider using a cast‑iron skillet for its superior heat retention.
Creative Twists and Variations
Spicy Jalapeño Chaffle
Add diced jalapeños and a pinch of cumin to the batter for a fiery kick. The heat balances the richness, making it a perfect brunch for spice lovers. Pair it with a cool avocado spread to tame the heat.
Herb‑Infused Delight
Stir in chopped fresh rosemary, thyme, and oregano before baking. The aromatic herbs elevate the cheese’s flavor profile, giving the chaffle a Mediterranean twist. Serve with a light lemon vinaigrette for a refreshing contrast.
Smoky Bacon Chaffle
Fold in crisp bacon bits and a dash of smoked paprika. The bacon’s savory depth complements the cheese, while the paprika adds a subtle smokiness. This variation is a crowd‑pleaser for breakfast or a hearty snack.
Blue Cheese & Walnut Fusion
Replace cheddar with blue cheese and sprinkle chopped walnuts into the batter. The tangy blue cheese cuts through the richness, and the walnuts add a satisfying crunch. This combo is ideal for those who enjoy bold, complex flavors.
Vegan Chaffle Alternative
Use a flaxseed “egg” and dairy‑free cheese to keep the dish plant‑based. The batter will be slightly denser but still airy, and the cheese melt will be creamy. It’s a great option for vegans who crave a low‑carb breakfast.
Sweet Cinnamon Chaffle
Add a teaspoon of cinnamon and a dash of nutmeg to the batter. Serve with a drizzle of sugar‑free maple syrup or a smear of almond butter for a sweet, savory experience. This version is perfect for a dessert‑style breakfast.
Storing and Bringing It Back to Life
Fridge Storage
Store cooked chaffles in an airtight container in the refrigerator for up to 3 days. The airtight seal prevents moisture from making the crust soggy. When you’re ready to eat, simply reheat in a toaster oven for 3–4 minutes to restore crispness.
Freezer Friendly
Wrap each chaffle individually in parchment paper and place them in a freezer bag. They stay fresh for up to 2 weeks. When reheating, lay them on a baking sheet and bake at 350°F for 10 minutes. The parchment protects the edges from becoming rubbery.
Best Reheating Method
The key to a revived chaffle is a quick, high‑heat reheat. Preheat your oven to 375°F, place the chaffle on a baking sheet, and bake for 5–7 minutes. Add a splash of water to the bottom of the pan; the steam will keep the interior moist while the top crisps to perfection.
If you’re ready to elevate your low‑carb breakfast routine, this chaffle is your new go‑to. It’s quick, satisfying, and can be customized to suit any palate. The next time you’re craving something warm and comforting, remember that this simple combination of egg and cheese can deliver a breakfast that feels luxurious without the extra carbs. Happy cooking, and enjoy every bite!