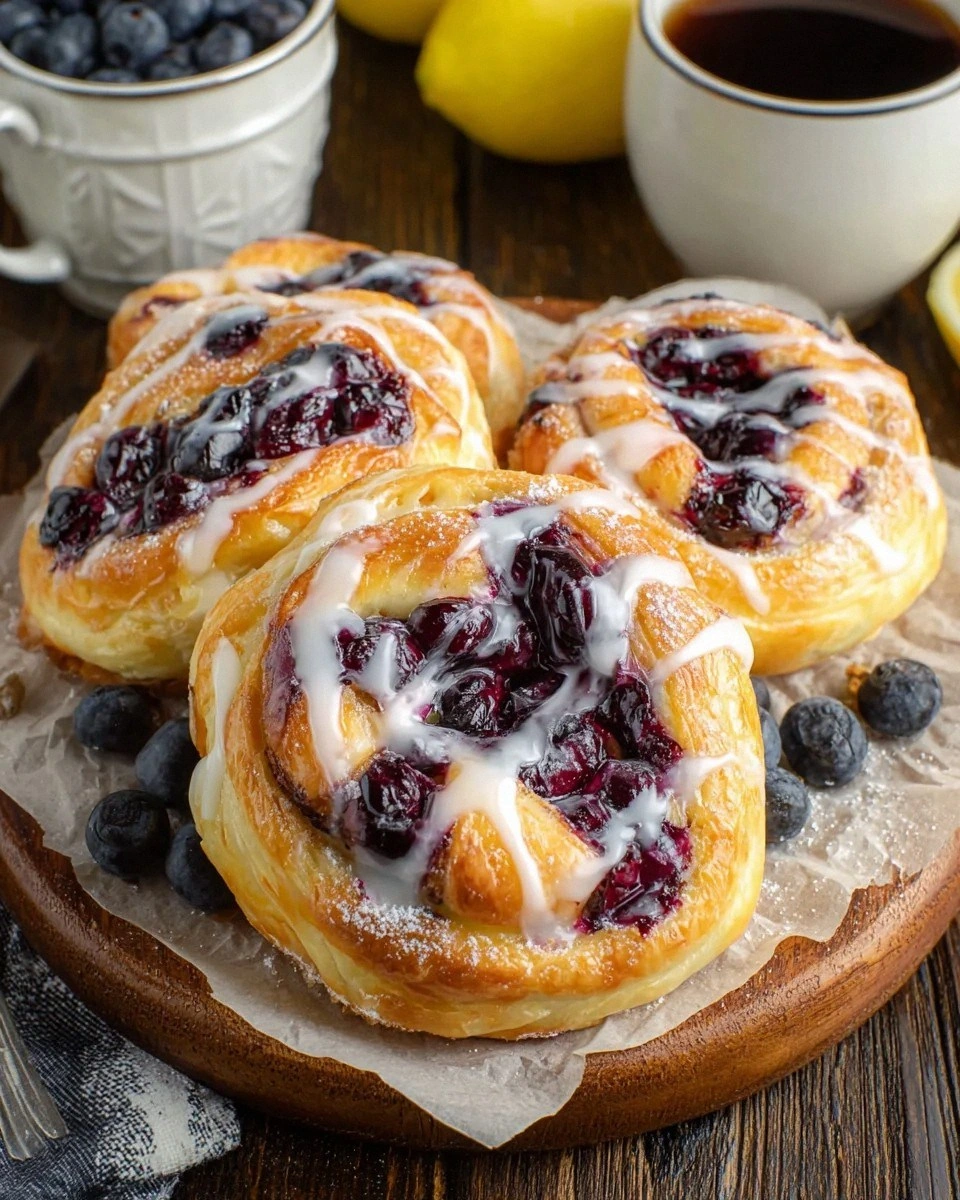
Picture this: it’s a lazy Saturday morning, the sun is spilling through the kitchen window, and you’re standing over a bowl of flour that looks like a tiny snowdrift. Suddenly, the neighbor’s dog starts barking, the toaster pops, and you realize you’ve been staring at the same bland, store‑bought pastry for years. I dared a friend to a “best‑bakery‑at‑home” showdown, and let’s just say I won—by a landslide, with a batch of blueberry lemon danishes that made the whole block smell like a summer orchard. This isn’t just a pastry; it’s a full‑on sensory assault that will have you humming the chorus of “I Want It That Way” while the oven timer dings.
When you first bite into the flaky, buttery layers, the lemon zest hits your palate like a burst of sunshine, and the blueberry filling follows with a sweet‑tart pop that makes your taste buds do a little happy dance. The crumble topping adds a whisper of crunch that shatters like thin ice, giving each bite a contrast you didn’t even know you were missing. I’ll be honest — I ate half the batch before anyone else got a chance to try, and that was the best mistake I ever made. Most recipes get this completely wrong, either drowning the dough in sugar or forgetting the crucial lemon‑butter balance; this version nails it every single time.
What truly sets this recipe apart is a secret weapon: a ready‑made baking mix that takes the guesswork out of the dough while still delivering that homemade, melt‑in‑your‑mouth texture. Pair that with a quick‑oats crumble that gives you that satisfying crunch without the hassle of making a separate streusel from scratch. And there’s a twist you won’t see anywhere else—a lemon glaze that’s both glossy and tangy, sealing the deal like a sweet‑sour kiss. I’m about to walk you through every single step — by the end, you’ll wonder how you ever made it any other way.
So grab your apron, preheat that oven, and get ready for a culinary adventure that will have you bragging at brunches for weeks. I dare you to taste this and not go back for seconds. Ready? Let’s dive in.
What Makes This Version Stand Out
- Flavor Explosion: The lemon zest cuts through the sweetness of the blueberry filling, creating a bright, balanced profile that sings on the tongue.
- Texture Harmony: Flaky pastry meets a crunchy oat crumble, delivering a mouthfeel that’s both delicate and satisfyingly crisp.
- Simplicity Redefined: Using a baking mix means you skip the tedious kneading, yet you still get that buttery, tender crumb you’d expect from scratch.
- Visual Wow Factor: The golden‑brown tops and glossy glaze make these danishes look bakery‑worthy, perfect for impressing guests.
- Crowd‑Pleaser Status: I’ve watched entire families line up for seconds, and even the pickiest eaters can’t resist the sweet‑tart combo.
- Ingredient Quality: Fresh lemon zest and high‑quality blueberry pie filling ensure every bite bursts with authentic flavor.
- One‑Pan Efficiency: The crumble topping bakes right on top of the danish, eliminating extra dishes and saving you precious cleanup time.
- Make‑Ahead Magic: Assemble the danishes ahead of time, refrigerate, then bake when you’re ready for fresh, warm pastries.
Inside the Ingredient List
The Flavor Base
Baking mix: This is the backbone of our dough, providing the perfect balance of flour, leavening, and a hint of salt. Because it’s pre‑blended, you avoid the common pitfall of uneven rising that can happen with homemade flour blends. If you’re feeling adventurous, you can swap it for a mix of 1 ½ cups all‑purpose flour, ½ cup cake flour, and 2 tsp baking powder, but the convenience factor of the mix is unbeatable.
Granulated sugar: A modest ¼ cup adds just enough sweetness to complement the tart lemon without overwhelming the blueberry. Skipping it would leave the pastry bland, while doubling it would make the glaze overly cloying. For a deeper flavor, try brown sugar for a subtle caramel note.
Unsalted butter (softened): The butter is the soul of any pastry, giving it richness and a melt‑in‑your‑mouth quality. Softening it to room temperature ensures it incorporates smoothly with the baking mix, preventing gritty pockets. If you’re dairy‑free, try a high‑fat coconut oil, but expect a faint coconut undertone.
The Texture Crew
Milk: Milk hydrates the dry ingredients, creating a tender crumb. You can use whole milk for extra richness, or almond milk for a lighter, nutty twist. Skipping the liquid entirely will give you a crumbly, dry dough that won’t hold together.
Plain flour (for crumble topping): This adds structure to the crumble, ensuring it holds its shape while baking. Using cake flour would make the topping too delicate, while bread flour would make it overly dense.
Quick oats: Oats introduce a rustic crunch and a subtle nutty flavor that pairs beautifully with the lemon zest. If you’re gluten‑free, substitute with gluten‑free rolled oats, but keep the texture in mind.
Cold butter (for crumble topping): The cold butter is cut into the flour‑oat mixture, creating buttery crumbs that melt into a crisp topping. If the butter warms up too much, the crumble becomes soggy instead of crunchy.
The Unexpected Star
Lemon zest: Fresh zest is the secret weapon that delivers an aromatic, citrusy punch without the bitterness of the peel. A tablespoon is enough to brighten the entire batch; more than that can become overwhelming. If you don’t have fresh lemons, a high‑quality lemon extract works, but the aroma won’t be as vibrant.
Blueberry pie filling: This is the star of the show, offering sweet‑tart bursts that contrast the buttery dough. Using fresh blueberries is an option, but the filling ensures consistent sweetness and a glossy finish. Skipping the filling would turn this into a plain butter pastry, missing the whole point.
The Final Flourish
Powdered sugar & lemon juice (glaze): The glaze ties everything together with a glossy, tangy coat that makes each danish look like a miniature work of art. Too much lemon juice will make it runny; too little will leave it dull. Adjust to achieve a pourable yet thick consistency.
Everything's prepped? Good. Let’s get into the real action…
The Method — Step by Step
Preheat your oven to 375°F (190°C) and line a baking sheet with parchment paper. As the oven warms, the kitchen will start to fill with a faint buttery aroma that hints at the magic to come. I always set a timer for the preheat because walking away from the oven is a rookie mistake. This is the moment of truth—make sure the temperature is spot on, or the pastry will either puff up too quickly or stay soggy.
In a large mixing bowl, combine 2 cups of baking mix, ¼ cup granulated sugar, the softened butter, ½ cup milk, and 1 tbsp lemon zest. Using a handheld mixer on low speed, blend until a smooth, slightly sticky dough forms.
The dough should feel like a thick pancake batter—soft but not runny. Let it rest for 5 minutes; this gives the gluten a chance to relax, which is essential for that flaky texture.Kitchen Hack: If the dough feels too dry, add a splash of milk, one tablespoon at a time, until it comes together without being overly wet.While the dough rests, prepare the crumble topping. In a separate bowl, whisk together ½ cup plain flour, ⅓ cup quick oats, and a pinch of salt. Cut in 4 tbsp cold butter using a pastry cutter or your fingertips until the mixture resembles coarse crumbs. This is where the magic happens—those buttery flecks will melt into golden, crunchy islands on top of each danish.
Turn the rested dough onto a lightly floured surface and roll it out to about ¼‑inch thickness. Using a 3‑inch round cutter, cut out circles and place them on the prepared baking sheet, spacing them about an inch apart. If you don’t have a cutter, a drinking glass works just fine. The circles should be uniform; uneven sizes can lead to uneven baking.
Drop a generous tablespoon of blueberry pie filling into the center of each dough circle, leaving a small border around the edge. Then, gently fold the edges over the filling, creating a rustic, slightly open‑centered pocket.
The filling should peek through, promising a juicy surprise.Kitchen Hack: Chill the dough circles for 10 minutes before adding the filling; this prevents the butter from melting too quickly, preserving flakiness.Sprinkle the crumble topping evenly over each danish, pressing lightly so it adheres.
The edges should start to turn a light golden brown after about 12 minutes—this is your visual cue that the pastry is developing that coveted crunch.Watch Out: Don’t overload the crumble; too much will sink into the filling and become soggy.Place the sheet in the oven and bake for 20‑25 minutes, or until the tops are deep golden and the edges pull away slightly from the parchment. You’ll hear a faint sizzle as the butter melts and caramelizes, a sound that signals perfection. Keep an eye on the crumble; if it darkens too quickly, tent the danishes with foil to prevent burning.
While the danishes bake, prepare the lemon glaze. In a small bowl, whisk together ½ cup powdered sugar and 2 tbsp fresh lemon juice until smooth and glossy. If the glaze is too thick, add a few drops of water; if too thin, add a pinch more powdered sugar. The glaze should drizzle like a thin waterfall, not pool.
When the danishes are done, remove them from the oven and let them cool on a wire rack for 5 minutes. Then, drizzle the lemon glaze over each pastry, allowing it to cascade over the crumble and seep into the blueberry pockets. Picture yourself pulling this out of the oven, the whole kitchen smelling incredible—this is the climax of our baking adventure. Serve warm, and watch as your guests’ faces light up with delight.
That's it — you did it. But hold on, I've got a few more tricks that'll take this to another level...
Insider Tricks for Flawless Results
The Temperature Rule Nobody Follows
Always keep your butter and milk chilled until the very last moment. The colder the butter, the more layers it creates as it melts during baking, resulting in that coveted flaky texture. I once tried using room‑temperature butter to save time, and the pastry turned out dense, like a biscuit. Trust me, a few extra minutes of chilling are worth the buttery payoff.
Why Your Nose Knows Best
Before you pull the danishes out of the oven, trust the scent. When the top starts to smell nutty and the crumble gives off a toasted oat aroma, you’re at the perfect doneness. Relying solely on a timer can lead to over‑baking; your nose is a more precise kitchen tool than any digital readout.
The 5‑Minute Rest That Changes Everything
After baking, let the pastries rest for exactly five minutes before glazing. This short pause allows the interior to set, preventing the glaze from soaking straight through and making the crumb soggy. I’ve seen the opposite happen when glazing hot pastries—just a watery mess.
Glaze Consistency Secrets
For a glaze that holds its shape, whisk the powdered sugar and lemon juice together until no lumps remain, then let it sit for a minute. This rest period lets any air bubbles rise, giving you a smoother, shinier finish. If you prefer a thicker glaze, simply add a touch more powdered sugar; for a thinner drizzle, add a few extra drops of lemon juice.
Freezer‑Friendly Prep
Assemble the danishes up to the point of baking, then flash‑freeze them on a tray for 30 minutes. Transfer the frozen pastries to a zip‑top bag and store for up to a month. When you’re ready, bake them straight from the freezer, adding an extra 5‑7 minutes to the bake time. This trick has saved my brunches more times than I can count.
Creative Twists and Variations
This recipe is a playground. Here are some of my favorite ways to switch things up:
Raspberry‑Rose Delight
Swap the blueberry filling for raspberry jam and add a few drops of rose water to the glaze. The floral note pairs beautifully with the tart lemon, creating an elegant flavor profile perfect for a garden party.
Chocolate‑Covered Dream
After glazing, drizzle melted dark chocolate over the tops and sprinkle toasted almond slivers. The bitter chocolate balances the sweet glaze, while the nuts add an extra crunch.
Savory Sunrise
Replace the sweet filling with a mixture of goat cheese, lemon zest, and fresh thyme. Top with a light sprinkle of sea salt. This savory version makes a stunning brunch centerpiece.
Seasonal Berry Medley
Combine fresh strawberries, blackberries, and blueberries for a mixed‑berry filling. The varied colors make the danishes visually striking and add layers of flavor.
Maple‑Pecan Crunch
Mix a tablespoon of maple syrup into the crumble topping and add chopped toasted pecans. The caramel notes complement the lemon glaze for a cozy, autumnal twist.
Storing and Bringing It Back to Life
Fridge Storage
Place cooled danishes in an airtight container and store them in the refrigerator for up to three days. The glaze may firm up, but a quick microwave zap (10‑15 seconds) restores the softness.
Freezer Friendly
Wrap each danish individually in plastic wrap, then place them in a freezer‑safe zip bag. They’ll keep for up to two months. When ready to enjoy, thaw overnight in the fridge, then reheat in a 350°F oven for 8‑10 minutes.
Best Reheating Method
For the ultimate comeback, preheat your oven to 325°F, place the danish on a parchment‑lined tray, and add a tiny splash of water to the tray (not on the pastry). Cover loosely with foil and bake for 5‑7 minutes. The steam revives the crumb, while the glaze regains its shine.