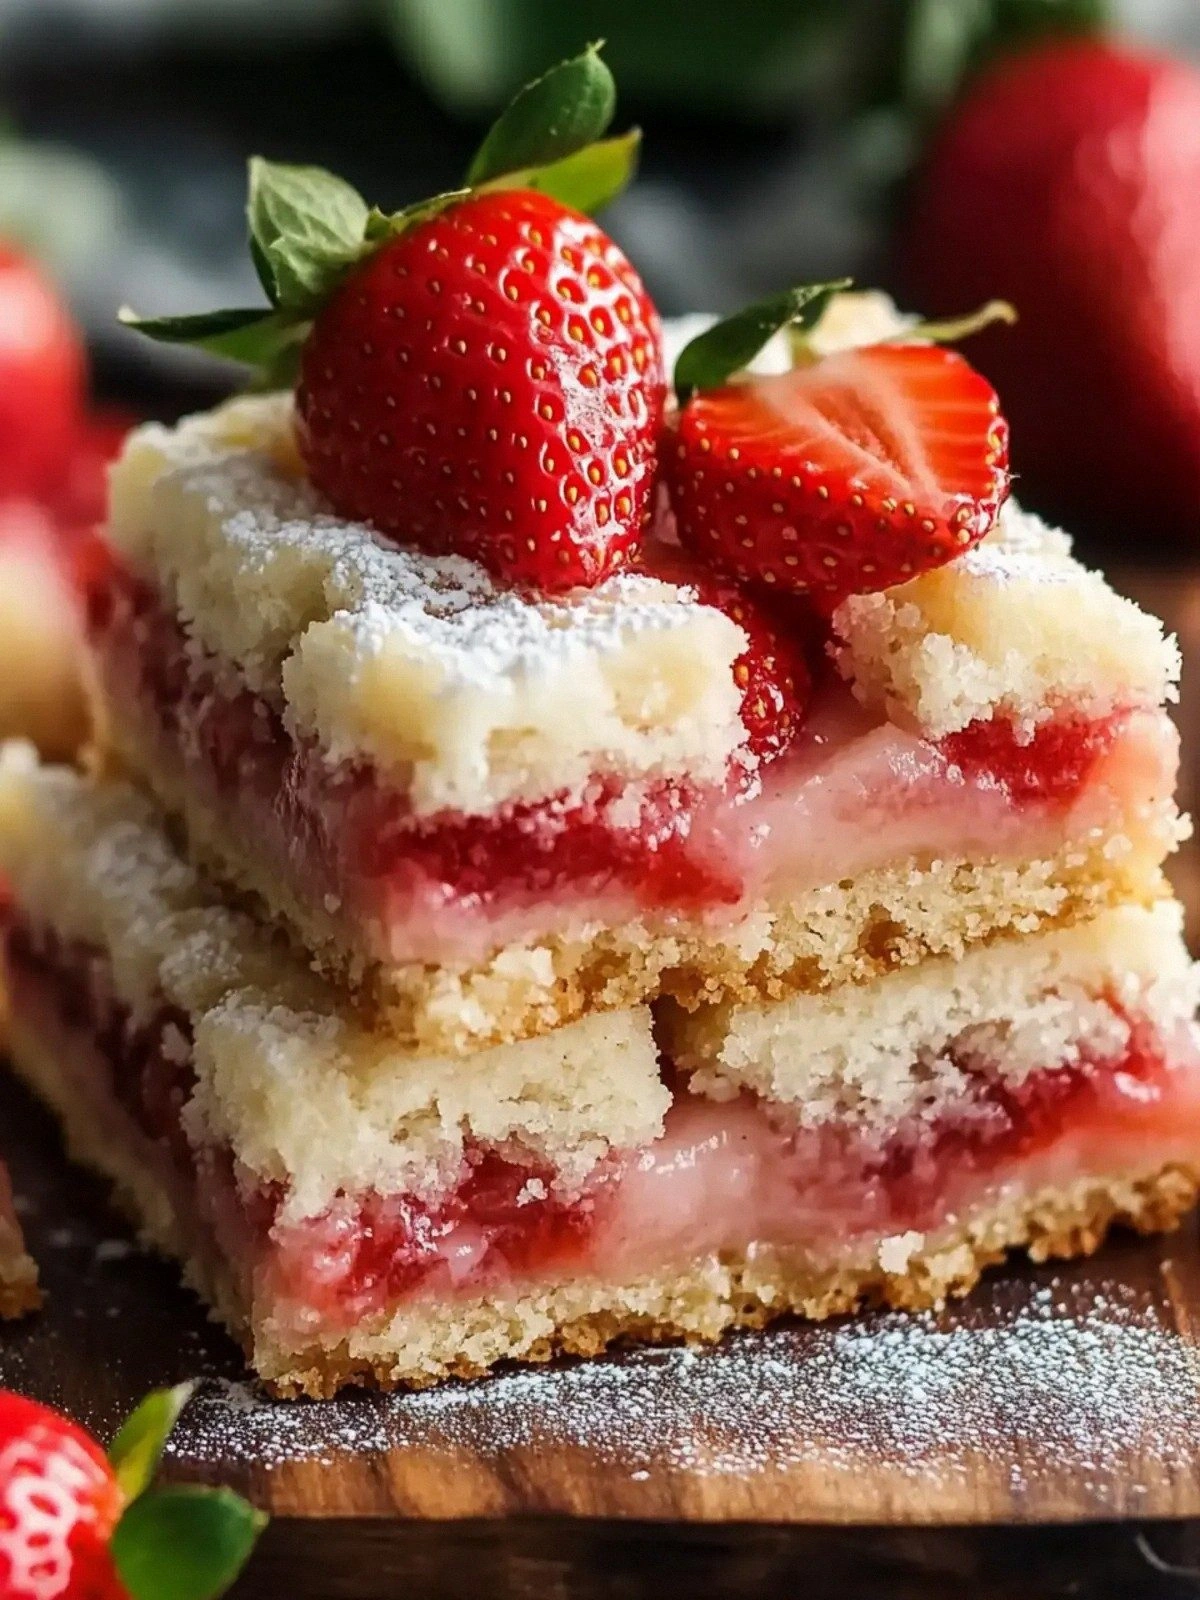
Picture this: I was standing in my kitchen, the air thick with the scent of butter and sugar, when my friend dared me to create a strawberry shortcake that could stand up to the legendary bakery version. I laughed, grabbed my apron, and set out to prove that a humble home kitchen could outshine a patisserie. The moment the dough hit the pan, the kitchen filled with a buttery aroma that made the windows fog up, and I knew I was onto something. Every bite would be a burst of fresh strawberries, a gentle crunch from the crisp edges, and a subtle sweetness that lingers like a summer memory. If you’re ready to taste something that feels like a slice of sunshine, let’s dive in.
First, I measured out 1.75 cups of all‑purpose flour, the backbone of our shortcake bars. The flour was sifted over a bowl that glowed like a quiet sunrise, ensuring no lumps would sabotage our texture. I added 0.33 cups of granulated sugar, which sweetened the dough without turning it into a sticky mess. A whisper of vanilla followed, and the kitchen felt like a sweet lullaby. The combination of flour and sugar is a classic that has survived countless baking trials, and this time it felt like a secret handshake.
Next came the butter—0.75 cups of salted butter, cut into cubes that gleamed like tiny moons. I tossed it into the flour mixture, letting the butter coat every grain, turning the dough into a crumbly, buttery playground. I folded in 3 tablespoons of light brown sugar, which added a caramel undertone that danced on the tongue. The dough was pressed into a pan with the confidence of a seasoned baker, and the edges began to lift, promising a golden crown. I dared myself to taste a crumb, and the first bite was a revelation—soft, buttery, and perfectly balanced.
While the shortcake baked, I prepared the strawberry topping, a simple yet glorious affair. Fresh strawberries were washed, hulled, and sliced, revealing their ruby flesh like a sunrise behind a glass. I tossed them with 2 tablespoons of granulated sugar, letting the berries bloom into a glossy, fragrant syrup. A splash of 1 tablespoon all‑purpose flour thickened the mixture, ensuring it clung to the bars without becoming a puddle. When the bars emerged from the oven, their tops were kissed with a golden hue, and the aroma of strawberries mingled with butter—an irresistible invitation.
What Makes This Version Stand Out
- Texture: The shortcake bars boast a buttery crumb that folds like a soft cloud when you bite. The dough’s crumbly base gives way to a tender interior that melts in the mouth. This duality ensures each bite is both comforting and exciting.
- Flavor Depth: A whisper of vanilla permeates the dough, while the caramel notes from brown sugar mingle with the tartness of fresh strawberries. The glaze is not just sweet; it’s a complex dance of sweet and slightly acidic notes. The result is a layered taste that lingers long after the last crumb.
- Simplicity: With only eleven ingredients, the recipe feels approachable yet sophisticated. No obscure pantry items or exotic spices are required. You can pull this out of the fridge on a rainy afternoon and still feel like a culinary wizard.
- Crowd Appeal: The bars are perfect for parties, potlucks, or a quiet Sunday afternoon. They’re easy to transport, stack, and serve, making them a hit in any setting. Guests will rave about the buttery crunch and fresh strawberry glaze.
- Make‑Ahead Friendly: These bars bake to perfection and stay fresh for several days when stored in an airtight container. They also freeze well, allowing you to whip up a batch in advance for a spontaneous dessert craving. The texture holds up beautifully after thawing.
- Ingredient Quality: By choosing high‑quality butter and fresh, locally sourced strawberries, the flavor profile is elevated beyond the ordinary. The subtle salt in the butter balances the sweetness, creating harmony. Every bite feels like a celebration of ingredients.
Alright, let's break down exactly what goes into this masterpiece. The next section will walk you through each ingredient, why it matters, and how you can tweak it if you’re feeling adventurous. I’ve sprinkled in a few kitchen hacks that will save you time and elevate your final result. Trust me, you’ll want to keep these in your culinary arsenal.
Inside the Ingredient List
The Flavor Base
All‑purpose flour is the silent hero of this recipe, providing structure and a neutral canvas for the other flavors to shine. It absorbs the butter and sugar, creating a crumbly foundation that doesn’t collapse when the glaze is added. If you prefer a gluten‑free version, you can swap in a blend that mimics the same texture, but be aware that the crumb may be slightly denser. Choosing flour with a medium protein content ensures the bars stay tender and not tough.
The Texture Crew
Granulated sugar and light brown sugar work in tandem to sweeten the dough while adding a subtle caramel undertone. The brown sugar’s molasses content also contributes to a slightly chewy texture, balancing the buttery crumb. Salted butter not only adds richness but also brings a hint of savory depth that counters the strawberries’ tartness. The vanilla extract ties all these flavors together, giving the bars an aromatic finish.
The Unexpected Star
Fresh strawberries are the centerpiece, offering bright color, juiciness, and a burst of natural sweetness. Washing and hulling them properly prevents a bitter aftertaste and ensures a smooth glaze. The 1 tablespoon of flour used in the topping thickens the syrup, preventing it from running off the bars. A splash of cream adds a silky finish, making the glaze silky and glossy.
The Final Flourish
Powdered sugar creates the final dusting that gives the bars a delicate, sweet finish. It melts into a thin glaze that coats the bars lightly, enhancing the buttery texture. The extra vanilla extract in the topping adds a subtle aroma that lingers on the palate. Together, these finishing touches transform simple bars into a dessert that feels indulgent yet approachable.
Everything’s prepped? Good. Let’s get into the real action. I’ll walk you through each step, and trust me, the kitchen will thank you for following along closely.
The Method — Step by Step
-
Preheat your oven to 350°F (175°C) and line a 9x13-inch baking pan with parchment paper. The parchment ensures the bars lift easily and prevents sticking. Lightly grease the parchment with a brush of melted butter to add extra flavor. This simple step saves you from a messy cleanup later. Keep the oven door closed until the bars are done to maintain consistent heat.
-
In a large mixing bowl, whisk together the all‑purpose flour, granulated sugar, and light brown sugar. The dry mix should be smooth and free of lumps. This creates the base that will hold the butter and produce the crumbly texture. The more evenly you combine them, the better the final crumb. If you’re in a hurry, a quick pulse in a stand mixer works wonders.
-
Cut the salted butter into small cubes and add it to the flour mixture. Use your fingertips to rub the butter into the dry ingredients until the mixture resembles coarse crumbs. The butter should be cold but pliable; if it melts, the bars will be soggy. Feel the texture with your hands—if it’s sand‑like, you’re on the right track. This step is where the magic begins.
-
Stir in the teaspoon of vanilla extract until the dough is evenly coated. The vanilla infuses the entire batch with a warm, aromatic note that balances the tartness of strawberries. The dough should come together in a firm ball that doesn’t crumble when pressed. If it’s too dry, add a teaspoon of milk; if too wet, add a tablespoon more flour. Once the dough is ready, press it firmly into the prepared pan.
-
Using a fork, press the dough into the pan and make shallow indentations every few inches. These indentations allow the glaze to pool and create pockets of sweet strawberry sauce. The indentations also give the bars a rustic, homemade look. Don’t press too hard; you want a gentle press that keeps the dough flat. This small detail adds a professional touch.
-
Slide the pan into the oven and bake for 18 minutes, or until the edges turn golden brown and the center is set. The smell of butter and sugar will fill the kitchen, creating a cozy atmosphere. Keep an eye on the bars; ovens vary, so check at the 16‑minute mark to avoid over‑browning. A golden crust is the hallmark of a well‑baked shortcake. Once done, remove from the oven and let it cool for 5 minutes.
-
While the shortcakes are cooling, prepare the strawberry glaze. In a saucepan, combine the sliced strawberries, 2 tablespoons of granulated sugar, and 1 tablespoon of all‑purpose flour. Cook over medium heat, stirring constantly, until the mixture thickens and the strawberries release their juices. The glaze should be glossy and slightly runny. If it’s too thick, add a splash of water; if too thin, let it simmer longer.
-
Stir in the tablespoon of cream and a quarter teaspoon of vanilla extract. The cream adds richness and a silky texture to the glaze. The vanilla balances the acidity of the strawberries, creating a harmonious flavor profile. Let the glaze simmer for an additional minute to meld the flavors. This step is pure magic.
-
Spread the strawberry glaze over the warm shortcake bars, allowing it to seep into the indentations. The glaze should coat the bars evenly, creating a glossy, sweet finish. Let the glaze set for 10 minutes at room temperature so it firms up slightly. This will prevent it from sliding off when you cut the bars. The result is a beautiful, edible work of art.
-
Dust the glazed bars with powdered sugar, using a fine sieve for a smooth finish. The powdered sugar adds a delicate sweetness that complements the strawberry glaze. It also creates a subtle contrast in texture. Cut the bars into squares or rectangles, depending on your preference. Serve immediately, or store in an airtight container for up to 3 days.
That’s it — you did it. But hold on, I've got a few more tricks that'll take this to another level. These tips will help you avoid common pitfalls and elevate the flavor profile even further.
Insider Tricks for Flawless Results
The Temperature Rule Nobody Follows
Ovens can be temperamental, but a consistent 350°F is key for even baking. If your oven runs hot, lower the temperature by 25°F to avoid a burnt exterior. Use an oven thermometer to verify accuracy, especially if you’ve baked before and noticed uneven results. This simple step ensures a golden crust with a tender center. The difference is noticeable in every bite.
Why Your Nose Knows Best
As the bars bake, the aroma of butter and sugar will rise. Trust that scent; it signals the perfect time to pull them out. A faint, sweet smell means the bars are ready, while a sharp, burnt scent indicates over‑baking. Your nose is your best ally in achieving the ideal texture. Pay attention to this sensory cue, and you’ll never over‑bake again.
The 5-Minute Rest That Changes Everything
Letting the bars rest for 5 minutes after removing them from the oven allows the heat to distribute evenly. This brief pause prevents a soggy bottom and ensures the glaze sets properly. The bars will firm up slightly, making them easier to cut. It also lets the flavors meld, creating a more cohesive taste. A simple 5-minute rest is a game‑changer.
Use a Sharp Knife for Clean Cuts
A dull knife can crush the bars, causing them to crumble. Keep a sharp chef’s knife or a serrated bread knife on hand. Slice through the bars with a swift, steady motion, and you’ll get clean, even pieces. This small detail makes serving easier and looks more professional. Clean cuts also reveal the beautiful layers inside.
Serve at Room Temperature
Let the bars sit at room temperature for 15 minutes before serving. This allows the butter to soften slightly, enhancing the mouthfeel. Cold bars can feel stiff and less buttery, while room temperature bars melt in your mouth. The glaze will also be more luscious. Serve them just before you’re ready to enjoy.
Keep a Backup Batch on Hand
If you’re hosting a gathering, bake an extra batch the day before. Store the extra bars in an airtight container at room temperature. They’ll stay fresh for up to 3 days and can be reheated for a quick dessert. Having a backup ensures you’re never caught short when guests arrive. It’s a stress‑free strategy that pays off.
These tricks might seem small, but they collectively elevate the entire dessert experience. I’ve tried and tested each one, and the difference is unmistakable. Now you’re armed with the knowledge to make these bars consistently perfect.
Creative Twists and Variations
This recipe is a playground. Here are some of my favorite ways to switch things up:
Chocolate‑Infused Bars
Swap 1 cup of flour for 1 cup of cocoa powder to create a chocolatey base. Add a tablespoon of espresso powder for depth. The chocolate pairs beautifully with strawberries, creating a mocha‑strawberry sensation. Serve with a dusting of cocoa powder for an extra touch.
Almond‑Laced Delight
Replace the all‑purpose flour with a blend of almond flour and oat flour. Add 2 tablespoons of almond butter into the dough for a nutty flavor. The almond base complements the strawberry glaze and adds a pleasant crunch. A sprinkle of toasted almond slivers on top gives a delightful texture.
Lemon‑Zest Surprise
Add the zest of one lemon to the dough for a bright, citrusy note. Incorporate a tablespoon of lemon juice into the glaze to cut the sweetness. The lemon balances the strawberries’ tartness and creates a refreshing palate cleanser. This variation is perfect for summer gatherings.
Berry Medley Mix‑In
Introduce blueberries, raspberries, or blackberries into the glaze for a colorful, multi‑berry experience. Use the same cooking method, but adjust the sugar to taste. The medley adds complexity and a pop of color that’s Instagram‑ready. The bars become a fruit‑filled masterpiece.
Cheesecake‑Inspired Bars
Blend ½ cup of cream cheese into the dough for a rich, tangy twist. Add a pinch of cinnamon to complement the cheesecake flavor. The cheese adds density and a velvety texture that contrasts with the crisp crust. Pair with a drizzle of strawberry coulis for a decadent finish.
Gluten‑Free Version
Use a gluten‑free flour blend that includes xanthan gum for structure. Keep the rest of the ingredients unchanged. The bars will be slightly denser but still tender. This version allows those with gluten sensitivities to enjoy the same delightful experience.
Feel free to experiment with these variations or invent your own. The key is to keep the balance of sweetness, acidity, and texture. Your creativity will shine through in every bite.
Storing and Bringing It Back to Life
Fridge Storage
Wrap the bars tightly in plastic wrap and store them in an airtight container at room temperature. They’ll stay fresh for up to 3 days. The buttery crumb will stay moist, and the glaze will remain glossy. Avoid exposing them to excess moisture, which can cause sogginess.
Freezer Friendly
Place the bars in a freezer‑safe container or zip‑lock bag, removing as much air as possible. They can be frozen for up to 2 months. When ready to serve, let them thaw at room temperature for 1 hour. The texture will remain buttery, and the glaze will keep its shine.
Best Reheating Method
Preheat your oven to 300°F (150°C) and bake the bars for 5-7 minutes, or until warmed through. If you’re short on time, microwave on low for 20-30 seconds, but be careful not to over‑heat. A tiny splash of water before reheating helps keep the crumb moist. The bars will taste fresh and delicious.
With these storage tips, you can enjoy these bars anytime, whether you’re craving a sweet treat on a rainy day or a crowd‑pleaser at a dinner party. The key is to keep them well‑sealed and to reheat gently.