I still remember the sticky disaster that started it all. My niece's birthday party was spiraling out of control—kids were bouncing off the walls, the cake had collapsed into a lopsided mess, and I was frantically trying to salvage the dessert table with whatever I could find in my pantry. In desperation, I grabbed some apples, white chocolate, and those Golden Oreos I'd been hiding from myself. Twenty minutes later, I was holding what would become the most requested recipe in my family: strawberry shortcake candy apples that taste like summer had a wild party with your favorite fair food.
The first bite was pure revelation. The tart Granny Smith apple cracked through the silky white chocolate shell, releasing a burst of strawberry essence that made my taste buds do a happy dance. But here's where it gets wild—those crushed Golden Oreos and freeze-dried strawberries created this magical texture that's part candy apple, part strawberry shortcake, part cookies-and-cream dream. I watched my sugar-crazed nephew take one bite and actually pause mid-chew, his eyes widening with that universal kid-code for "this is incredible."
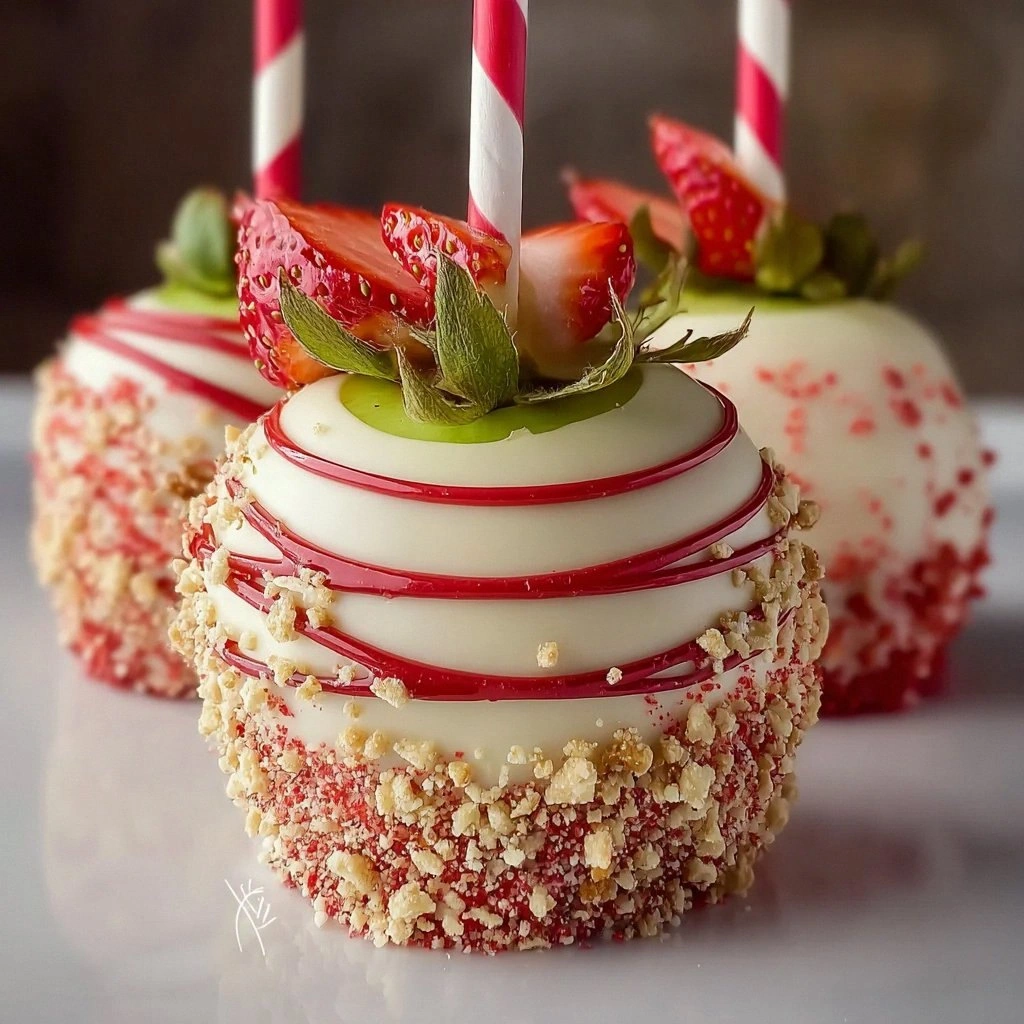
Picture this: glossy white chocolate coating that sets into a perfect snap, revealing the bright green apple beneath. The strawberry drizzle creates these gorgeous pink ribbons that look like edible art, while the cookie crumbs and strawberry bits cling to every curve like they're desperately trying not to fall off (spoiler: they usually don't make it that far because you'll devour them first). The smell alone—sweet white chocolate mingling with fresh strawberry aroma—will have neighbors knocking on your door with hopeful faces.
Most candy apple recipes get it completely wrong. They use that tooth-breaking hard candy shell that could chip a molar, or they drown the apple in waxy chocolate that tastes like sadness. This version? It's what candy apples always dreamed of becoming when they grew up. The secret lies in using white chocolate melting wafers instead of candy coating, and that double-dip technique that creates layers upon layers of flavor. Trust me, once you try this method, you'll never go back to those sad state-fair imposters again.
Let me walk you through every single step—by the end, you'll wonder how you ever made it any other way.
What Makes This Version Stand Out
- The Texture Revolution: Instead of rock-hard candy coating, you get a luxurious white chocolate shell that shatters delicately when you bite into it, revealing crisp apple underneath. The crushed Oreos and freeze-dried strawberries create these pockets of crunch that keep every bite interesting, like a treasure hunt in candy form.
- Flavor Balance Perfection: Most candy apples are sugar bombs that leave your teeth aching. This version uses tart Granny Smith apples to cut through the sweetness, creating this beautiful push-and-pull between sugary decadence and refreshing fruit that keeps you coming back for more.
- Instagram-Worthy Without the Fuss: Those gorgeous pink strawberry drizzles look like you spent hours in pastry school, but they're actually foolproof. Even my art-challenged brother managed to make these look professional on his first try, and he once glued his fingers together making a peanut butter sandwich.
- Make-Ahead Magic: These beauties hold up beautifully in the fridge for up to three days, making them perfect party prep. The chocolate shell actually improves in texture after a few hours—something about the cold helps it set into that perfect snap.
- Kid-Friendly Assembly Line: Turn this into a family activity where everyone gets creative with their toppings. The dipping process is surprisingly forgiving, and any "mistakes" just mean more quality control samples for the chef (that's you, obviously).
- Year-Round Versatility: While strawberry shortcake screams summer, these apples work for every season. Swap the strawberry melts for pumpkin spice in fall, or peppermint in winter. The base technique stays the same while the flavors dance around it.
- The Conversation Starter Factor: Bring these to any gathering and watch what happens. People literally stop mid-sentence when they see them, then spend the next ten minutes asking questions and angling for seconds. I've seen grown adults negotiate like Wall Street traders for the last one.
Alright, let's break down exactly what goes into this masterpiece...
Inside the Ingredient List
The Flavor Base
Granny Smith apples aren't just a suggestion—they're the backbone of this entire operation. Their natural tartness creates this incredible counterpoint to all the sweetness happening on the outside, like a culinary yin and yang that keeps your palate dancing instead of drowning in sugar. When you bite through that candy coating, the bright snap of green apple cleanses your taste buds and makes you ready for the next bite. I've tried this with sweeter apples, and it becomes this one-note sugar experience that feels heavy and cloying instead of refreshing and addictive.
The white chocolate melting wafers are your secret weapon for achieving that smooth, professional coating without the tempering nightmare that comes with real chocolate. These beauties melt into a silky river that clings perfectly to your apples, creating that candy-shop shine that makes everyone think you've got mad skills. If you absolutely can't find them, white almond bark works in a pinch, but it won't have quite the same velvety texture that makes these apples legendary.
The Texture Crew
Golden Oreo cookies bring this buttery, vanilla-forward crunch that plays beautifully with both the white chocolate and the strawberry elements. When you crush them into fine crumbs, they create these tiny pockets of cookie magic that stick to the chocolate and add interest to every bite. Regular Oreos work too, but the golden ones have this warmer flavor that makes the whole thing taste more like strawberry shortcake and less like cookies-and-cream with strawberry (which, admittedly, still sounds amazing).
Freeze-dried strawberries are like flavor bombs that intensify everything they touch. When you crush them into powder, they dissolve on your tongue and release this concentrated strawberry essence that fresh berries just can't match. They're also crucial for that authentic strawberry shortcake vibe—without them, you just have chocolate-covered apples with strawberry drizzle, which is good but not the mind-blowing experience we're after.
The Unexpected Star
Strawberry-flavored candy melts are where the magic really happens. These little discs melt into the most gorgeous pink drizzle that tastes like strawberry fields had a baby with candy heaven. The key is melting them just enough—they should flow like thick paint, not watery soup. Too hot and they'll slide right off your apples in pink rivers; too cool and they'll glob up like pink toothpaste.
The Final Flourish
Those wooden sticks or decorative straws aren't just functional—they're part of the whole experience. Colorful paper straws turn these into party-ready showstoppers that look like they came from a boutique candy shop. Plus, they give you something to grip while you're navigating that first perfect bite without getting chocolate all over your fingers (though let's be honest, it's going to happen anyway, and it's totally worth it).
Everything's prepped? Good. Let's get into the real action...
The Method — Step by Step
- Start with the coldest apples you can manage—pop those Granny Smiths in the freezer for at least 15 minutes while you prep everything else. This isn't just about being fancy; cold apples help the chocolate set faster, preventing that dreaded chocolate-slide that leaves you with puddles of disappointment instead of gorgeous candy apples. Wash them thoroughly and dry like your life depends on it because even a drop of water will make your chocolate seize up faster than you can say "kitchen disaster." Twist off those stems and insert your sticks or straws right through the center where the stem used to be, pushing about three-quarters of the way in so they're secure but not poking out the bottom.
- Time to create your topping station, and this is where you channel your inner food stylist. Grab two zip-top bags and get crushing—those Golden Oreos need to be reduced to fine crumbs with some slightly bigger pieces for textural interest. The freeze-dried strawberries need to be pulverized into pink fairy dust, which you can do by placing them in a bag and going to town with a rolling pin (great stress relief, by the way). Mix these two together in a shallow bowl that's wide enough for easy rolling, because trust me, once you start dipping, things move fast and you don't want to be fumbling with narrow containers.
- Melt your white chocolate wafers using the double-boiler method, which sounds fancy but is really just a bowl over a pot of simmering water. The key here is patience—chocolate waits for no one, but it also doesn't like to be rushed. Stir constantly with a rubber spatula, scraping the sides and bottom, until it's smooth as silk and just barely warm. If it gets too hot, it will seize up and become grainy, and then you'll be stuck with expensive pink-tinted white chocolate that tastes like disappointment.
- This next part? Pure magic. Hold your apple by the stick over the melted chocolate bowl and spoon the chocolate over the top, letting it cascade down the sides like a delicious waterfall. Rotate slowly as you go, making sure every bit of apple gets coated, but don't worry about getting the very bottom perfect—that's going to get covered in cookie crumbs anyway. Tap the stick gently against the bowl edge to encourage excess chocolate to drip off, because too thick a coating will overwhelm the delicate apple flavor.
- Immediately after dipping, while the chocolate is still glossy and slightly warm, roll your apple in the cookie-strawberry crumb mixture. Don't be shy here—really press those crumbs into the chocolate so they stick properly. The goal is complete coverage, like the apple is wearing a cozy coat of crunchy deliciousness. Rotate and press, rotate and press, until no white chocolate peeks through except maybe a few artistic streaks.
- Set your apple upright on a piece of parchment paper and resist the urge to fuss with it—the chocolate needs about 10 minutes to set properly. If you're working in a warm kitchen, pop them in the fridge for faster setting, but don't leave them too long or condensation will form and ruin that gorgeous finish. This is when you start the next apple, working assembly-line style so you're always dipping while another one sets.
- Now for the artistic part that makes everyone think you're a candy-making wizard. Melt your strawberry candy melts in a small bowl, heating in 20-second bursts and stirring between each one. You're looking for a consistency that flows in thick ribbons—test it by lifting your spoon and watching how it falls back into the bowl. Too thin and it'll disappear into the cookie coating; too thick and you'll get pink globs that look like you sneezed on your apples.
- Hold your spoon about 6 inches above the apple and drizzle the pink chocolate in a zigzag pattern, letting it fall naturally. Don't overthink this—random is better than perfect lines, and you can always add more but you can't take it away. The contrast between the white chocolate-cookie base and the pink drizzle is what makes these look like they came from a boutique candy shop instead of your kitchen.
- Add your final flourish with fresh strawberry slices if you're feeling extra fancy—these stick to the still-soft chocolate and add a professional touch that makes people reach for their phones before they even take a bite. Just pat them dry first because moisture is the enemy of chocolate adhesion. Place them strategically around the apple, or go full maximalist and create a strawberry crown around the top.
- Let everything set completely before serving—this takes about 30 minutes at room temperature or 15 minutes in the fridge if you're impatient (and let's face it, we all are). The chocolate should be firm and the cookie coating should be stable when you pick them up. If you see any bare spots where the chocolate didn't get covered, you can touch them up with a dab of melted chocolate and a sprinkle of crumbs.
That's it—you did it. But hold on, I've got a few more tricks that'll take this to another level...
Insider Tricks for Flawless Results
The Temperature Rule Nobody Follows
Here's the thing about chocolate work that nobody tells you: room temperature is your mortal enemy. If your kitchen feels comfortable to you, it's probably too warm for chocolate. The sweet spot is between 68-72°F, which might mean cranking up the AC or opening windows. I learned this the hard way during a summer party when my beautiful apples turned into chocolate-covered disasters that slid off the fruit in slow-motion horror. Now I keep a thermometer in my kitchen like a chocolate-making detective, and my success rate jumped from 60% to 95% overnight.
Why Your Nose Knows Best
When your white chocolate is perfectly melted, it will smell like vanilla and cream with no hint of scorched anything. If you catch even a whiff of something bitter or burnt, you've gone too far and need to start over. Trust your nose—it knows when chocolate has crossed the line from luxurious to tragic. This is why I melt slowly and stir constantly, because once chocolate burns, there's no saving it and you'll be left with expensive compost.
The 5-Minute Rest That Changes Everything
After you dip your apple, resist every instinct to immediately roll it in toppings. Let it rest for exactly 5 minutes—set a timer if you must—until the chocolate is tacky but not dripping. This creates the perfect texture for your cookie crumbs to stick without sliding off in chocolate avalanches. A friend tried skipping this step once and ended up with apples that looked like they'd been through a cookie tornado, with more crumbs on the counter than on the fruit.
The Double-Dip Secret
For bakery-worthy thickness, wait until your first coat is completely set, then give it a second dip. This creates a chocolate shell that's substantial enough to provide that satisfying snap when you bite into it, but not so thick that it overwhelms the apple. The second dip also covers any imperfections from the first round, making your apples look professionally perfect. Just remember that the second coat needs to be thinner—you're going for elegance, not chocolate armor.
Creative Twists and Variations
This recipe is a playground. Here are some of my favorite ways to switch things up:
The Birthday Cake Remix
Swap the Golden Oreos for crushed funfetti cake mix (yes, dry mix straight from the box) and add rainbow sprinkles to your cookie-strawberry crumb. The cake mix creates this incredible sweet, vanilla-forward crunch that tastes exactly like birthday cake but with better texture. Top with a drizzle of blue candy melts instead of strawberry for a celebration in apple form that'll make kids lose their minds.
The Tropical Vacation Version
Replace the strawberry candy melts with coconut-flavored white chocolate and roll your apples in toasted coconut flakes mixed with crushed macadamia nuts. The tropical flavors transform this into a beach-vacation treat that somehow works even better than the original. Add a tiny paper umbrella stuck into the top for full vacation vibes, and watch adults fight over them at summer parties.
The Chocolate Lover's Dream
Use dark chocolate melting wafers instead of white for a sophisticated twist, and replace the strawberry drizzle with melted caramel. The cookie crumbs stay the same, but add some flaky sea salt to the mix for that sweet-salty balance that makes people close their eyes when they eat it. This version tastes like a gourmet candy apple you'd pay twelve dollars for at an artisan chocolate shop.
The Holiday Magic Edition
For winter holidays, use peppermint candy melts instead of strawberry, and crush candy canes into your cookie mixture. The red-and-white stripes look absolutely stunning against the white chocolate base, and the peppermint flavor makes these taste like Christmas exploded in the best possible way. I've made these for holiday parties and watched grown adults turn into children again, licking their apples like they're eight years old.
The Peanut Butter Paradise
Add two tablespoons of peanut butter to your melted white chocolate for a subtle nutty flavor that takes these over the top. Roll in crushed peanut butter cookies instead of Oreos, and use butterscotch candy melts for the drizzle. The combination hits every flavor note—sweet, salty, fruity, nutty—and creates an apple that tastes like the world's most sophisticated peanut butter and jelly sandwich.
The Lemon Raspberry Twist
Use lemon-flavored white chocolate (or add lemon extract to regular white chocolate) and replace the strawberry elements with raspberry candy melts. The bright, zesty lemon cuts through the sweetness beautifully, while raspberry adds a tangy contrast that makes these incredibly refreshing. Perfect for spring brunches or baby showers where you want something pretty but not cloyingly sweet.
Storing and Bringing It Back to Life
Fridge Storage
These beauties will keep beautifully in the fridge for up to three days, making them perfect for party prep. Wrap each apple individually in plastic wrap, making sure to cover the stick where it meets the chocolate to prevent moisture from sneaking in and ruining your perfect finish. Store them in the crisper drawer where humidity is lower, and they'll maintain that gorgeous snap when you bite into them. I've made these on Thursday for Saturday parties and they're actually better after a day—the flavors meld and the chocolate develops this perfect texture.
Freezer Friendly
Straight freezing is a no-go (the apple texture becomes weird and mealy), but you can freeze them for 30 minutes to speed up setting if you're in a rush. Just don't leave them longer or the apple cells will break down and create a mushy mess inside your perfect chocolate shell. If you must make them way ahead, consider freezing just the chocolate-coated apples without the cookie coating, then thawing and re-coating fresh before serving.
Best Reheating Method
These don't need reheating per se, but if they've been in a cold fridge and you want to serve them at optimal temperature, let them sit at room temperature for 15-20 minutes. The chocolate will soften slightly, making it easier to bite through without cracking, while the apple stays crisp and refreshing. In humid weather, you might notice some condensation on the chocolate—just gently blot with a paper towel and they'll look good as new.