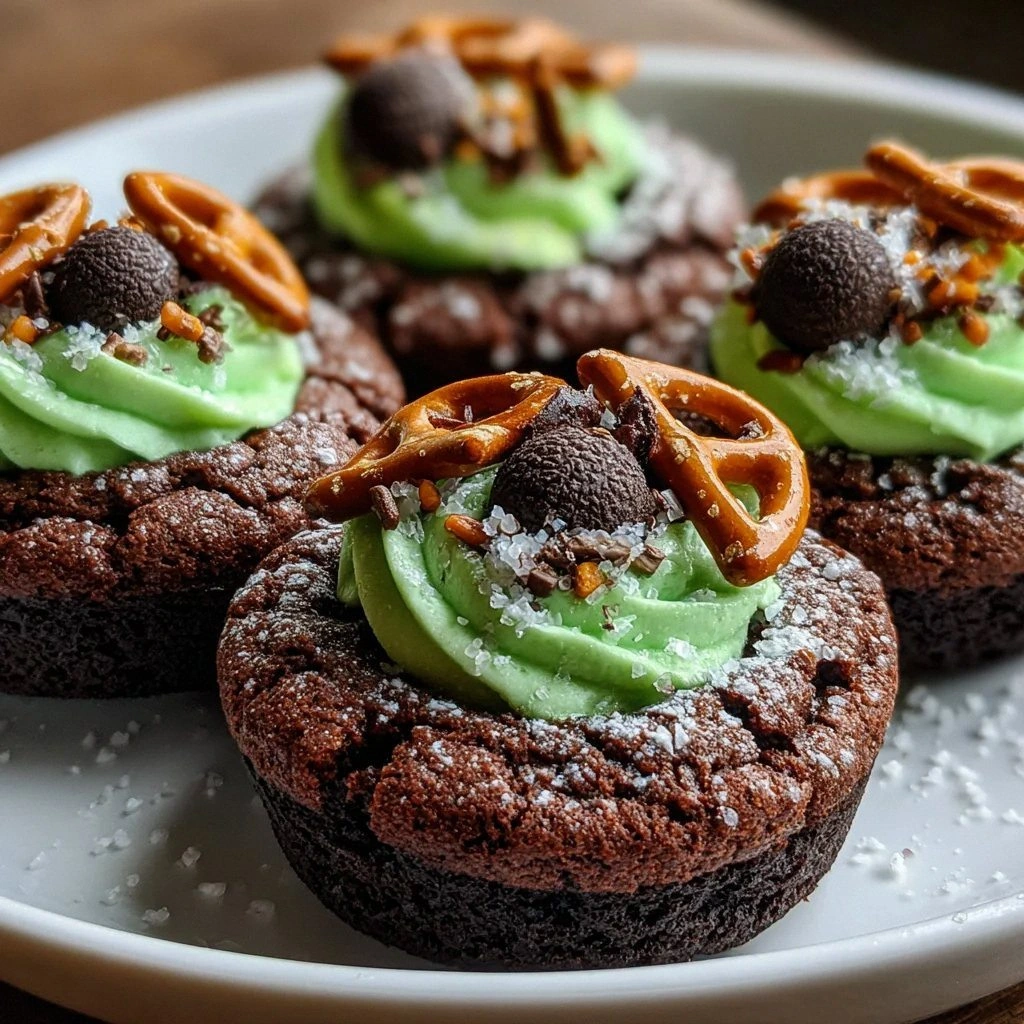
I was standing in my kitchen at midnight, half‑asleep, when my roommate dared me to bake something that could double as a spooky prop and a dessert. I laughed, grabbed the nearest chocolate‑laden box I could find, and whispered, “Challenge accepted.” The result? A batch of cookie cups that look like bubbling cauldrons, each one filled with neon‑green buttercream that screams Halloween but tastes like a chocolate dream. I’ll be honest — I ate half the batch before anyone else got a chance to try, and the only regret was that I didn’t make a second pan.
Picture this: the oven door opens, a wave of warm cocoa perfume rolls out, and the cookies themselves start to puff up like little black moons. The edges turn a deep, almost midnight‑black, while the centers stay soft enough to hold a generous dollop of frosting without cracking. When you bite, the cookie crunches like a crisp autumn leaf, then melts into a velvety chocolate interior that’s richer than any store‑bought brownie. The frosting, dyed a vivid witch‑brew green, slides onto the cookie like molten lava, and the candy eyeballs stare back at you, daring you to take another bite.
Most recipes for “cookie cups” either drown the base in too much butter or leave the cup too fragile to hold any topping. This version stands out because it uses Devil’s Food Cake Mix as the structural backbone, giving the cookies a tender crumb and a deep chocolate flavor that holds up under the weight of frosting, sprinkles, and pretzel stir sticks. The secret weapon? A splash of black food coloring that deepens the color without compromising texture, plus a quick chill before baking that creates a perfect, firm rim. I’m daring you to taste this and not go back for seconds – that’s a promise.
Okay, ready for the game‑changer? I’m about to walk you through every single step – from the moment you open the pantry to the final sprinkle of candy eyeballs. By the end, you’ll wonder how you ever made any other version of cookie cups. Stay with me here — this is worth it.
What Makes This Version Stand Out
- Depth of Flavor: Devil’s Food Cake Mix brings a cocoa intensity that regular chocolate chips can’t match, creating a rich, almost fudgy base that still feels light.
- Texture Balance: The oil keeps the cookie tender, while a brief chill in the fridge before baking gives the rims a crisp, sturdy edge perfect for holding frosting.
- Simplicity: You only need pantry staples and a handful of decorations – no need for separate flour, cocoa, or leavening.
- Visual Wow Factor: The black‑tinted dough and neon green buttercream make these cups the star of any Halloween spread, party platter, or spooky movie night.
- Crowd Reaction: Guests are always amazed when they see the candy eyeballs staring back – it’s an instant conversation starter.
- Make‑Ahead Potential: Bake the cups ahead of time, store them airtight, and pipe the frosting just before serving for zero stress.
- Ingredient Quality: Using a high‑quality Devil’s Food mix means you get a consistent, deep chocolate flavor without extra steps.
- Versatility: Swap the green frosting for any color you like, or replace the candy eyeballs with spooky marshmallows for a different vibe.
Inside the Ingredient List
The Flavor Base
The star of the show is the Devil’s Food Cake Mix. This mix already contains cocoa, sugar, and leavening, so you skip the hassle of measuring out flour and cocoa separately. It gives the cookies a deep, almost velvety chocolate taste that’s impossible to achieve with plain chocolate chips. If you skip it, you’ll end up with a bland, cookie‑like crust that can’t hold the frosting without crumbling. For the best results, choose a mix with a high cocoa percentage and no added pudding mix.
Large Eggs act as the binder, adding moisture and richness. One egg is enough for this batch; more would make the dough too wet and cause spreading. If you’re allergic, a flax‑egg (1 tbsp ground flaxseed + 3 tbsp water) works as a substitute, but expect a slightly denser texture.
Canola or Vegetable Oil keeps the cookies tender and gives them a glossy finish. Oil is preferable to butter here because it won’t solidify during the chill, ensuring a smooth dough. If you’re out of oil, melted coconut oil works but will add a faint coconut note.
The Texture Crew
Black Food Coloring (optional) is the secret to that midnight‑black look. Just a few drops will darken the dough without altering the flavor. If you forget it, the cookies will still taste amazing, but they won’t have that dramatic Halloween vibe.
Unsalted Butter is reserved for the frosting, giving it a silky mouthfeel. Using unsalted butter lets you control the salt level precisely, which is crucial for balancing the sweetness of the powdered sugar.
Powdered Sugar creates a smooth, pipeable frosting. It dissolves easily in the butter, preventing any gritty texture. If you use granulated sugar, you’ll end up with a grainy frosting that ruins the visual appeal.
The Colorful Potion
Vanilla Extract adds warmth and depth to the frosting, making the green color pop without tasting artificial. A good quality vanilla is worth the extra pennies – it’s the difference between a bland buttercream and a fragrant, bakery‑level finish.
Salt is the unsung hero that brings out the chocolate and butter flavors. A pinch (about 1/4 tsp) is enough; too much will make the frosting taste salty, too little and it will taste flat.
Milk adjusts the frosting’s consistency. Start with 2 tbsp and add more if you need a softer pipe. Too much milk makes the frosting runny, so add it gradually.
The Final Flourish
Green Food Coloring turns the buttercream into a bubbling potion. A few drops are enough; remember that the color intensifies as the frosting sits.
Round Green Sprinkles and Halloween Sprinkles give the cups a festive crunch and visual sparkle. Feel free to mix them or use themed sprinkles that match your party palette.
Candy Eyeballs are the pièce de résistance. They sit on top of the frosting like tiny, googly monsters, adding a playful, spooky touch that kids adore.
Pretzel Sticks double as stir sticks for the frosting and add a salty crunch that balances the sweetness. They also serve as edible “spoon” for scooping the frosting into the cups.
Everything's prepped? Good. Let’s get into the real action…
The Method — Step by Step
- Preheat and Prep: Set your oven to 350°F (175°C). While it heats, line a standard 12‑cup muffin tin with silicone cupcake liners. This prevents sticking and makes removal a breeze. I dare you to taste this and not go back for seconds – the aroma will already be intoxicating.
- Mix the Cookie Dough: In a large bowl, combine 2 cups of Devil’s Food Cake Mix, 1 large egg, and ½ cup of canola oil. Stir until just combined – over‑mixing creates a tough cookie. Add 2–3 drops of black food coloring if you want that midnight hue; the dough will turn a deep charcoal that’s perfect for Halloween.
- Chill the Dough: Transfer the dough onto a piece of parchment, shape into a flat disk, and wrap tightly in plastic. Chill in the fridge for 15 minutes. This step is crucial – it firms the dough, making it easier to press into the muffin cups without tearing. Watch Out: Skipping the chill often leads to a runny batter that spreads too thin and loses its cup shape.
- Form the Cups: Take a heaping tablespoon of chilled dough and press it into each muffin cup, pushing up the sides to create a sturdy wall. The bottom should be about ¼ inch thick. This is the moment of truth – the dough should hold its shape and not crack when you lift the tin.
- Bake the Cups: Slide the tin into the preheated oven and bake for 12‑15 minutes, or until the edges are set and the tops are just beginning to turn a rich, dark brown. The scent of chocolate will fill your kitchen, making it impossible to resist sneaking a taste.
- Cool Completely: Remove the tin and let the cups cool in the pan for 5 minutes, then transfer them to a wire rack. They need to be completely cool before frosting, or the buttercream will melt and slide off.
- Prepare the Green Buttercream: While the cups cool, beat ½ cup unsalted butter until light and fluffy (about 2 minutes). Gradually add 2 cups powdered sugar, 1 tsp vanilla, and a pinch of salt. Add 2‑3 tbsp milk until you reach a pipeable consistency, then mix in 4–5 drops of green food coloring until the frosting looks like a witch’s brew.
- Pipe and Decorate: Fill a piping bag with the green buttercream and pipe a generous swirl into each cookie cup, filling them about three‑quarters full. Sprinkle round green sprinkles and Halloween sprinkles over the frosting, then press a candy eyeball into the center of each cup. Finally, insert a pretzel stick on the side as a stir stick. The result? A cauldron that looks ready to bubble over with a potion you actually want to drink.
That’s it — you did it. But hold on, I’ve got a few more tricks that’ll take this to another level…
Insider Tricks for Flawless Results
The Temperature Rule Nobody Follows
Never bake cookie cups straight from a freezer. Cold dough spreads too quickly, giving you thin walls that can’t hold frosting. Instead, let the dough sit at room temperature for 5 minutes after chilling, just enough to soften the edges but keep the center firm. This tiny adjustment yields a cup that’s crisp on the rim and tender inside.
Why Your Nose Knows Best
Rely on scent, not just timer. When the edges start to smell nutty and the tops emit a faint caramel note, they’re done. Over‑baking turns the chocolate bitter, ruining the flavor balance. Trust your nose; it’s the most reliable kitchen gauge.
The 5‑Minute Rest That Changes Everything
After piping the frosting, let the cups rest for exactly five minutes before adding sprinkles and eyeballs. This short pause allows the buttercream to set just enough so the decorations don’t sink. A friend once tried to skip this step and ended up with sprinkles sliding off – a mess we all want to avoid.
Pretzel Stick Power
Don’t just use pretzel sticks as garnish; they double as a functional stir stick for the frosting. Lightly butter them before serving to prevent the frosting from sticking too much. This tiny touch adds a salty crunch that perfectly counters the sweet buttercream.
Color Consistency Trick
If your green frosting looks more teal than neon, add a pinch of cocoa powder. The cocoa deepens the hue without making the frosting taste chocolatey. This is pure magic for achieving that eerie, glowing cauldron look.
Creative Twists and Variations
This recipe is a playground. Here are some of my favorite ways to switch things up:
Spooky S’mores Cauldron
Swap the green frosting for a marshmallow fluff, drizzle melted chocolate over the top, and sprinkle crushed graham crackers. The result is a campfire‑in‑a‑cup that’s perfect for autumn evenings.
Minty Monster Melt
Add a teaspoon of peppermint extract to the buttercream and replace green sprinkles with dark chocolate shavings. The cool mint cuts through the richness, creating a refreshing bite.
Caramel Cauldron
Stir a couple of tablespoons of caramel sauce into the buttercream and top with sea‑salt flakes. The salty‑sweet combo makes the cups addictive.
Nutty Nightmare
Fold finely chopped toasted almonds into the cookie dough before baking. The nuts add a crunchy surprise that pairs nicely with the smooth frosting.
Vegan Vortex
Replace the cake mix with a vegan chocolate cake mix, use flax eggs, and swap butter for coconut oil‑based frosting. The result is a plant‑based treat that still looks and tastes hauntingly good.
Storing and Bringing It Back to Life
Fridge Storage
Place the cooled cookie cups in an airtight container and refrigerate for up to 5 days. The frosting will firm up a bit, so let them sit at room temperature for 10 minutes before serving to regain that silky texture.
Freezer Friendly
Wrap each cup individually in plastic wrap, then store in a zip‑top freezer bag. They’ll keep for up to 2 months. When you’re ready, thaw overnight in the fridge, then bring to room temperature before piping fresh frosting.
Best Reheating Method
To revive a slightly stale cup, preheat your oven to 300°F (150°C), place the cup on a baking sheet, and warm for 5‑7 minutes. Add a tiny splash of milk to the frosting before reheating – the steam restores its smoothness.