I'm not going to sugarcoat this — I used to be the world's worst chicken roller. My early attempts looked like sad, deflated burritos with cheese oozing out like some kind of dairy crime scene. Picture me standing in my kitchen at 11 PM, wrapping and unwrapping the same piece of chicken, muttering words that would make Gordon Ramsay blush. That all changed the night my best friend dared me to make "those fancy restaurant roll-ups" for her birthday dinner. Challenge accepted, dignity on the line, and what emerged from that culinary chaos became this ridiculously good recipe that I'm about to shove into your life like I wish someone had done for me years ago.
Here's the thing about these grilled chicken roll-ups: they're basically edible magic tricks. You take a boring old chicken breast, pound it into submission, stuff it with flavors that make your taste buds do backflips, roll it up like you're rolling a burrito for a giant, and suddenly you've got restaurant-quality food that makes people think you've been secretly attending culinary school. The first time I served these, my brother actually asked if I'd ordered takeout from that expensive Italian place downtown. Nope, just me, my trusty cast iron pan, and a recipe that I'm convinced was whispered to me by a very wise Italian grandmother.
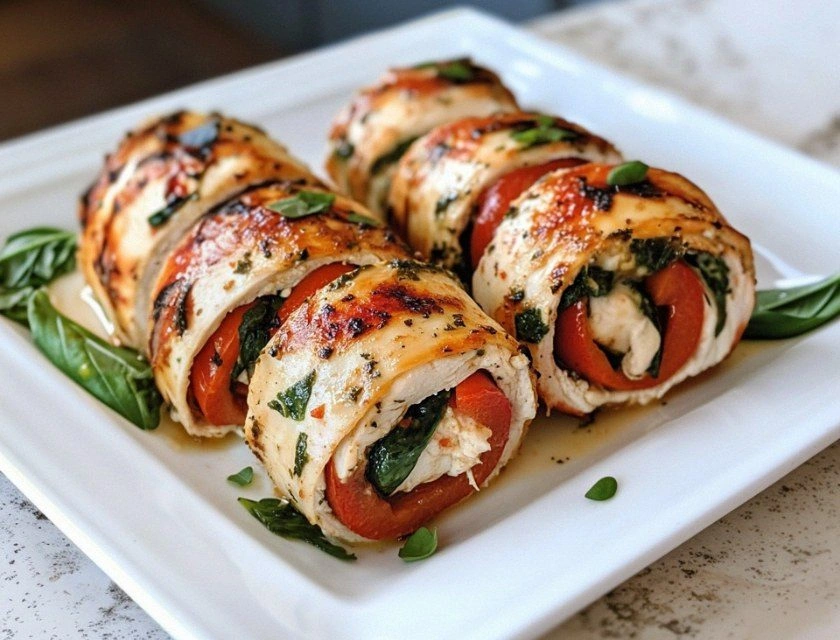
What makes these particular roll-ups borderline addictive is the holy trinity of spinach, roasted red peppers, and mozzarella that gets tucked inside. The spinach wilts into this silky green ribbon, the roasted peppers bring that sweet-smoky punch that makes everything better, and the mozzarella? Oh, the mozzarella creates this molten river of cheese that stretches for miles when you cut into it. I'm getting distracted just thinking about it, and I promise you're going to feel the same way when you smell these cooking. That moment when the cheese starts bubbling out the sides and the edges get those gorgeous grill marks? Pure kitchen nirvana.
But here's the kicker — and I'm letting you in on the secret that changed everything for me — it's all about the roll technique and the temperature control. Most recipes get this completely wrong, leaving you with dry chicken or cheese explosions that look like your dinner had a small volcanic event. I'm going to show you exactly how to avoid those disasters, plus a few tricks that'll make your roll-ups so good, you'll be finding excuses to make them every week. Let me walk you through every single step — by the end, you'll wonder how you ever made it any other way.
What Makes This Version Stand Out
Flavor Bomb: These roll-ups pack more taste into every bite than most chicken dishes manage in the entire breast. The combination of garlicky spinach, sweet roasted peppers, and that melty mozzarella creates this perfect storm of savory, sweet, and creamy that'll make your taste buds think they've died and gone to an Italian deli.
Texture Paradise: We're talking about tender chicken wrapped around silky spinach with little pops of roasted pepper and that stretchy cheese pull that Instagram dreams are made of. Every bite has this incredible contrast between the slightly crispy chicken exterior and the soft, molten interior that'll have you closing your eyes involuntarily.
Weeknight Friendly: Despite looking like you spent hours in culinary school, these come together in under 45 minutes from start to finish. I've made them on Tuesday nights when I couldn't be bothered with anything complicated, and they're still impressive enough for Saturday dinner parties.
Make-Ahead Magic: You can prep these bad boys up to 24 hours ahead, keep them wrapped in the fridge, and just pop them on the grill when you're ready. I dare you to taste this and not go back for seconds when you realize how much time this saves on busy weeknights.
Leftover Champion: Here's what actually works — slice up any leftovers cold for the most incredible chicken sandwiches the next day. The flavors meld together overnight into something even more spectacular, if you can resist eating them all the first night.
Scale Factor: This recipe scales like a dream. I've made it for romantic dinners for two and for backyard barbecues with twenty hungry friends. The technique stays exactly the same no matter how many you're feeding.
Confidence Booster: If you've ever struggled with making chicken interesting, you're not alone — and I've got the fix. This recipe will make you feel like a proper chef, even if your usual specialty is toast.
Inside the Ingredient List
The Flavor Foundation
Chicken breasts are the obvious star here, but not all breasts are created equal. I learned this the hard way after buying those massive, hormone-pumped monstrosities that could feed a small village. Go for medium-sized, organic chicken breasts — about 6-8 ounces each. They're easier to pound thin, cook more evenly, and have better texture than their oversized cousins. If you can only find the huge ones, butterfly them first and save yourself the wrestling match with your meat mallet.
Olive oil isn't just for cooking — it's your flavor carrier. Use a good quality extra virgin olive oil for drizzling at the end, and regular olive oil for cooking. The fruity notes of a quality olive oil will make your roll-ups taste like they came from a proper Italian kitchen instead of a sad American chain restaurant. Skip the cheap stuff that tastes like motor oil — your taste buds deserve better than that culinary crime.
The Texture Crew
Fresh spinach is non-negotiable here, and I'll fight anyone who suggests using frozen. Fresh spinach wilts into these delicate, silky ribbons that practically melt into the chicken. Frozen spinach turns into watery, stringy sadness that'll make your roll-ups soggy and depressed. Buy a big bag because spinach cooks down to nothing, and you'll want plenty for that gorgeous green layer. Look for bright, crisp leaves without any yellowing or slimy spots — if it looks sad in the bag, it'll taste sad on your plate.
Mozzarella choice makes or breaks these roll-ups. Fresh mozzarella gives you those dramatic cheese pulls for days, but it can be too watery if you're not careful. I use a combination — fresh mozzarella torn into pieces for the center, plus a little shredded low-moisture mozzarella on top for that perfect golden bubble. If you can only pick one, go with the fresh stuff and pat it dry with paper towels first. The difference between this and the pre-shredded stuff in a bag is like comparing a Ferrari to a bicycle with square wheels.
The Flavor Amplifiers
Roasted red peppers from a jar are perfectly acceptable — I use them all the time because who has time to roast and peel peppers on a Tuesday? Look for ones packed in water or olive oil, not that weird vinegary brine that makes everything taste like a pickle. Pat them dry and give them a rough chop so you get little sweet-smoky bursts throughout each bite. If you're feeling fancy, roast your own peppers over a gas flame until they're charred and blistered, then steam them in a bowl covered with plastic wrap — the skins slip right off.
Garlic is your best friend here, but treat it right. Minced garlic gets sautéed with the spinach to create this aromatic base that perfumes the whole dish. Don't even think about using that pre-minced stuff in a jar — it tastes like disappointment and has the texture of little rubber erasers. Fresh garlic, minced fine, cooked just until fragrant but not browned — that's your ticket to flavor town. Overcooked garlic turns bitter and will ruin the whole delicate balance we're building here.
The Unexpected Star
Italian seasoning might seem basic, but it's the secret handshake that ties everything together. I make my own blend — equal parts dried oregano, basil, thyme, and a pinch of rosemary. The dried herbs hold up better to the high heat of grilling than fresh ones would, giving you that concentrated Mediterranean flavor that makes these taste like they came from a trattoria. Don't go overboard — you want to enhance the other ingredients, not create a spice bomb that overpowers the delicate chicken and cheese.
Everything's prepped? Good. Let's get into the real action...
The Method — Step by Step
- Start by laying your chicken breasts on a cutting board and covering them with plastic wrap. Using a meat mallet, rolling pin, or the bottom of a heavy pan, pound them evenly until they're about 1/4 inch thick. Don't go crazy here — you're not trying to make chicken wallpaper. Work from the center outward, keeping the thickness consistent so they cook evenly. This is where most people mess up by leaving them too thick, which makes rolling impossible, or going too thin and creating holes that'll let all your precious filling escape during cooking.
- Season both sides of your flattened chicken generously with salt, pepper, and half of your Italian seasoning blend. Be assertive with the seasoning — chicken breast needs help in the flavor department, and this is your first layer of building something spectacular. Let them sit while you prep the filling, which gives the salt time to work its magic and season the meat throughout rather than just sitting on the surface like an afterthought.
- Heat a large skillet over medium heat and add a tablespoon of olive oil. When the oil shimmers and moves like water, toss in your minced garlic and let it dance for about 30 seconds. You want to smell that gorgeous aroma but don't let it brown — burnt garlic is bitter garlic, and bitter garlic will turn your beautiful roll-ups into a disappointment sandwich. Add the spinach in handfuls, stirring as it wilts down. Season with a pinch of salt and the remaining Italian seasoning.
- Once the spinach has wilted into a beautiful green tangle, remove it from the heat and let it cool slightly. You don't want to burn your fingers when you're assembling, and hot filling will start melting the cheese before you even get these rolled. Squeeze out any excess moisture — I use a clean kitchen towel for this — because watery filling equals soggy roll-ups that fall apart faster than my willpower in a bakery.
- Lay your seasoned chicken pieces out on a clean surface, smoother side down. Place a layer of spinach mixture down the center of each piece, leaving about an inch border on all sides. Top with strips of roasted red pepper and pieces of mozzarella. Don't overstuff them — I know it's tempting, but you'll thank me later when your roll-ups actually stay rolled instead of exploding like a poorly constructed burrito. Less is more here, people.
- Secure each roll-up with toothpicks or kitchen twine, spacing them evenly so they hold their shape during cooking. If using toothpicks, soak them in water for 10 minutes first to prevent burning — learned that one the hard way after setting off every smoke detector in my apartment. Space them about every 2 inches, making sure to catch all the layers so nothing escapes during the grilling process.
- Preheat your grill or grill pan to medium-high heat — you want it hot enough to create those beautiful grill marks but not so hot that the outside burns before the inside cooks through. Brush the grates with oil to prevent sticking, because nothing ruins presentation quite like your beautiful roll-ups tearing apart when you try to flip them. The grill should be hot enough that you can only hold your hand over it for 2-3 seconds.
- Place your roll-ups seam-side down first — this helps seal them closed and prevents them from unfurling like party streamers. Grill for 6-8 minutes per side, turning carefully with tongs. You're looking for golden-brown grill marks and chicken that feels firm but still has a little give when pressed. The cheese inside should be melted and bubbly, creating little rivers of molten deliciousness that might leak out — don't worry, that's just flavor concentrate for your plate.
- Once they're done, transfer to a plate and let them rest for 5 minutes — this is where the magic happens. The juices redistribute, the cheese sets slightly so it doesn't all run out when you cut into them, and you don't burn your mouth on lava-hot cheese. I know the smell is driving you crazy right now, but trust me on this one. Good things come to those who wait, and these 5 minutes make the difference between good roll-ups and legendary ones.
- Remove the toothpicks or twine before serving — unless you want your dinner guests to perform an impromptu dental procedure. Slice them on the bias for maximum presentation points, revealing that gorgeous spiral of green, red, and white. The cross-section should look like edible art, with distinct layers that make everyone reach for their phones before they even taste them.
That's it — you did it. But hold on, I've got a few more tricks that'll take this to another level...
Insider Tricks for Flawless Results
The Temperature Rule Nobody Follows
Here's the thing that separates restaurant-quality roll-ups from home cook disasters — internal temperature. Chicken breast hits its sweet spot at 165°F, but because these are rolled and stuffed, you want to pull them at 160°F and let carryover cooking take them the rest of the way. A friend tried skipping this step once — let's just say it didn't end well, and we had to order pizza instead. Use an instant-read thermometer inserted into the thickest part, making sure you're not touching the filling which can give you a false reading.
Why Your Nose Knows Best
That sizzle when they hit the pan? Absolute perfection. But here's what most people miss — your nose is actually the best timer you have. When you start smelling that gorgeous roasted chicken aroma mingling with the garlic and herbs, you're about 2 minutes away from flip time. It's like having a built-in kitchen assistant that never needs batteries. This smell signals the Maillard reaction working its magic, creating those complex flavors that make these roll-ups taste like they took hours instead of minutes.
The 5-Minute Rest That Changes Everything
I'll be honest — I ate half the batch before anyone else got to try it the first time I made these, all because I couldn't wait for them to rest properly. But here's what actually works: those 5 minutes of resting time aren't just for show. The proteins relax, the juices redistribute, and the cheese sets to that perfect molten consistency instead of running all over your plate like a dairy avalanche. Cover them loosely with foil during the rest — too tight and you'll steam them, making the outside soggy instead of maintaining that gorgeous texture.
The Double-Sear Secret
Okay, ready for the game-changer? After your roll-ups have rested, pop them back on the grill for just 30 seconds per side. This creates an extra-crispy exterior that contrasts beautifully with the molten interior. It's like having a built-in textural surprise that makes people wonder what kind of wizardry you performed. Just be careful not to overdo it — you're looking for enhanced color and texture, not chicken jerky.
The Presentation Trick That Impresses Everyone
Slice them on a bias with a very sharp knife, wiping the blade between cuts for clean, professional-looking slices. Arrange them in a slight spiral on the plate, drizzling with any accumulated juices. Add a few fresh basil leaves and a crack of black pepper on top. Suddenly you're not just serving dinner — you're presenting a masterpiece that looks like it came from a cooking show. My mother-in-law, who critiques everything, actually gasped when I served these. A literal gasp. From my mother-in-law.
Creative Twists and Variations
This recipe is a playground. Here are some of my favorite ways to switch things up:
The Mediterranean Makeover
Swap the Italian seasoning for a blend of oregano, lemon zest, and fresh dill. Replace the roasted peppers with sun-dried tomatoes and add some crumbled feta to the mozzarella. The result tastes like you're dining on a Greek island, minus the expensive plane ticket and questionable travel decisions. Add a squeeze of fresh lemon right before serving for brightness that makes everything pop like a flavor firework.
The Southwest Adventure
Replace the Italian seasoning with cumin, chili powder, and a touch of smoked paprika. Use pepper jack cheese instead of mozzarella and add some roasted poblano peppers along with the red peppers. Serve with a side of salsa verde for dipping — suddenly you've got roll-ups that taste like they came from a Mexican cantina. The spice level is totally customizable, so you can make them as mild or wild as your crowd prefers.
The French Connection
Go full French with brie, caramelized onions, and wilted spinach with a touch of nutmeg. Use herbes de Provence instead of Italian seasoning. The brie melts into this luxurious river of cheese that makes regular mozzarella seem like amateur hour. These are rich enough for a special occasion but easy enough for a random Wednesday when you need to feel fancy. Picture yourself pulling this out of the oven, the whole kitchen smelling like a Parisian bistro.
The Breakfast Champion
Stuff them with sautéed spinach, crispy bacon pieces, and sharp cheddar instead of mozzarella. Add a smear of cream cheese to help everything stick together. These make incredible brunch roll-ups that pair perfectly with mimosas and lazy Sunday mornings. The bacon fat bastes the chicken from the inside, creating incredible flavor that makes regular breakfast seem like a sad, forgotten memory.
The Veggie Powerhouse
Skip the chicken entirely and use large portobello mushroom caps instead. Fill them with the same spinach mixture, add some grilled zucchini strips, and use a combination of mozzarella and goat cheese. Even dedicated carnivores devour these — they're that good. The mushrooms give you that meaty texture without the meat, and the goat cheese adds this tangy complexity that makes vegetables feel indulgent instead of virtuous.
The Surf and Turf Deluxe
Add some cooked crab meat or small shrimp to the filling along with the other ingredients. Use Old Bay seasoning instead of Italian herbs. This takes the roll-ups into special occasion territory — they're rich, impressive, and taste like something you'd order at a fancy coastal restaurant. The seafood adds sweetness that plays beautifully against the savory chicken and cheese, creating this sophisticated flavor profile that'll have everyone asking for the recipe.
Storing and Bringing It Back to Life
Fridge Storage
Store leftover roll-ups in an airtight container in the refrigerator for up to 4 days. Here's what actually works: let them cool completely before storing, and place a piece of parchment paper between layers to prevent them from sticking together. The key is to store them whole rather than sliced — they stay moister and don't dry out like cut pieces inevitably do. When you're ready to reheat, you'll have something that tastes almost as good as fresh instead of sad, dried-out chicken roll-ups that taste like regret.
Freezer Friendly
These freeze beautifully for up to 3 months, making them perfect for meal prep or emergency dinner situations. Wrap each cooled roll-up individually in plastic wrap, then place them all in a freezer bag with the air pressed out. Label with the date because frozen chicken has a way of becoming mysterious after a few months. The trick is to undercook them slightly if you know you're freezing them — pull them about 2 minutes early so they don't get overcooked when you reheat them later.
Best Reheating Method
Add a tiny splash of water before reheating — it steams back to perfection. Cover with a damp paper towel and microwave for 2-3 minutes, or wrap in foil and warm in a 350°F oven for about 15 minutes. The microwave method is faster but can make them rubbery if you're not careful. The oven method takes longer but restores them to almost fresh quality. For the best of both worlds, microwave for 1 minute to take the chill off, then finish in a hot skillet for 2 minutes per side to crisp up the outside again.