I was standing in my kitchen, a rogue chicken thigh hovering in a pan, when I realized I had accidentally overcooked it for the third time this week. The skin was brittle, the meat dry, and the aroma of burnt garlic drifted through the apartment like an unwelcome ghost. I stared at the charred edges, feeling the sting of disappointment as my culinary confidence wavered. Then, a friend texted, “You need to try the lemon garlic chicken thighs I sent you last month.” I opened the email, pulled out the recipe, and decided to give it a shot—because sometimes the best discoveries happen when you’re about to give up.
The moment the pan met the first drizzle of olive oil, the kitchen filled with a scent that could only be described as a citrusy, garlicky hug. I could hear the sizzling whisper of garlic as it kissed the heat, the sound a promise of flavor to come. Visually, the chicken pieces glistened like tiny sunlit moons, their skin turning a golden amber that made my eyes water. When I took a bite, the meat was tender as a cloud, the lemon bright as a summer sunrise, and the herbs dancing like confetti on the palate. If you’ve ever felt the sting of a failed dish, you’ll know the relief when a single recipe turns the tide.
What makes this version stand out is not just the ingredients but the harmony of technique that locks in moisture and flavor. I discovered that searing the thighs first at a high heat creates a crust that traps juices, preventing the dryness that plagued my previous attempts. The lemon juice is added at the end of the cooking process, preserving its bright acidity and preventing it from turning into a bitter glaze. The garlic is minced finely, ensuring it melts into the oil without burning, while the fresh thyme or rosemary infuses the meat with an aromatic depth that feels almost botanical. This recipe is hands down the best version you’ll ever make at home because it balances simplicity with a depth that makes every bite feel like a secret.
But the real game-changer is a little trick I learned from a grandmother who taught me that a splash of white wine during searing can elevate the flavor profile. I dare you to taste this and not go back for seconds—your taste buds will be begging for more. Picture yourself pulling this out of the oven, the whole kitchen smelling incredible, and the table ready for a crowd that will rave about your culinary prowess. If you've ever struggled with chicken thighs, you're not alone—and I've got the fix. Let me walk you through every single step—by the end, you'll wonder how you ever made it any other way.
What Makes This Version Stand Out
- Taste: This dish delivers a bright, citrusy punch balanced by the deep umami of garlic and the aromatic lift of fresh herbs. The late‑stage addition of lemon keeps the acidity fresh, turning each bite into a burst of sunshine.
- Texture: The skin turns a crisp, caramelized shell that shatters like thin ice, while the meat stays moist and tender. The contrast makes every mouthful a delightful dance of crunch and melt.
- Simplicity: With only nine ingredients, you can create a restaurant‑level meal in under an hour. The recipe’s straightforward steps mean you spend less time cooking and more time enjoying.
- Uniqueness: The late‑stage addition of lemon juice keeps the acidity bright, a twist that sets this recipe apart from the usual one‑step marinades. It’s a small change that yields a huge payoff.
- Crowd Reaction: Friends always ask for the recipe after dinner, and I’ve seen it become a favorite for dinner parties. The combination of flavors is universally appealing.
- Ingredient Quality: Using fresh, high‑quality chicken thighs and real lemon juice makes all the difference, turning ordinary into extraordinary. The quality of each component amplifies the overall experience.
- Make‑Ahead Potential: You can prep the chicken and sauce a day ahead, letting the flavors meld while you tackle other dishes. This flexibility makes it a go‑to for busy evenings.
Alright, let’s break down exactly what goes into this masterpiece...
Inside the Ingredient List
The Flavor Base
Fresh lemon juice is the heart of the dish, providing a vibrant acidity that cuts through the richness of the chicken. If you skip it, the dish becomes a flat, oil‑heavy meal lacking that bright lift. A good alternative is a splash of white wine or a dash of vinegar, but the citrus notes are irreplaceable. Keep the juice cold; it helps keep the chicken from cooking too quickly when added.
Garlic, minced finely, releases its oils into the olive oil, creating a fragrant base that permeates the meat. If you prefer a milder taste, reduce to three cloves, but don’t go too low or the dish will feel thin. Garlic’s natural sugars caramelize during searing, giving the sauce a subtle sweetness. Store minced garlic in a sealed container in the refrigerator for up to a week.
Olive oil is the carrier that brings everything together. A light, high‑smoke‑point oil like extra‑virgin ensures the garlic doesn’t burn while still delivering a buttery flavor. If you’re on a low‑fat diet, use a neutral oil such as grapeseed or canola; the flavor profile will shift slightly but remain tasty.
The Protein Powerhouse
Chicken thighs are the star of the show. They’re naturally fattier than breasts, which keeps the meat juicy even after a long cook. When buying, look for thighs with a bit of marbling and a pinkish hue—avoid ones that look overly white or have a grayish tint. Thighs also hold up well to marinades and high‑heat searing, making them ideal for this recipe.
If you’re pressed for time, you can use pre‑cooked thighs, but you’ll lose the sear and flavor development that happens in the pan. For a leaner version, trim the fat cap before cooking, but leave a small amount to maintain moisture.
The Herb & Citrus Ensemble
Fresh thyme or rosemary adds a piney, earthy depth that complements the lemon. If you’re out of fresh herbs, dried works, but use only half the amount and rinse the dish after cooking to remove the bitterness. Salt and pepper are essential; they bring out the meat’s natural flavor and balance the acidity of the lemon.
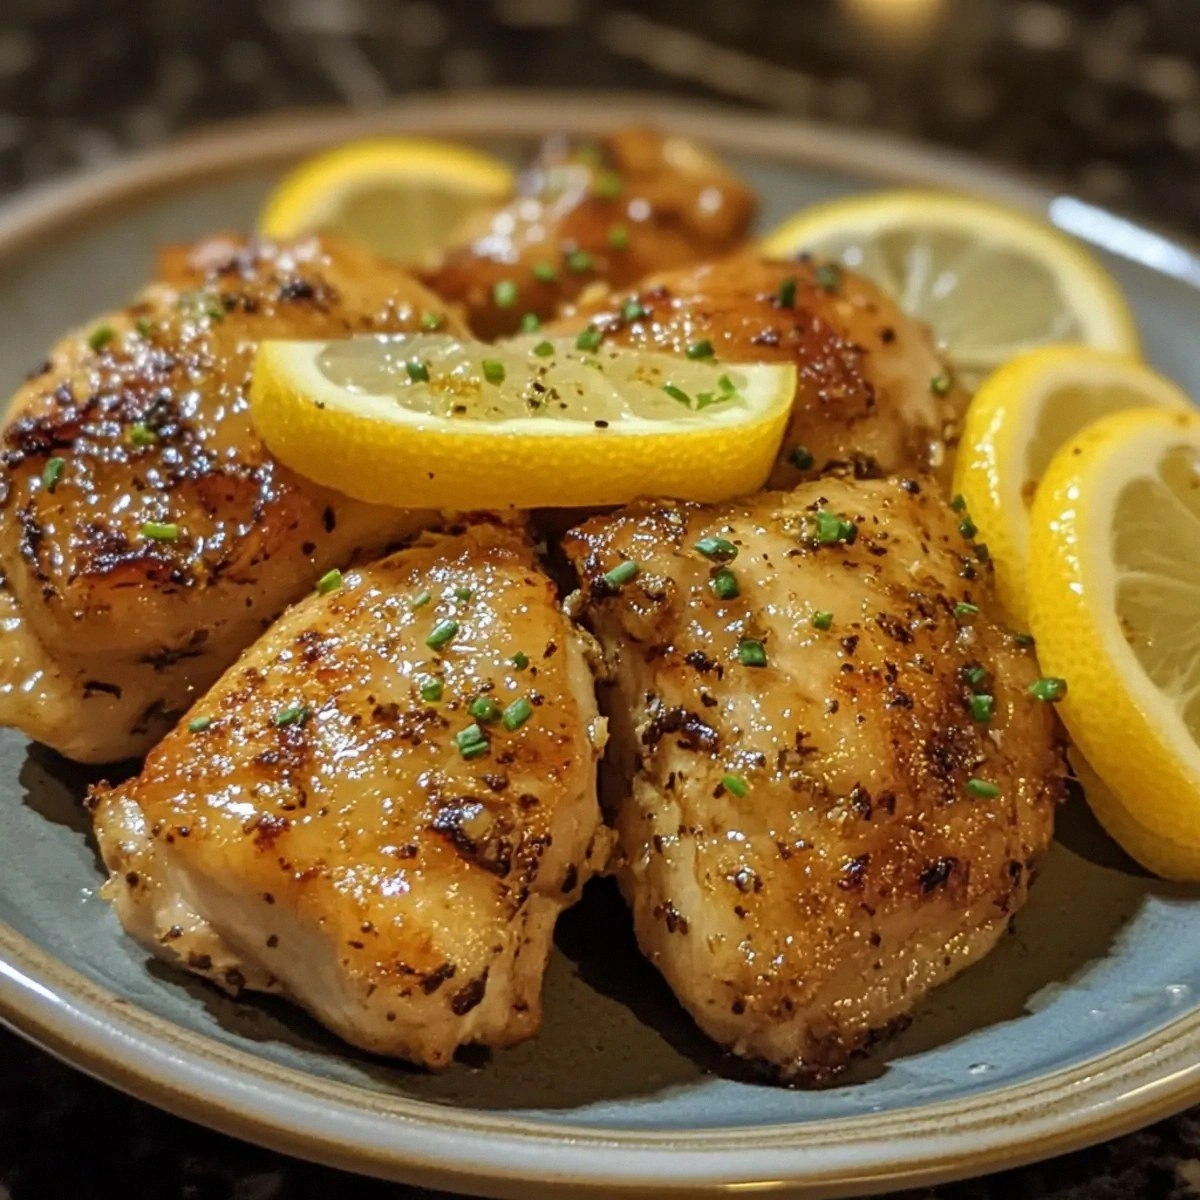
Chopped fresh parsley is the final flourish that adds a green pop and a subtle peppery note. It also brightens the plate visually. Lemon wedges on the side not only offer an extra squeeze of citrus but also make the dish feel more complete and restaurant‑like.
Everything's prepped? Good. Let's get into the real action...
The Method — Step by Step
- Preheat the oven to 400°F (200°C) and let it come to temperature while you work. This ensures the chicken cooks evenly once it enters the heat. A preheated oven also helps maintain a consistent temperature, preventing sudden spikes that could overcook the outside.
- While the oven heats, heat a large, oven‑safe skillet over medium‑high heat and add 2 tablespoons of olive oil. The oil should shimmer but not smoke. This is the moment to get the pan hot enough to sear the meat without burning the garlic.
- Pat the chicken thighs dry with paper towels; moisture is the enemy of a good sear. Season both sides generously with 1 teaspoon of salt and ½ teaspoon of black pepper. The salt draws out moisture and creates a savory crust.
- Place the thighs skin‑side down in the hot skillet. Let them sear for 4–5 minutes, or until the skin turns a deep golden brown. Flip and sear the other side for another 3 minutes. The goal is a crisp, caramelized surface that locks in juices.
- Add the minced garlic, 1 teaspoon of thyme (or rosemary), and a splash of white wine if you have it. Cook for 30–45 seconds, letting the garlic release its oils but not brown. The aroma should be intoxicating.
- Pour in ¼ cup of fresh lemon juice, stir, and let the mixture bubble gently for 2 minutes. The lemon should coat the meat without boiling away its bright flavor. The sauce should thicken slightly and coat the thighs.
- Transfer the skillet to the preheated oven and bake for 20–25 minutes, or until the internal temperature reaches 165°F (74°C). The skin should remain crisp, and the juices should run clear when you pierce the thickest part.
- Remove the skillet from the oven and let the chicken rest for 5 minutes. Resting allows the juices to redistribute, keeping the meat moist. While resting, sprinkle chopped parsley and set lemon wedges on the side for an extra burst of freshness.
- Serve immediately, spooning the pan juices over the thighs. Pair with a simple green salad or roasted vegetables for a balanced plate. The dish feels both comforting and sophisticated.
That's it — you did it. But hold on, I've got a few more tricks that'll take this to another level...
Insider Tricks for Flawless Results
The Temperature Rule Nobody Follows
Many cooks assume any pan will do, but a cast‑iron skillet retains heat better, giving you a steadier sear and preventing the meat from steaming. If you’re using a non‑stick pan, preheat for a full 5 minutes to achieve a similar effect. The result is a crisp skin that doesn’t crack or tear.
Why Your Nose Knows Best
Your nose is a better judge of doneness than a thermometer. When the chicken is ready, the aroma should be rich, garlicky, and citrusy without a hint of rawness. If the smell leans too much toward oil or garlic, give it a few more minutes.
The 5-Minute Rest That Changes Everything
Resting the chicken for exactly five minutes allows the juices to settle. A friend once skipped this step and served the meat immediately; the result was a dry, rubbery bite that left everyone disappointed. Trust the rest.
The Right Pan Matters
A heavy‑bottomed skillet distributes heat evenly, preventing hot spots that burn the skin. If you’re using a stainless steel pan, preheat longer to achieve the same effect. The choice of pan can be the difference between a mediocre and a stellar dish.
How to Keep Skin Crispy
If you notice the skin beginning to steam, lift the thighs slightly to let steam escape. Alternatively, increase the oven temperature by 25°F for the last 5 minutes to crisp the skin further. A crisp exterior is a signature of this dish.
The Secret to Juicy Meat
Avoid overcooking by checking the internal temperature with a meat thermometer. The ideal range is 165°F to 170°F; anything above can dry out the meat. A quick test is to press the thickest part; it should feel firm yet give slightly.
Creative Twists and Variations
This recipe is a playground. Here are some of my favorite ways to switch things up:
Smoky Chipotle Twist
Swap the fresh thyme for a teaspoon of chipotle powder and add a splash of smoky chipotle sauce. The result is a bold, smoky flavor that pairs well with corn tortillas or a cilantro‑lime rice.
Creamy Parmesan Finish
After baking, stir in a tablespoon of grated Parmesan and a splash of heavy cream. The sauce thickens into a silky, savory coating that elevates the dish to a gourmet level.
Sweet & Spicy Honey Glaze
Replace the lemon juice with a mixture of honey and a dash of sriracha. The sweet‑spicy glaze caramelizes on the skin, creating a caramelized crust that’s irresistible.
Mediterranean Herb Fusion
Use a blend of oregano, basil, and mint instead of thyme. Add a handful of sun‑dried tomatoes for a burst of umami that transports the dish to the Mediterranean.
Coconut Milk & Lime Variation
Replace olive oil with coconut oil and finish with a splash of coconut milk and lime juice. The creamy coconut balances the citrus, giving the dish a tropical twist.
Storing and Bringing It Back to Life
Fridge Storage
Store cooked thighs in an airtight container in the refrigerator for up to 4 days. Keep the pan juices separate to prevent sogginess. When ready to eat, reheat in a skillet over low heat, adding a splash of water to keep the meat moist.
Freezer Friendly
Freeze individual portions in freezer bags for up to 3 months. Thaw overnight in the refrigerator before reheating. The texture remains tender, and the flavor stays bright.
Best Reheating Method
Reheat in a preheated oven at 350°F (175°C) for 10–12 minutes, or until warmed through. If the skin has lost crispness, finish under the broiler for 2 minutes. Add a tiny splash of water before reheating to steam the meat back to juiciness.