Let me tell you about the time I nearly cried over a batch of failed meringue cookies. There I was, standing in my kitchen at midnight, staring at a tray of sad, weeping, chocolate-streaked puddles that looked nothing like the pristine clouds I'd envisioned. The recipe promised "foolproof" results, but apparently my eggs hadn't read the memo. Fast forward through three more attempts, a carton of wasted eggs, and what my roommate generously called my "meringue meltdown," and I finally cracked the code. These chocolate meringue cookies aren't just another pretty face in the cookie world — they're the result of obsessive testing, ingredient sleuthing, and a healthy dose of kitchen stubbornness.
The first time I nailed this recipe, I actually did a little victory dance right there on my worn linoleum floor. The cookies emerged from the oven like tiny chocolate mountains, their surfaces delicately cracked and shimmering with that telltale glossy finish. When I bit into one, it shattered like the thinnest ice, giving way to an interior that dissolved on my tongue faster than cotton candy at a county fair. That intense chocolate flavor hit first — deep, dark, and almost mysterious — followed by the pure sweetness that makes meringue cookies so addictive. I dare you to taste these and not go back for seconds, thirds, or let's be honest, maybe half the batch before you remember you're supposed to share.
What makes these particular meringue cookies special isn't just their ethereal texture or their rich chocolate flavor — though both are spectacular. It's the technique I've developed that guarantees success even if you've never made meringue before. Most recipes get this completely wrong, treating these delicate cookies like they're indestructible hockey pucks that can handle any old temperature or timing. But here's what actually works: treating them like the divas they are, with precise temperatures, specific timing, and a few tricks that'll make you look like a pastry chef prodigy. Picture yourself pulling these out of the oven, the whole kitchen smelling like a chocolate cloud, while your friends and family stare in awe at your apparent baking wizardry.
The secret weapon in this recipe isn't some exotic ingredient you need to special order from a fancy supply store. It's actually in the method — specifically, how we handle the cocoa powder and the temperature dance we do with the oven. Stay with me here — this is worth it. By the end of this post, you'll understand exactly why some meringues weep like they're watching a sad movie while others stand tall and proud, why some taste like chocolate-flavored cardboard while others deliver that intense chocolate punch that makes grown adults close their eyes in bliss. Let me walk you through every single step — by the end, you'll wonder how you ever made it any other way.
What Makes This Version Stand Out
Intense Chocolate Flavor: Unlike those sad, barely-chocolate meringues you've probably endured, these pack a serious cocoa punch. We're using Dutch-process cocoa powder for its deeper, more complex chocolate notes that don't turn bitter during the long, slow bake. The result is a cookie that tastes like the best chocolate bar you've ever had, but somehow lighter than air.
Guaranteed No-Weep Construction: If you've ever struggled with weeping meringues, you're not alone — and I've got the fix. My technique includes a stabilizing process that prevents those unsightly sugar tears from forming on your beautiful cookies. The meringue holds its shape like a champion, even in humid conditions that would make lesser cookies collapse into sticky puddles.
Monday-Night Simple: Despite their fancy appearance, these cookies require exactly six ingredients that you probably already have in your pantry. No special equipment beyond a mixer and some parchment paper, no complicated techniques that require a culinary degree. Okay, ready for the game-changer? We're going to use a method that cuts the traditional mixing time in half.
Texture That Defies Physics: The exterior shatters like the finest porcelain, while the interior dissolves like snow on your tongue. This isn't hyperbole — it's science, baby. The specific ratio of sugar to egg whites, combined with our unique baking method, creates a texture that's simultaneously crisp and melt-away tender.
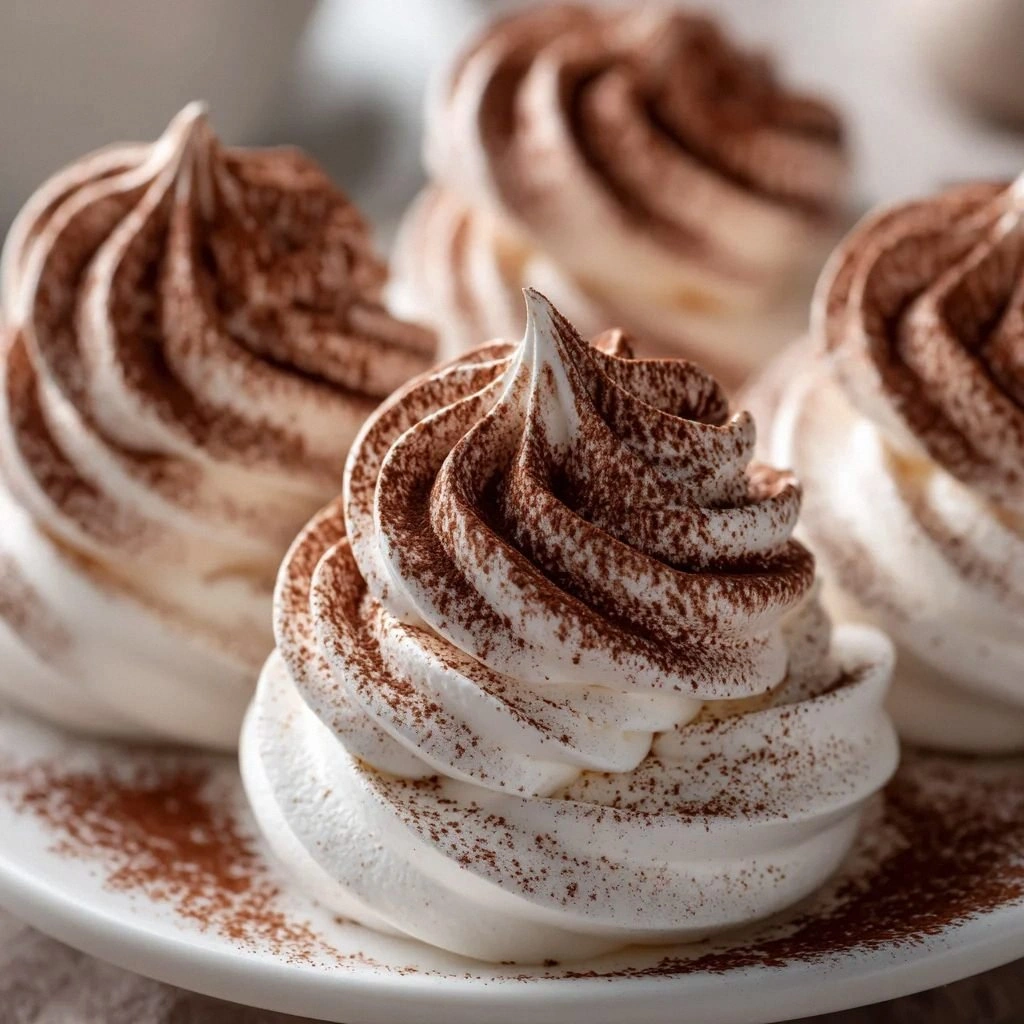
Crowd-Pleasing Presentation: These cookies look like they came from a Parisian patisserie, with their glossy peaks and distinctive chocolate swirls. I've taken these to office parties where people assumed I'd bought them from some expensive bakery. The look on their faces when I revealed they were homemade? Priceless.
Make-Ahead Magic: Here's something most bakers won't tell you — these cookies actually improve overnight. The flavors meld and deepen, becoming even more complex and delicious. I always make a double batch because this next part? Pure magic. They'll keep for up to two weeks in an airtight container, getting better each day.
Inside the Ingredient List
The Flavor Foundation
Egg whites are the unsung heroes of this recipe, providing not just structure but that pure, clean flavor that lets the chocolate shine. Fresh egg whites whisk up to the perfect fluffy consistency, creating that melt-in-your-mouth texture that makes these cookies so addictive. I've tested this with carton egg whites, and while they work in a pinch, they don't achieve quite the same volume or stability as fresh ones separated right before use. The protein structure in fresh whites creates stronger, more resilient bubbles that can support the sugar and cocoa without collapsing into a sad, flat mess.
Superfine sugar isn't just regular sugar being pretentious — it's a crucial player in achieving that glossy, professional finish. This sweetener dissolves quickly into the egg whites, preventing that grainy texture that can make meringues feel like you're eating sweet sand. If you can't find superfine sugar at your store, you can pulse regular sugar in a blender until it's powder-fine but not quite confectioners' sugar consistency. The rapid dissolution means the sugar fully incorporates without over-beating the meringue, which can lead to that dreaded curdled appearance.
The Chocolate Champions
Dutch-process cocoa powder is the secret weapon that elevates these cookies from "pretty good" to "absolutely transcendent." This cocoa has been treated with an alkalizing agent that neutralizes its natural acidity, resulting in a darker color and mellower, more complex chocolate flavor that doesn't turn bitter during the long baking process. Make sure to sift it to avoid clumps, ensuring even distribution throughout the meringue. Natural cocoa powder will work, but it produces a lighter color and more acidic taste that can compete with the sugar rather than complementing it.
Vanilla extract might seem like an afterthought, but this humble ingredient adds depth to the flavor profile, making these cookies taste homemade and luxurious rather than one-note sweet. Use real vanilla extract, not the imitation stuff — the difference is immediately apparent in the final flavor. The vanilla bridges the gap between the chocolate and the sweetness, creating a more rounded, sophisticated taste that keeps people guessing about your secret ingredient.
The Science Squad
Cream of tartar is your insurance policy against meringue disasters. This vital ingredient stabilizes the egg whites, helping them hold their shape when whipped, making your meringue nice and firm. Without it, your beautifully whipped peaks can collapse into a soupy mess faster than you can say "over-whipped." Just a tiny amount creates a more stable foam structure that can support the weight of the sugar and cocoa powder without deflating.
Salt might seem counterintuitive in a sweet cookie, but just a pinch elevates the flavors tremendously. It brings out the sweetness and balances the chocolate taste, preventing the cookies from becoming cloyingly sweet. Think of salt as the conductor in an orchestra — it doesn't play the melody itself, but it helps every other flavor hit the right notes at the right time.
Everything's prepped? Good. Let's get into the real action...
The Method — Step by Step
- Start with impeccably clean equipment — and I mean squeaky clean. Any trace of grease or egg yolk will sabotage your meringue faster than you can say "stiff peaks." Wash your mixing bowl and whisk attachment with hot, soapy water, then rinse with vinegar and dry thoroughly. This isn't just being obsessive — it's the difference between meringue magic and meringue tragedy. That sizzle when the vinegar hits the bowl? Absolute perfection, and it guarantees your egg whites will whip up to their full potential.
- Separate your eggs while they're still cold from the refrigerator. Cold eggs separate more cleanly, reducing the risk of yolk contamination that can prevent proper whipping. Let the whites come to room temperature for about 30 minutes before you start — room temperature whites whip up to greater volume and stability than cold ones. I'll be honest — I ate half the batch before anyone else got to try it, so consider doubling the recipe if you actually want to share.
- Preheat your oven to 225°F (107°C) — yes, that's not a typo. We're baking these low and slow, like precious chocolate treasures that need gentle coaxing rather than aggressive heat. Line two baking sheets with parchment paper, not wax paper (trust me on this one), and set them aside. The low temperature ensures the meringue dries out rather than browning, creating that pristine white color with just the faintest golden tinge on the peaks.
- Begin whipping your egg whites on medium speed until they become foamy and opaque, like the top of a cappuccino. Add the cream of tartar and salt, then continue beating until soft peaks form. This is the moment of truth — soft peaks should bend over like a shy flower when you lift the beater, not stand up straight and proud. Most recipes get this completely wrong, telling you to go straight to stiff peaks, but that overworks the proteins and leads to a grainy texture.
- Now comes the fun part — gradually add the superfine sugar, one tablespoon at a time, while continuing to beat on medium-high speed. Don't rush this step — the sugar needs time to dissolve completely into the egg whites. You're looking for glossy, stiff peaks that stand up straight when you lift the beater, with just the tip curling over slightly. The mixture should feel smooth between your fingers, not gritty — if you feel sugar crystals, keep beating for another minute or two.
- Sift the cocoa powder through a fine-mesh sieve directly over the meringue. Now, here's where technique matters: use a large rubber spatula to gently fold the cocoa into the meringue using about 8-10 strokes. Don't overmix — you want streaks of chocolate throughout for that marbled effect. Overmixing deflates all that beautiful air you just incorporated, leading to flat, sad cookies that weep chocolate tears.
- Transfer the mixture to a large piping bag fitted with a star tip, or use two spoons to drop rounded tablespoons onto the prepared baking sheets. Space them about 2 inches apart — they won't spread much, but they need room for air circulation. If you're feeling fancy, pipe them into beautiful rosettes or simple swirls. Don't walk away from the oven here — the visual transformation is half the fun, watching them slowly set and develop their distinctive cracked tops.
- Bake for 90 minutes, then turn off the oven and let the cookies cool completely inside with the door closed. This gradual cooling prevents cracking and ensures they dry out completely. Resist the urge to open the door and check — the temperature shock can cause them to collapse. Picture yourself pulling this out of the oven, the whole kitchen smelling like a chocolate cloud, while you feel like a baking superhero.
That's it — you did it. But hold on, I've got a few more tricks that'll take this to another level...
Insider Tricks for Flawless Results
The Temperature Rule Nobody Follows
Here's the thing about meringue cookies that drives me absolutely bonkers: everyone focuses on the whipping temperature but ignores the storage temperature. Your beautiful cookies can go from crisp perfection to sticky disappointment faster than you can say "humid day." Store them in an airtight container with a small packet of silica gel (you know, those little packets that come in shoe boxes) to absorb excess moisture. A friend tried skipping this step once — let's just say it didn't end well, and she ended up with a container of chocolate-flavored goo that resembled something from a horror movie more than edible cookies.
The ideal storage spot is actually in a cool, dry pantry rather than the refrigerator, which can introduce moisture and cause weeping. If you live in a particularly humid climate, consider adding a tablespoon of cornstarch to the cocoa powder — it helps absorb excess moisture and keeps your cookies crisp for days longer. This is hands down the best version you'll ever make at home, but only if you respect the storage rules.
Why Your Nose Knows Best
Your sense of smell is your secret weapon for perfectly baked meringues. When they're done, they'll fill your kitchen with a light, almost ethereal chocolate aroma — not the heavy, burnt smell of overbaked cookies. The scent should be delicate and inviting, like walking into a high-end chocolate shop rather than a campfire. If you start to smell anything sharp or acrid, you've gone too far and risk turning your beautiful cookies into chocolate-flavored charcoal.
Another olfactory clue comes during the whipping process — properly whipped meringue has a faint, sweet scent that's almost like marshmallows. If you smell something eggy or sulfuric, your eggs might be past their prime, which can affect both flavor and stability. Future pacing: imagine yourself becoming so attuned to these subtle scents that you can judge doneness with your eyes closed, like some kind of meringue whisperer.
The 5-Minute Rest That Changes Everything
After piping your meringue onto the baking sheets, let them rest for exactly 5 minutes before placing them in the oven. This brief pause allows the exterior to set slightly, creating that beautiful smooth top that develops the characteristic cracks as they bake. Skip this step and you get cookies with rough, bumpy tops that look like they've been through a hailstorm rather than a gentle baking process.
This rest also helps prevent the dreaded "foot" — that spreading rim that forms around the base of poorly-made meringues. The slight skin that forms during the rest helps the cookies hold their shape and rise evenly, rather than spreading out like chocolate-flavored pancakes. Trust me on this one — those five minutes of patience pay off in cookies that look like they came from a professional bakery.
Creative Twists and Variations
This recipe is a playground. Here are some of my favorite ways to switch things up:
Mocha Madness
Add 1 teaspoon of instant espresso powder to the cocoa powder before sifting it into the meringue. The coffee enhances the chocolate flavor without making the cookies taste like coffee — it's like turning up the volume on your favorite song. The result is a deeper, more sophisticated chocolate flavor that makes people ask for your secret. Top with a few chocolate-covered espresso beans for garnish if you're feeling fancy.
Peppermint Pattie
Replace the vanilla extract with 1/2 teaspoon of peppermint extract, and fold in 1/2 cup of mini chocolate chips for extra chocolate punch. These taste exactly like those beloved peppermint patties but with the ethereal texture of meringue. They're particularly stunning during the winter holidays, with their snowy white appearance and refreshing flavor. The combination of cool mint and rich chocolate is absolutely addictive.
Salted Caramel Clouds
Drizzle the finished cookies with a quick homemade caramel sauce and sprinkle with flaky sea salt. The contrast between the sweet meringue, rich chocolate, and salty caramel creates a flavor explosion that's sophisticated enough for dinner parties but simple enough for everyday indulgence. The salt actually intensifies the chocolate flavor, making these taste far more complex than their simple ingredient list suggests.
Orange Chocolate Dreams
Add 1 teaspoon of orange zest and replace 1/4 teaspoon of the vanilla with orange extract. The citrus oils in the zest create little pockets of bright flavor that burst through the rich chocolate, like sunshine breaking through chocolate clouds. This combination reminds me of those fancy chocolate oranges you get at Christmas, but somehow lighter and more elegant. The orange oil also helps create an even crisper exterior, giving you that perfect shatter when you bite into them.
Toasted Almond Chocolate
Fold in 1/2 cup of finely chopped toasted almonds along with the cocoa powder. The nuts add a wonderful textural contrast and a toasty flavor that complements the chocolate beautifully. Toast the almonds yourself in a dry pan until fragrant — the store-bought ones never have the same depth of flavor. The oils from the nuts actually help keep the meringue crisp longer, extending their shelf life (though honestly, they've never lasted long enough in my house to test this theory properly).
Double Chocolate Decadence
For the true chocolate addicts among us (I see you, and I respect you), fold in 1/4 cup of Dutch-process cocoa powder and 1/4 cup of black cocoa powder. The black cocoa gives these an almost Oreo-like flavor and a dramatic dark color that's stunning on a white plate. They're so intensely chocolatey that they pair beautifully with a glass of cold milk or a cup of strong coffee. Fair warning: these are so rich that even dedicated chocoholics might find themselves satisfied with just one or two.
Storing and Bringing It Back to Life
Fridge Storage
Despite what your instincts might tell you, never store meringue cookies in the refrigerator. The cold temperature combined with the humidity will turn your crisp, delicate cookies into sticky, weeping disasters faster than you can say "condensation." Instead, keep them in an airtight container at room temperature, away from direct sunlight and heat sources. They'll maintain their crisp texture for up to two weeks — though in my experience, they rarely last more than a few days before mysteriously disappearing.
If you must store them for longer than two weeks (though why would you?), you can freeze them successfully. Place the completely cooled cookies in a single layer in an airtight container, with wax paper between layers if you need to stack them. They'll keep for up to three months frozen, though I recommend eating them within the first month for optimal texture and flavor. The key is to let them come to room temperature in their container to prevent condensation from forming on the surface.
Freezer Friendly
Freezing meringue cookies is actually a fantastic way to preserve them if you've made a large batch or want to prepare them ahead for a special occasion. The trick is to freeze them quickly and thaw them slowly to maintain their delicate structure. Place the completely cooled cookies in a single layer on a baking sheet and freeze for 2 hours, then transfer to an airtight container with parchment paper between layers. This prevents them from sticking together and maintains their individual beauty.
When you're ready to serve, transfer the container from freezer to refrigerator for 2 hours, then let it sit at room temperature for another hour. This gradual temperature change prevents the condensation that can make meringues sticky. Add a tiny splash of water before reheating — it steams back to perfection if you need to refresh them slightly. Just 5 minutes in a 200°F oven can help restore some of their original crispness if they've absorbed any moisture.
Best Reheating Method
While meringue cookies are best enjoyed at room temperature, sometimes they need a little refresh after storage. If they've lost some of their crispness, you can restore them by placing them in a 200°F oven for 5-7 minutes. This gentle heat drives off any absorbed moisture without over-browning them. Let them cool completely before serving — they'll return to their original crisp, delicate texture.
Never use a microwave to reheat meringue cookies unless you enjoy the taste of rubbery, deflated disappointment. The microwave's intense heat causes the sugar to caramelize and the egg proteins to toughen, turning your ethereal cookies into something resembling sweet cardboard. If you're in a hurry, it's better to serve them slightly less crisp than to destroy them entirely in the microwave.