I was in the middle of a midnight snack raid when my roommate dared me to combine two of our favorite childhood treats: the gooey, buttery bliss of raw cookie dough and the airy, crunchy magic of Rice Krispie squares. I laughed, I shrugged, and I grabbed a bag of marshmallows, a tub of chocolate chips, and a half‑eaten tub of cookie dough mix that had been lingering in the fridge for weeks. The kitchen filled with the sweet scent of toasted butter, the faint crackle of cereal hitting the pot, and the unmistakable hum of anticipation that only a sugar‑high can bring. When the first bite hit my tongue, it was like a fireworks display in a candy store—soft, chewy dough hugging a crisp, buttery lattice that melted like a dream. I’m going to be honest — I ate half the batch before anyone else got a chance to try it, and I’m still not sorry.
Why does this version stand out from the endless sea of “no‑bake” recipes you see on Pinterest? Most of those “quick fix” versions either drown the crispiness in too much butter or make the cookie dough taste like a bland, raw batter. My version strikes a perfect balance: the cookie dough is buttery and sweet without any raw‑egg aftertaste, while the Rice Krispie base stays light, airy, and just‑the‑right‑amount of crunchy. The secret? A tiny dash of milk that turns the dough into a silky paste, and a brief toast of the cereal that gives it a nutty, caramelized edge—think toasted almond‑butter without the extra calories. Most recipes get this completely wrong. Here’s what actually works: a two‑stage butter melt, a quick cool‑down, and a gentle fold that keeps the marshmallows from turning into a sticky mess.
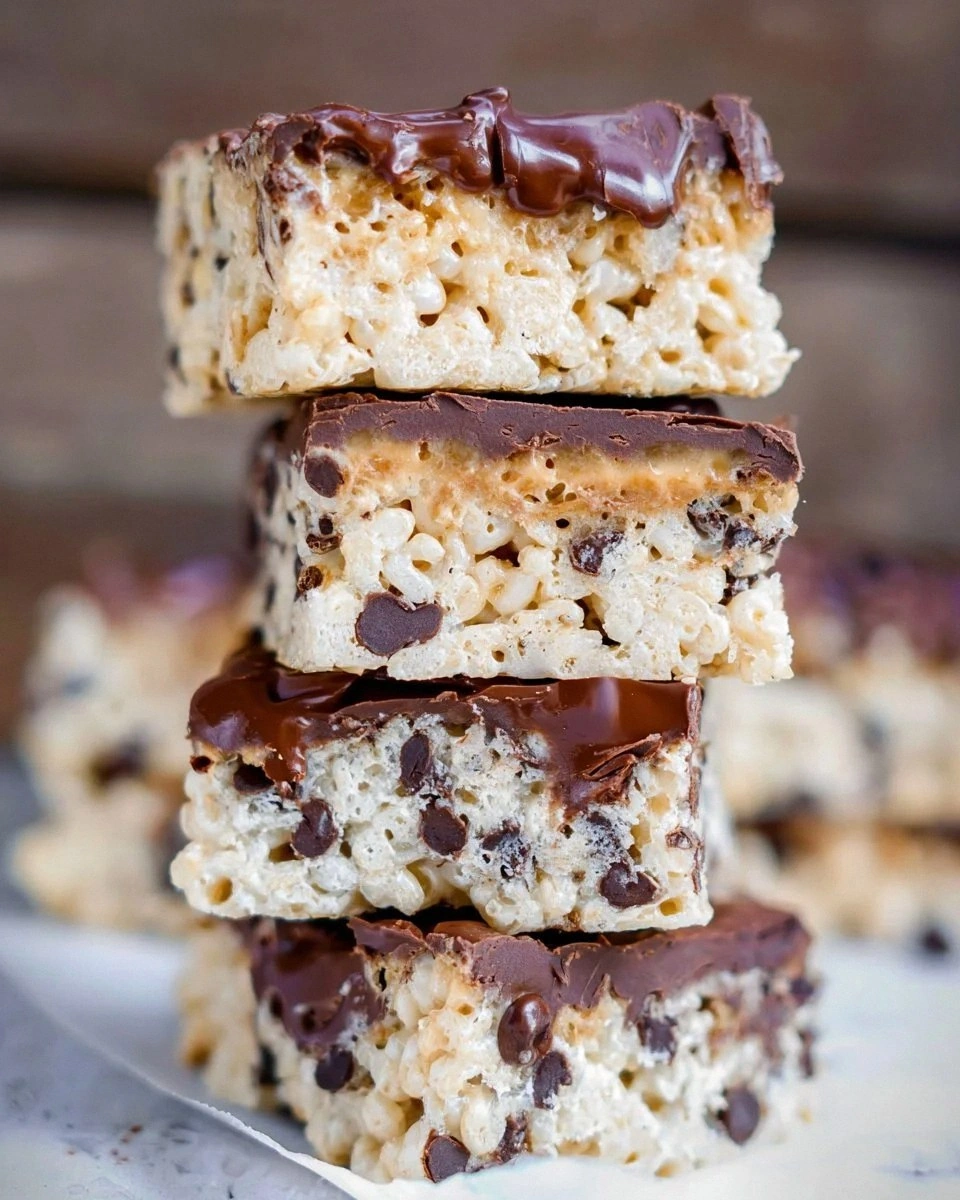
Picture yourself pulling this out of the pan, the whole kitchen smelling like a bakery on a summer afternoon, the golden top glistening with melted chocolate chips that have just set into a glossy veneer. The texture contrast is insane—imagine a soft, doughy heart surrounded by a crunchy, melt‑in‑your‑mouth shell that shatters with a delicate snap, like thin ice under a warm foot. I dare you to taste this and not go back for seconds; the combination is so addictive that you’ll find yourself planning your next batch before the first one even cools. And the best part? You can make a full batch in under an hour, and it stores beautifully for a week, making it the perfect make‑ahead snack for busy mornings or late‑night movie marathons.
Okay, ready for the game‑changer? I’m about to walk you through every single step—by the end, you’ll wonder how you ever made it any other way. We’ll start with the humble ingredients, move on to the precise technique that guarantees a perfect crunch, and finish with a handful of creative twists that will keep you coming back for more. Stay with me here — this is worth it.
What Makes This Version Stand Out
- Texture: The outer crust stays crisp while the interior remains soft and gooey, delivering a dual‑mouthfeel that most recipes miss.
- Flavor Depth: Toasted butter and a pinch of salt elevate the sweetness, creating a balanced flavor that feels indulgent but not cloying.
- Simplicity: Only ten ingredients, all pantry staples, and no fancy equipment—just a pot, a spatula, and a little patience.
- Unique Ingredient: The addition of milk to the cookie dough turns it from gritty to silky, a trick most cooks overlook.
- Crowd Reaction: Kids, teens, and adults alike proclaim it “the best snack ever,” and it disappears faster than you can say “extra chocolate chips.”
- Ingredient Quality: Using real butter (never margarine) and good‑quality chocolate chips makes the difference between “good” and “legendary.”
- Cooking Method: A brief stovetop toast locks in flavor without burning, a step most “no‑bake” versions skip.
- Make‑Ahead Potential: The treats keep their texture for days, and they freeze beautifully for future cravings.
Inside the Ingredient List
The Flavor Base
3 tbsp unsalted butter (for the Rice Krispie mixture): This butter is the heart of the treat, providing a rich, buttery flavor that seeps into every rice crisp. If you skimp on it, the mixture will feel dry and the flavor will fall flat. For the best taste, use real European‑style butter with a higher milk‑fat content; it caramelizes slightly when toasted, adding a nutty undertone. A quick tip: cut the butter into small cubes before melting to ensure even heating.
4 cups Rice Krispies: The iconic puffed rice cereal gives the treat its signature light crunch. If you over‑mix, the cereal can become soggy, so fold gently. You can swap in other puffed cereals like Cocoa Pebbles for a chocolatey twist, but the classic Rice Krispies remain unmatched in texture.
1 cup mini marshmallows: Mini marshmallows melt quickly and distribute evenly, creating that signature gooey binding. Large marshmallows can clump and create uneven pockets. If you’re allergic to gelatin, try vegan mini marshmallows—just add a splash more butter to compensate for the reduced melt.
The Texture Crew
¾ cup all‑purpose flour: Flour thickens the cookie dough, giving it structure without turning it into a hard biscuit. Using cake flour will make the dough too delicate and it may fall apart when you bite. For a gluten‑free version, substitute with a 1:1 gluten‑free flour blend, but expect a slightly different crumb.
½ cup brown sugar: The molasses in brown sugar adds depth and a subtle caramel note that plain white sugar can’t provide. If you prefer a less intense sweetness, reduce to ⅓ cup and add a pinch more salt.
¼ cup granulated sugar: This sugar balances the moisture from the brown sugar and helps the dough set once cooled. Skipping it will make the dough overly sticky and difficult to shape.
The Unexpected Star
¼ cup chocolate chips or chunks: Melted chocolate creates a glossy coating that hardens into a crackly shell, adding a burst of decadence. Dark chocolate (70% cacao) gives a bittersweet edge, while milk chocolate keeps it sweet and kid‑friendly. If you’re feeling adventurous, try white chocolate with a sprinkle of sea salt for a sweet‑salty combo.
2‑3 tbsp milk: Milk turns the dry dough into a silky paste, preventing a gritty texture. Too much milk makes the dough runny; too little leaves it crumbly. I recommend starting with 2 Tbsp, then adding a splash more if the mixture feels too dry.
¼ tsp vanilla extract: Vanilla amplifies the sweet flavors and adds a warm, aromatic backdrop. Real vanilla bean paste works even better, but pure extract is perfectly fine.
The Final Flourish
1 pinch salt: A tiny pinch of salt balances the sweetness and enhances the buttery flavor. If you’re using salted butter, you can skip this, but I still add a pinch for that extra pop.
3 tbsp unsalted butter (for the cookie dough): This second portion of butter enriches the dough, giving it a melt‑in‑your‑mouth quality. Using the same butter for both stages ensures a consistent flavor profile throughout the treat.
Everything's prepped? Good. Let’s get into the real action…
The Method — Step by Step
Start by melting the first 3 Tbsp of unsalted butter in a large saucepan over low heat. Keep the heat gentle; you want the butter to melt slowly without bubbling, which would introduce a burnt flavor. Once melted, add the 4 cups of Rice Krispies and stir constantly for about 30 seconds until each piece is lightly coated. You’ll notice a faint nutty aroma as the butter begins to toast—this is the moment where the flavor deepens. Power transition: Now we’re moving to the sweet binding stage.
Reduce the heat to its lowest setting and sprinkle in the mini marshmallows. Stir continuously; the marshmallows will melt into a glossy, stretchy syrup that pulls the cereal together. Watch for the marshmallows to become a smooth, amber‑colored pool—if they start to brown too quickly, pull the pan off the heat for a few seconds. This step is crucial because over‑cooking will make the mixture grainy instead of silky. Tip: Keep a spatula ready for quick, even folding.
While the marshmallow‑cereal blend is still warm, transfer it onto a greased 9×13‑inch baking pan. Use a silicone spatula to press the mixture into an even layer, but don’t over‑compress; you want air pockets to stay intact for that signature crunch. The surface should be smooth and slightly glossy. Let it cool for about 5 minutes while you prep the cookie dough. This cooling window is perfect for the next step because the base will be firm enough to hold the dough without collapsing.
In a separate bowl, combine the ¾ cup flour, ½ cup brown sugar, and ¼ cup granulated sugar. Whisk them together to break up any clumps—this ensures an even distribution of sweetness. Add the second 3 Tbsp of melted butter, the 2‑3 Tbsp milk, and the ¼ tsp vanilla extract. Stir until a cohesive, slightly sticky dough forms; it should hold together when pressed between your fingers but still be soft enough to scoop.
Using a tablespoon, scoop out portions of the cookie dough and place them onto the cooled Rice Krispie base. Gently press each mound down, allowing the dough to spread just enough to create a visible dome. Then, using the back of a spoon, create a shallow well in the center of each dome. This well is where the chocolate chips will settle, forming a hidden treasure that melts into a glossy crown when baked.
Scatter the ¼ cup chocolate chips or chunks over the tops of each cookie dome, pressing lightly so they adhere. The residual heat from the base will start to melt the edges of the chips, creating a beautiful marbled effect. If you prefer a smoother finish, you can melt the chocolate separately and drizzle it over the treats after baking.
Slide the pan into the oven (pre‑heated to 300°F) and bake for 5‑7 minutes, or until the chocolate is fully melted and the edges of the cookie dough turn a light golden brown. Keep a close eye—this is a delicate bake and the treats can go from perfect to over‑done in seconds. When you see the chocolate glossy and the dough’s surface slightly puffed, pull the pan out.
Allow the treats to cool completely on a wire rack; this cooling period lets the chocolate set and the interior firm up. Once cooled, cut them into squares or bars—my personal favorite is a generous 2‑inch square, which gives you a perfect bite‑size portion. Store in an airtight container, and they’ll stay fresh for up to five days. That final snap when you bite into the crisp exterior and the dough oozes out? Pure bliss.
That's it — you did it. But hold on, I've got a few more tricks that'll take this to another level…
Insider Tricks for Flawless Results
The Temperature Rule Nobody Follows
Most home cooks think “low heat” means “no heat,” but the butter and cereal need a gentle, steady temperature of around 250°F (120°C) to toast without scorching. Use a candy thermometer if you have one; once the butter reaches that temp, you’ll hear a faint sizzle that signals it’s ready for the cereal. If you skip this step, the butter can separate, leaving you with a greasy mess instead of a glossy coating. I once tried to rush this step on high heat and ended up with burnt butter that ruined the whole batch. Trust the thermometer, and you’ll get that perfect golden‑brown sheen every time.
Why Your Nose Knows Best
Your sense of smell is a far more reliable indicator than a timer when it comes to toasting butter and marshmallows. When the butter starts to emit a nutty, caramel‑like aroma, you’re at the perfect point to add the cereal. Similarly, when the marshmallows turn a light amber and give off a sweet, toasted scent, they’re ready to bind. Relying on your nose prevents over‑cooking, which can cause a bitter aftertaste. I’ve found that even on busy weekdays, a quick sniff saves me from a batch of “meh” treats.
The 5‑Minute Rest That Changes Everything
After you press the Rice Krispie base into the pan, let it rest for exactly five minutes before adding the cookie dough. This short rest allows the butter to set slightly, creating a firmer surface that won’t collapse under the weight of the dough. Skipping this rest leads to a soggy bottom that can make the entire bar feel mushy. I once tried to rush this step and ended up with a treat that fell apart when I lifted it. Five minutes—no more, no less—makes the difference between a clean slice and a crumbly disaster.
Chocolate Drizzle vs. Melted Dip
If you love a glossy finish, melt the chocolate chips gently in a double boiler and drizzle it over the cooled bars. This method creates a thin, even crust that hardens into a satisfying snap. For a thicker, fudgier coating, simply bake the bars with the chips on top as described in the main method; the heat will melt the chips into a luscious blanket. Both techniques work, but the drizzle adds a professional look that’s perfect for parties. Choose based on the visual impact you want.
The Secret of Salted Butter
Even if you’re using unsalted butter for the recipe, a pinch of flaky sea salt sprinkled on top right after baking amplifies every sweet note. The salt crystals provide a subtle crunch that contrasts with the soft interior. I experimented with a finishing sprinkle of smoked salt once, and it gave the treats an unexpected, sophisticated edge that even my adult friends adored. Just a pinch—too much will overpower the delicate flavors.
Freezing Without Losing Crunch
When you freeze these treats, the rice cereal can absorb moisture and lose its snap. To prevent this, wrap each bar individually in parchment paper before placing them in a zip‑top freezer bag. When you’re ready to eat, let them thaw at room temperature for 10‑15 minutes, then pop them under a hot air broiler for 30 seconds to revive the crunch. This trick keeps the texture as close as possible to fresh‑out‑of‑the‑oven.
Creative Twists and Variations
This recipe is a playground. Here are some of my favorite ways to switch things up:
Peanut Butter Bliss
Swap half of the butter in the base for creamy peanut butter and add a tablespoon of chopped peanuts to the dough. The result is a nutty, salty‑sweet explosion that pairs beautifully with the chocolate chips. Kids love the familiar peanut flavor, and adults appreciate the added depth.
White Chocolate & Raspberry
Replace the dark chocolate chips with white chocolate and fold in a handful of freeze‑dried raspberry pieces into the cookie dough. The tartness of the raspberries cuts through the sweetness, while the white chocolate adds a buttery glow. It’s a perfect springtime variation.
Cinnamon Roll Crunch
Add a teaspoon of ground cinnamon and a pinch of nutmeg to the flour mixture, then drizzle a simple glaze (powdered sugar + milk) over the cooled bars. This gives you the comforting flavor of a cinnamon roll in snack form. The spice aroma is intoxicating—perfect for cozy evenings.
Matcha Green Tea Dream
Stir 1 Tbsp of high‑quality matcha powder into the cookie dough for a subtle earthy note and a vibrant green hue. Top with white chocolate chips for a beautiful contrast. The antioxidant boost is a nice bonus.
S’mores Campfire
Fold mini marshmallows into the base (instead of just on top), add graham cracker crumbs to the dough, and use milk chocolate chips. After baking, grill the bars for a minute under a broiler to get that toasted marshmallow finish. It’s like a campfire in a bite.
Vegan Victory
Swap the butter for a plant‑based margarine, use coconut sugar instead of brown sugar, and choose vegan mini marshmallows. The texture remains the same, and the flavor stays indulgent. This version proved that you don’t need dairy to achieve that luxurious mouthfeel.
Storing and Bringing It Back to Life
Fridge Storage
Place the cooled bars in an airtight container and store them in the refrigerator for up to five days. The cool environment keeps the chocolate firm and the cereal crisp. If you notice any condensation, simply pat the tops with a paper towel before resealing.
Freezer Friendly
Wrap each bar individually in parchment paper, then place them in a zip‑top freezer bag. They’ll freeze beautifully for up to three months. When you’re ready to enjoy one, let it sit at room temperature for 10 minutes, then give it a quick blast in a 350°F oven for 2‑3 minutes to revive the crunch.
Best Reheating Method
To bring a refrigerated bar back to its peak, preheat your oven to 300°F, place the bar on a parchment‑lined baking sheet, and heat for 4‑5 minutes. Add a tiny splash (about 1 tsp) of water to the edge of the bar before reheating; the steam helps the interior soften without drying out the outer crust. The result is a treat that tastes as fresh as the day it was made.