I was standing in my kitchen on a rainy Saturday morning, half‑asleep, when the toaster decided to launch a slice of bread like a tiny, angry frisbee. While I was chasing that rogue toast, a friend texted me, “Dare you make something that looks like a sunrise and tastes like a zen garden?” I laughed, but the challenge stuck. I imagined a pancake that could double as a conversation starter, a stack that would make even the most stubborn brunch‑hater whisper, “I’m never eating anything else again.” The idea of marrying the earthy, slightly bitter whisper of matcha with the fluffy comfort of pancakes became an obsession that night, and I’ve been perfecting it ever since.
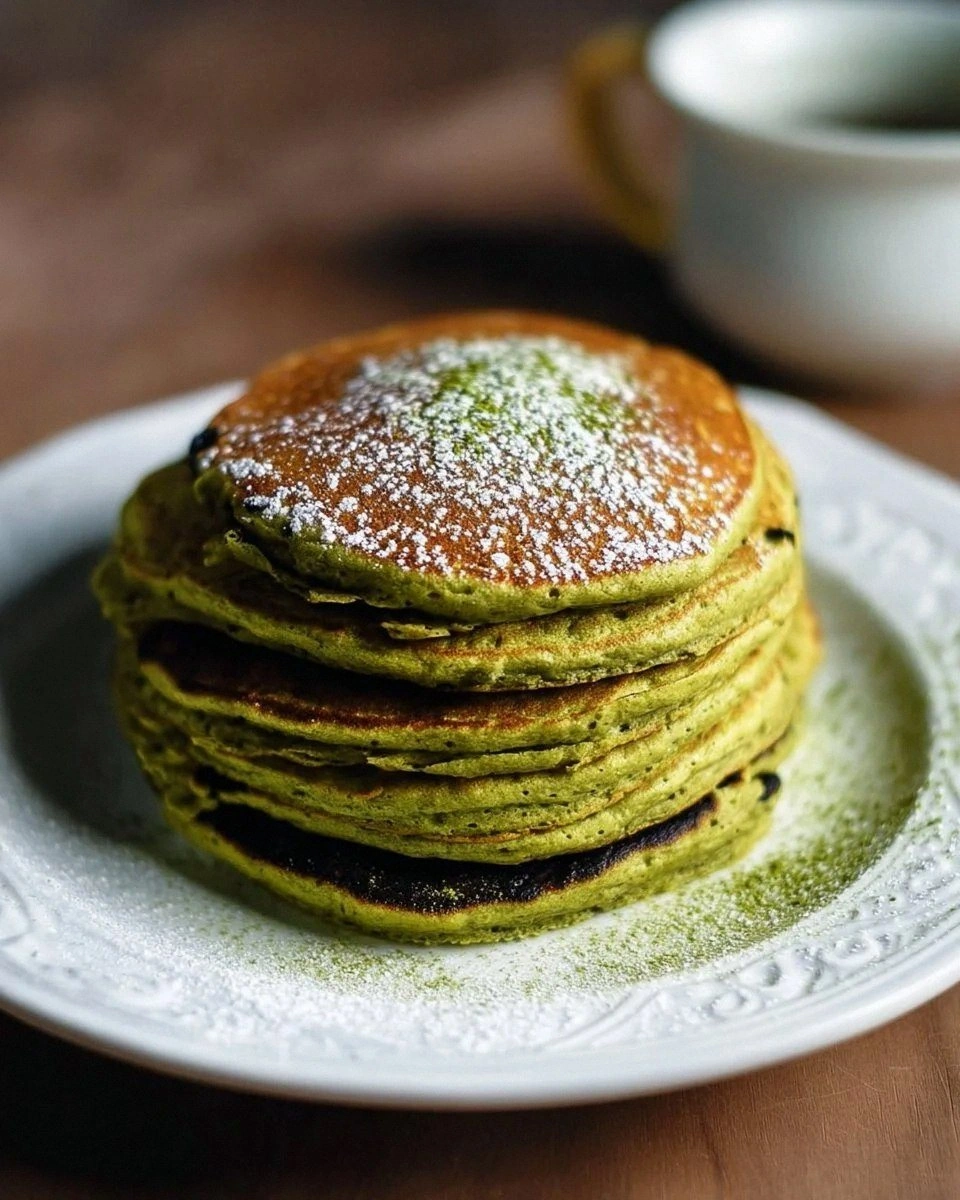
Picture this: a golden‑brown stack, each layer speckled with a delicate jade hue, the scent of toasted wheat mingling with the sweet, vegetal perfume of matcha. When you cut into it, the interior is a buttery, cloud‑like crumb that holds its shape, not a soggy mess. The first bite is a surprise—soft, slightly sweet, with a subtle grassy note that dances on the palate like a quiet wind through a tea garden. The edges are crisp enough to give a satisfying snap, yet the middle remains as tender as a cloud that’s been kissed by sunrise. And the best part? It’s not just a pretty picture; it’s a full‑on flavor experience that can hold its own against maple syrup, fresh berries, or a dollop of whipped cream.
Most pancake recipes either ignore the balance between wet and dry, over‑mix the batter, or treat matcha as a gimmick that turns the whole thing into a bitter disappointment. I’ve tried those, and let me be honest—I ate half the batch before anyone else got a chance to try it because the first one was so good. The secret lies in a few precise tweaks: a splash of milk for a light texture, a pinch of baking soda to lift the batter without turning it rubbery, and a careful folding technique that keeps the air trapped inside. I also add a whisper of vanilla extract, which you’ll notice is optional, but it adds a sweet undercurrent that makes the matcha sing rather than shout.
Now, I’m about to hand you the exact roadmap to this culinary masterpiece. I dare you to taste this and not go back for seconds. By the time you finish reading, you’ll have a stack of matcha pancakes that will make you wonder how you ever settled for plain old buttermilk pancakes. Let me walk you through every single step — by the end, you’ll wonder how you ever made it any other way.
What Makes This Version Stand Out
- Flavor Fusion: The earthy bitterness of matcha is perfectly balanced by a touch of sugar and vanilla, creating a nuanced taste that’s both comforting and sophisticated.
- Texture Triumph: A light, airy crumb with crisp edges is achieved by the precise ratio of leavening agents and a gentle folding method that preserves air bubbles.
- Simplicity: Only ten ingredients, all pantry‑friendly, mean you can whip this up without a special trip to the specialty store.
- Visual Wow Factor: The jade‑green hue is a show‑stopper for brunch tables, Instagram feeds, and anyone who appreciates a little culinary theater.
- Crowd‑Pleaser: Even matcha skeptics rave after the first bite; the flavor is subtle enough to please kids yet refined enough for adults.
- Ingredient Quality: Using high‑grade culinary‑grade matcha ensures a vibrant color and a clean, non‑astringent taste.
- Cooking Method: A hot, non‑stick skillet with a thin butter film creates the perfect golden crust without sticking.
- Make‑Ahead Potential: These pancakes freeze beautifully and reheat like fresh, making them perfect for busy mornings.
Inside the Ingredient List
The Flavor Base
The matcha powder is the star of the show. It provides that distinctive emerald color and a subtle, grassy flavor that’s both refreshing and grounding. If you skimp on quality, you’ll end up with a dull green and a bitter aftertaste. I recommend sourcing culinary‑grade matcha from a reputable tea supplier; look for a bright, vivid hue and a sweet, almost umami aroma. If you can’t find matcha, a teaspoon of spirulina can give you color, but the flavor will be entirely different.
The Texture Crew
All‑purpose flour gives the structure, while the baking powder and baking soda act as the lift team. The soda reacts with the acidic components (a splash of milk and the matcha’s natural acidity) to create bubbles that make the pancakes rise without becoming cakey. Sugar isn’t just for sweetness; it also helps with browning, giving those beautiful caramelized edges. If you’re avoiding refined sugar, try coconut sugar or a drizzle of honey—just remember that honey adds extra liquid, so you might need to thin the batter slightly.
The Unexpected Star
Melted butter or coconut oil adds richness and a subtle nutty note that complements the matcha. The fat coats the flour particles, limiting gluten formation and keeping the crumb tender. If you’re dairy‑free, coconut oil is a fantastic alternative; it also adds a faint tropical aroma that pairs nicely with the green tea flavor. A splash of vanilla extract (optional) rounds out the flavor profile, making the matcha taste less “green” and more “comforting.”
The Final Flourish
Milk (or a plant‑based alternative) hydrates the dry ingredients and adds a creamy mouthfeel. Whole milk yields the richest texture, while almond or oat milk keeps the pancakes lighter and adds a faint nutty undertone. The large egg acts as a binder and adds extra lift; its proteins coagulate as the pancake cooks, giving structure. Salt, though used sparingly, amplifies all the other flavors, ensuring the sweetness doesn’t become cloying. Everything’s prepped? Good. Let’s get into the real action...
The Method — Step by Step
In a large mixing bowl, whisk together the flour, matcha powder, sugar, baking powder, baking soda, and salt. Take a moment to admire the speckled green dust swirling with the white flour—this is the visual promise of what’s to come. The whisk should move in a figure‑eight pattern to ensure even distribution of the leavening agents. Tip: If you see any clumps of matcha, break them up with a quick flick of the wrist; you want a uniform, powdery blend.
In a separate bowl, combine the milk, melted butter (or coconut oil), the egg, and the optional vanilla extract. Beat lightly until the mixture is smooth; you should hear a gentle whoosh as the butter emulsifies with the milk. This is where the batter starts to come alive—watch the liquid turn glossy, a sign that the fats are fully incorporated.
Make a well in the center of the dry ingredients and pour the wet mixture into it. Using a rubber spatula, gently fold the batter from the edges toward the center. The key is to mix until just combined; a few streaks of flour are okay. Over‑mixing will develop gluten, resulting in dense pancakes. Watch Out: If you see a smooth, glossy batter, you’ve probably over‑mixed—scrape the bowl, add a splash more milk, and give it a quick stir to rescue the texture.
Let the batter rest for five minutes. During this pause, the flour fully hydrates, the matcha’s flavor deepens, and the leavening agents get a chance to start working. You’ll notice the batter thickening slightly and small bubbles forming on the surface—this is the magic happening.
Heat a non‑stick skillet over medium‑low heat. Add a thin layer of butter or oil—just enough to coat the surface. When a drop of water sizzles and evaporates instantly, the pan is ready. This temperature is crucial; too hot and the pancakes will burn before the inside cooks, too cool and they’ll turn rubbery.
Using a ¼‑cup measuring cup, pour batter onto the skillet, forming circles about 3‑inches in diameter. You’ll hear a gentle sizzle as the batter meets the hot surface—That sizzle when it hits the pan? Absolute perfection. Let the pancake cook undisturbed for about 2‑3 minutes. The edges will start to look set, and tiny bubbles will form across the surface.
Flip the pancake with a thin spatula once the edges are set and the bubbles have popped. The underside should be a beautiful caramel‑gold hue. Cook for another 1‑2 minutes, allowing the interior to finish setting. The pancake should spring back slightly when pressed—if it feels mushy, give it another 30 seconds.
Transfer the cooked pancake to a warm plate and cover loosely with foil to keep it soft while you finish the batch. Repeat the process with the remaining batter, adding a little more butter to the pan as needed. If you notice the batter thickening after a few pancakes, stir in a splash of milk to restore consistency.
Once all pancakes are cooked, stack them high, drizzle with maple syrup, fresh berries, or a dollop of whipped cream. For an extra touch, dust the top with a pinch of extra matcha powder for that vivid green pop. And now the fun part: dig in and savor the buttery, airy texture that melts on your tongue while the matcha leaves a lingering, pleasant aftertaste.
That's it — you did it. But hold on, I've got a few more tricks that'll take this to another level...
Insider Tricks for Flawless Results
The Temperature Rule Nobody Follows
Most home cooks set the stove to “medium” and hope for the best. The truth is, a skillet at 350°F (175°C) is the sweet spot for these pancakes. Use an infrared thermometer or the back‑of‑a‑spoon test: a drop of water should sizzle and dance, not evaporate instantly. If you’re using an electric stove, let the pan heat for a full minute before testing. Consistent heat ensures even rise and a uniform golden crust.
Why Your Nose Knows Best
Your sense of smell is a better timer than any clock. When the batter hits the pan, you’ll smell a faint nutty aroma within 30 seconds. As the pancake cooks, the scent will shift to a sweet, toasted note. When that aroma reaches a caramel‑like depth, it’s a reliable cue that the underside is ready to flip. Trust your nose; it’s a built‑in kitchen timer that never lies.
The 5‑Minute Rest That Changes Everything
After mixing, let the batter sit for exactly five minutes. This short rest allows the gluten to relax and the baking soda to fully react with the acidic components, creating a lighter crumb. Skipping this step is the most common reason for dense, heavy pancakes. I’ve seen friends pour batter straight into the pan and end up with a texture more akin to a dense cake than a fluffy pancake.
Butter vs. Oil: The Fat Debate
Butter gives a richer flavor, while coconut oil adds a subtle tropical note and a higher smoke point. If you’re aiming for a crispier edge, use coconut oil for the cooking surface and butter in the batter. This combination gives you the best of both worlds: buttery depth inside, crisp, non‑sticky edges outside.
Gentle Folding, Not Stirring
When incorporating the wet and dry mixtures, use a gentle folding motion. Over‑mixing creates gluten strands that make the pancake tough. Think of it like coaxing a shy cat—slow, careful, and with a light touch. A few streaks of flour are perfectly fine; they’ll disappear during cooking.
Seasonal Sweeteners
If you want to add a seasonal twist, swap the regular sugar for maple syrup, agave, or even a drizzle of honey. Each sweetener brings its own flavor profile—maple adds a caramel depth, honey adds floral notes, and agave keeps the flavor neutral while adding moisture. Just remember to reduce the liquid slightly if you add a wet sweetener.
Creative Twists and Variations
This recipe is a playground. Here are some of my favorite ways to switch things up:
Citrus Zest Burst
Add a tablespoon of finely grated lemon or orange zest to the batter. The bright citrus cuts through the earthiness of matcha, creating a fresh, spring‑like flavor that pairs beautifully with a dollop of mascarpone.
Nutty Crunch
Stir in a quarter cup of toasted almond slivers or chopped hazelnuts just before cooking. The nuts add a satisfying crunch and a nutty aroma that complements the matcha’s vegetal notes.
Chocolate Swirl
Drop a teaspoon of melted dark chocolate into the center of each pancake just before flipping. The chocolate creates a molten core that contrasts the green exterior, turning each bite into a surprise.
Protein Power
Add a scoop of vanilla whey or plant‑based protein powder to the dry mix. This boosts the protein content for a post‑workout brunch without compromising flavor. You might need an extra splash of milk to keep the batter pourable.
Savory Spin
Skip the sugar and add a pinch of smoked paprika and a tablespoon of grated Parmesan to the batter. Top with a poached egg and a drizzle of soy‑ginger glaze for a brunch that blurs the line between sweet and savory.
Storing and Bringing It Back to Life
Fridge Storage
Place cooled pancakes in an airtight container lined with parchment paper. They’ll stay fresh for up to three days. Reheat in a skillet over low heat, adding a tiny splash of butter to revive the crisp edges.
Freezer Friendly
Stack pancakes between sheets of wax paper and seal them in a zip‑top freezer bag. They freeze solid for up to two months. To reheat, microwave for 30 seconds, then finish in a hot skillet for a minute on each side to regain that golden crunch.
Best Reheating Method
No matter how you store them, add a splash of water (about a teaspoon per pancake) before reheating. The steam generated keeps the interior moist while the pan restores the exterior’s crispness. This trick works for both fridge‑stored and frozen pancakes.